This article was co-authored by wikiHow Staff. Our trained team of editors and researchers validate articles for accuracy and comprehensiveness. wikiHow's Content Management Team carefully monitors the work from our editorial staff to ensure that each article is backed by trusted research and meets our high quality standards.
The wikiHow Video Team also followed the article's instructions and verified that they work.
This article has been viewed 386,151 times.
Learn more...
A fun project to enjoy with your children is to make paper cars together. Best of all, your child will have a paper car to play with afterwards. You can start out with a simple, origami car. If you have more time on your hands, you can make a paper car that moves instead!
Steps
Making a Flat Origami Car
-
1Make a crease in the middle of the origami paper. Fold the paper in half, widthwise. Run your fingernail along the fold to make a crease, then unfold the paper. [1]
-
2Fold the top and bottom edges of the paper by 1/3. Fold the top edge of the paper down by 1/3. Next, fold the bottom edge of the paper up by 1/3. You should now have 3, equal-sized sections on your paper.[2]
- For the rest of the tutorial, the folded top and bottom edges will be called the "top" and "bottom" flaps.
- The top and bottom third of your paper will be colored, while the middle will be white. If you are making a white car, then the middle part will be colored.
Advertisement -
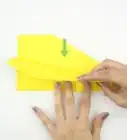
3Fold the corner of the top flap up until it goes past the folded edge. Go back to your top flap. Fold the bottom-right corner upwards until it goes past the top, folded edge. The left point of the corner should be about 1/3 of the way across the flap.[3]
- Keep the top flap folded down for this step. Don't unfold it!
-
4Fold the other corners in a similar way. Fold the bottom-left corner on the top flap upwards. Next, fold the top 2 corners of the bottom flap down. Each folded corner should be 1/3 the length of your flaps.
- You are essentially doing the same process for the bottom flap as you did for the top. If you need to, rotate the paper so that the bottom flap is along the top.
-
5Fold the tips of the corners to make them more wheel-like. The corners that you just folded will make the wheels. Unfortunately, they are pointy, which is not very wheel-like. To fix this, fold down the tips of the corners to flatten them.[4]
- If you want to, you can "cheat" by cutting the corners into semi-circles. This is stepping away from origami, however.
-
6Fold the whole paper in half along the first crease. This completes the body of your car, so make sure that the color you want is on the outside. Be sure to run your fingernail back and forth across the top crease to sharpen it.[5]
- You while have a bottom fold, just above the wheels. If you want to, run your fingernail across it (on both sides of the car) to make it neater.
-
7Fold the top right corner inward to form the trunk. Hold the car gently in your left hand. Press down on the right side of the crease until it goes into the car. Flatten the car, then run your fingernail along the edge to make a crease.[6]
- #* This is known as a pocket fold.
- Make the pocket fold at a deep angle, so that it matches up with the back wheel.
-
8Fold the top left corner inward to make the windshield. Use the same technique as you did to make the windshield. This time, make the pocket fold at a slight angle so that it extends past the front wheel.[7]
- Take a moment to sharpen your creases by running your fingernail across them. While not absolutely necessary, this will make your car look neater.
-
9Set the car down on top of its wheels. Thanks to the pocket folds, the car won't lay completely flat. You should be able to stand it up on all four wheels.
- Take your car to the next level by drawing some windows, doors, handles, and other details.

Making a Moving Car
-
1Create a T-shaped template using a pencil and a ruler. Make the vertical part of the T 1 inch (2.5 cm) wide and 4 inches (10 cm) tall. Make the top, horizontal part of the T 1 inch (2.5 cm) wide and 8 inches (20 cm) long.[8]
- You can make your car out of printer paper or construction paper, but cardstock will be much better.
- The top, horizontal part will make the sides of the car. The vertical part will make a curved roof, like in a buggy.
-
2Cut out your T, then cut the top corners off at downward angles. Cut out the T-shape first. Next, cut the corners off from the top, horizontal part of the T. Make them angle downward, toward the vertical part of the T.[9]
- These cuts will eventually make the windshield. Make sure that you cut both of them at the same angle.
-
3Fold the top, horizontal part of the T to make the sides of the car. Draw a 1 in (2.5 cm) square in the middle of the top, horizontal part of the T first. Next, use the sides of the square as guidelines. Fold the left side of the T along the left side of the box, then repeat the process for the right side of the T.[10]
- When you are done, you will have a set of 3 1⁄2 in (8.9 cm) prongs that are 1 inch (2.5 cm) apart. Sticking up between the prongs is your 4 in (10 cm) tall vertical bar.
-
4Tape the vertical part of the T between the 2 prongs. Hold the ends of the 2 prongs 1 inch (2.5 cm) apart. Bring the bottom of the T between the 2 prongs, so that it is aligned with the slanted edges. Secure everything together with a strip of tape.[11]
- For a neater finish, put the tape inside the car instead.
- The vertical part of the T will arch over the 2 prongs, creating a rounded roof, like a buggy.
-
5Cut four 1 in (2.5 cm) circles out of cardstock. Trace these circles using a compass, large coins, or bottle caps. When you are done, cut them out with scissors. These will be your wheels, so cut them as neatly as you can, otherwise the wheels won't turn.[12]
- Black cardstock will work the best, but you can use a different color.
- To make sturdier wheels, cut them out of cardboard instead. Don't worry about the color; you can always paint the wheels later.
-
6Paint and decorate your car, including the wheels. Start by coloring your wheels black, then adding grey or silver hubcaps. Paint your car, if you wish, then draw some doors and handles on the sides. Finish off by adding on a front and back windshield.
- Add some more details, such as decals, headlights, or even a driver!
- You can paint or draw the details on. If you use paint, let the car dry before moving on.
-
7Punch some holes for the wheels. Use a hole puncher to make 2 holes on each side of your car, 1⁄8 to 1⁄4 inch (0.32 to 0.64 cm) from the bottom edge, and 2 inches (5.1 cm) apart. Use a thick needle to make 1 hole in the middle of each wheel.[13]
- Don't use a hole puncher on the wheels. The holes will be too big.
- If you don't have a needle, you can use a toothpick or an awl. Be careful, however!
-
8Poke a toothpick through the holes on the car. You will need 2 toothpicks: 1 for the front set of holes, and 1 for the back.[14] Trim down the toothpicks until they are 1⁄4 to 1⁄2 inch (0.64 to 1.27 cm) long on each side of the car.
- Paint the toothpicks black first for a more realistic effect.
- If you don't have any toothpicks, you can cut down some skewers or use lollipop sticks instead. You may have to make the holes on the wheels bigger, however.
-
9Attach the wheels. Slide the wheels onto the toothpicks—make sure that the hubcaps are facing out. Don't worry if the wheels don't rotate on the toothpick. The toothpick will rotate in the holes on the car instead.[15]
- If you used lollipop sticks, you can hot glue the wheels onto the sticks instead. Again, don't worry of the wheels won't turn on the sticks themselves.
-
10Secure the wheels with beads, if needed. The wheels should fit snugly onto the toothpicks. If they are loose or falling off, slide a small bead over each end of the toothpick. Secure the bead with a drop of glue, if needed.[16]
- If the bead is a different color from the hubcap, you can paint it grey or silver to match.
- If you can't find any small beads, try a bit of hot glue instead.
-
11Finished.
Community Q&A
-
QuestionHow do I know the places I need to cut?
 Community AnswerTo remember which fold or spot to cut, draw it out or mark it first.
 -
QuestionWhat did you use to poke the holes in the car?
 Community AnswerThey used a hole puncher, but if you don't have one you can use a toothpick, which works just as well.
 -
QuestionDo I need cardboard for the wheels?
 Community AnswerYou should use a sturdy material for the wheels. Cardboard is a perfect choice!
Things You'll Need
Making a Flat Origami Car
- Origami paper
Making a Moving Car
- Paper, preferably cardstock
- Pen or pencil
- Ruler
- Scissors
- Tape
- 2 toothpicks
- 4 small beads (optional)
- Glue (optional)
References
- ↑ http://www.origami-instructions.com/origami-car.html
- ↑ http://www.origami-instructions.com/origami-car.html
- ↑ http://www.origami-instructions.com/origami-car.html
- ↑ http://www.origami-instructions.com/origami-car.html
- ↑ http://www.origami-instructions.com/origami-car.html
- ↑ http://www.origami-instructions.com/origami-car.html
- ↑ http://www.origami-instructions.com/origami-car.html
- ↑ http://krokotak.com/2016/08/glue-lee-printable-cars/
- ↑ http://krokotak.com/2016/08/glue-lee-printable-cars/
- ↑ http://krokotak.com/2016/08/glue-lee-printable-cars/
- ↑ http://krokotak.com/2016/08/glue-lee-printable-cars/
- ↑ http://krokotak.com/2016/08/glue-lee-printable-cars/
- ↑ http://krokotak.com/2016/06/moving-paper-cars/
- ↑ http://krokotak.com/2016/06/moving-paper-cars/
- ↑ http://krokotak.com/2016/06/moving-paper-cars/
- ↑ http://krokotak.com/2016/06/moving-paper-cars/
About This Article

To make a paper car, use card stock to draw a T-shaped template. Then cut it out and fold the top right part of the horizontal across the center to the left, and the left part across to the right, so you have a vertical bar and two prongs. Tape the vertical part of the T to the prongs so it looks like a rounded car roof. Next, cut card stock into circles for wheels, and color and decorate your car. Finally, make 2 holes about 2 inches apart and 1/4 of an inch from the bottom of the car on each side and attach the wheels with toothpicks. For more information on making a paper car, including a flat origami car, read on!