This article was co-authored by Amy Guerrero. Amy Guerrero is an Arts and Crafts Specialist and the Owner of Sunshine Craft Co., a crafting studio based in Phoenix, Arizona. Amy specializes in macrame, DIY crafting, and teaching fiber arts. She offers monthly in-person and online workshops along with having developed a range of DIY craft kits for at-home projects. Amy holds a BS in Industrial Design from Philadelphia University. She worked as a graphic designer before starting her own business. Sunshine Craft Co. is a creative hub that offers a wide range of workshops, tools, and resources for any craft project to inspire creativity and community engagement.
This article has been viewed 71,366 times.
Sun catchers are a simple way to add some color to your window. Instead of buying one, why not make your own using tissue paper? The colors and design possibilities are endless! Keep in mind that these sun catchers are for indoor use only. If they get wet, they may come apart!
Steps
Using Contact Paper
-
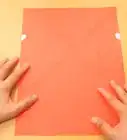
1Cut a simple shape out of a sheet of black paper. If your shape is symmetrical, fold the paper in half first, then cut half of your shape out along the folded edge.
- When you are cutting a shape, it is best to have a guide. Lightly draw its outline with a pencil and then cut over top of the line.
-
2Cut the inside of the shape out. Trace along the inside edge of your shape to create a ¼ to ½-inch (0.64 to 1.27-centimeter) border. Poke a hole in your shape, then cut along your lines. Save the border and discard the inside shape.[1]
- If your border is symmetrical, keep it folded, cut out the inside shape, then unfold it.
- If you want your sun catcher to be the same on both sides, you will need to make another border for the back. Use your first border as a guide for the second one.
Advertisement -
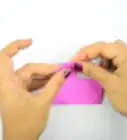
3Cut or tear colored tissue paper into smaller pieces. There is no right or wrong way to do this, so you can get really creative here. You can cut the tissue paper into small squares, rectangles, or triangles. You can also tear them into random shapes instead.[2]
- Try to use at least two different colors.
- Aim to make the pieces about 1 to 3 inches (2.54 to 7.62 centimeters).
-
4Set up your contact paper. Cut off a sheet of contact paper a little larger than your border. Peel off the backing, and set it down on the table, sticky-side up. Tape down the corners so that it stays put.
-
5Place the border down onto the contact paper. Try to center it as much as possible so that you have a little bit of contact paper all around the border. If you made two borders, set the second one aside for now.[3]
- If you can see your tracing lines, make sure that they are facing up. This way, they will be on the inside of the sun catch and not visible in the finished piece.
-
6Fill in your border. It's time to get creative again! Take your colored pieces of tissue paper, and start filling in the border. Try to overlap the tissue paper pieces so that there are as few gaps as possible.
- It's okay if some of the pieces extend onto the border, or even beyond it. You will be trimming it down later.
-
7Cover your sun catcher with another sheet of contact paper. Cut off another sheet of contact paper. Peel away the backing, and set it down on top of the sun catcher. Run your fingernail along the outside edges of the border to seal everything in.
- If you made a second border, glue it down on top of the sun catcher first. Make sure that it is aligned with the first one.
-
8Cut the sun catcher out. Leave a slight border of contact paper around it, about ⅛-inch (0.32 centimeter). This will help hold the sun catcher together.
-
9Hang your sun catcher in a bright window. Poke a hole in the top of your sun catcher and thread a piece of string through it. Tie the ends of the string together to make a loop. Hang the sun catcher in a bright, sunny window.

Using Wax Paper
-
1
-
2Cut or tear colored tissue paper into smaller pieces. Use at least two different colors and make the pieces about 1 to 3 inches (2.54 to 7.62 centimeters). Other than that, you can get really creative here. You can cut or tear the tissue paper into small squares, rectangles, triangles, strips, etc.
-
3Brush some glue onto the wax paper. Squeeze some glue onto a paper plate (or another scrap of wax paper). Use a paintbrush or a foam brush to apply a thin layer of glue to a small section of your wax paper.[7]
- Don't make the section too big, or the glue will dry before you lay all of the tissue paper pieces down. You can always add more glue later.
-
4Lay down some pieces of tissue paper onto the glue. Make sure that you overlap them slightly. Don't worry if the glue soaks through the tissue paper. You will be covering them with more glue later on.
-
5Brush some more glue over the tissue paper patch. Extend the glue past the edges of the patch to help seal everything in. At this point, you can make your design bigger by adding more glue to the wax paper, and covering it with more tissue paper. Remember to coat everything with a thin layer of glue when you are done.[8]
-
6Let the glue dry before peeling the tissue paper off. Glue doesn't stick very well to slippery surfaces, such as wax paper, which is a good thing for this project. Once the glue dries, carefully peel your tissue paper design off of the wax paper. You should now have a thin sheet of patchy tissue paper.
-
7Consider making a border. This is completely optional. If you do not wish to make a border, simply cut your tissue paper into a shape and hang it in a bright window.[9] If you'd like to make a border, follow the steps below:
- Cut a simple shape out of a sheet of black paper.
- Cut a second shape out of from the inside, leaving a ¼ to ½-inch (0.64 to 1.27-centimeter) border.
- Keep the border and discard the inside shape.
- Consider making a second border for the back of the sun catcher. Use the first border as your guide.
-
8Brush a thin layer of glue onto your border. If you made a second border for the back, set it aside for right now.[10]
-
9Place the tissue paper patch onto the border. Smooth it down with your hands so that it sticks to the glue. If you made a second border for the back, glue it on top of your sun catcher now. Make sure that it's aligned.[11]
-
10Trim off any excess tissue paper. You will most likely have some tissue paper sticking out from behind your border. To make your sun catcher look neater, trim this excess tissue paper off with a pair of scissors.
-
11Hang the sun catcher indoors in a bright window. Punch a hole near the top of your sun catcher. Thread some string through the hole. Tie the string into a loop, then hang it up.

Warnings
- Do not get these sun catchers wet, especially the wax paper ones. They will melt.⧼thumbs_response⧽
Things You'll Need
Using Contact Paper
- Black paper
- Contact paper
- Tape
- Tissue paper
- Scissors
- Craft glue or glue stick (optional)
Using Wax Paper
- Black paper
- Wax paper
- Tape
- Tissue paper
- Scissors
- Craft glue
- Paintbrush or foam brush


References
- ↑ https://www.allkidsnetwork.com/crafts/halloween/tissue-paper-pumpkin-craft.asp
- ↑ http://www.minieco.co.uk/butterfly-sun-catchers/
- ↑ https://www.allkidsnetwork.com/crafts/halloween/tissue-paper-pumpkin-craft.asp
- ↑ http://www.firstpalette.com/Craft_themes/Colors/tissuepapersuncatchers/tissuepapersuncatchers.html
- ↑ http://www.firefliesandmudpies.com/rainbow-heart-suncatchers/
- ↑ https://www.favecrafts.com/Crafting-with-Kids/colorful-tissue-paper-suncatchers
- ↑ https://www.favecrafts.com/Crafting-with-Kids/colorful-tissue-paper-suncatchers
- ↑ https://www.favecrafts.com/Crafting-with-Kids/colorful-tissue-paper-suncatchers
- ↑ http://www.firefliesandmudpies.com/rainbow-heart-suncatchers/
- ↑ https://www.favecrafts.com/Crafting-with-Kids/colorful-tissue-paper-suncatchers
- ↑ https://www.favecrafts.com/Crafting-with-Kids/colorful-tissue-paper-suncatchers
- ↑ http://www.firstpalette.com/Craft_themes/Colors/tissuepapersuncatchers/tissuepapersuncatchers.html
- ↑ http://www.minieco.co.uk/butterfly-sun-catchers/
- ↑ http://www.firstpalette.com/Craft_themes/Colors/tissuepapersuncatchers/tissuepapersuncatchers.html
About This Article