This article was co-authored by wikiHow Staff. Our trained team of editors and researchers validate articles for accuracy and comprehensiveness. wikiHow's Content Management Team carefully monitors the work from our editorial staff to ensure that each article is backed by trusted research and meets our high quality standards.
There are 20 references cited in this article, which can be found at the bottom of the page.
The wikiHow Video Team also followed the article's instructions and verified that they work.
This article has been viewed 83,435 times.
Learn more...
You don't need to track down a fancy toy for your hamster to have an opportunity to explore and play. Many colorful hamster toys can be created out of disposable household supplies. A few pieces of cardboard or wood are enough to make treat holders, box hideouts, and climbing platforms for any cage or playpen. Choose non-toxic paint and other decorations to give your hamster a colorful new toy that is also safe to explore.
Steps
Making a Toilet Paper Roll Toy
-
1Trim a toilet paper roll to the size you need. Measure out how much space you have available in your hamster’s cage if you need to. Then, use scissors or a utility knife to cut the cardboard tube to size. Trim it evenly at the ends, removing any frayed or damaged portions.[1]
- Toilet paper rolls are relatively short and work well as a base toy. Most of them don’t need to be trimmed. If you don’t have any, use a paper towel roll and trim it down to the size you need.
-
2Cut small holes in the toilet paper roll with a utility knife. Scissors work, but a utility knife is the easiest way to cut out parts of the roll without damaging it. Cut a few circles, about 4 or 5, along the length of the tube. Space them out to retain the tube’s shape. The holes are like windows your hamster can use to see treats and remove them without needing to chew through the cardboard.
- Make the holes about the size of your hamster’s head. That way, it will be able to reach the seeds easily and will not get stuck if it crawls into the tube. Making larger holes is fine but may cause the toy to break apart faster.
- An alternative way to make the toy is to cut the ends of the rolls into strips about 1⁄3 in (0.85 cm). Then, fold the strips inwards to create a small toy for your hamster to play with.[2]
Advertisement -
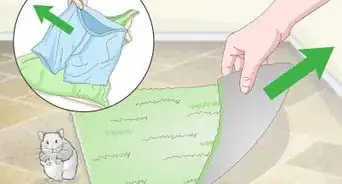
3Wrap the tube in non-toxic paper and make holes in it. Roll the tube up tightly in plain white printer paper. Feel the tube to find where you cut holes in it. Then, use scissors or a utility knife to remove the paper covering these areas. Mark the spots and unwrap the roll if you need to lay the paper flat to cut it.[3]
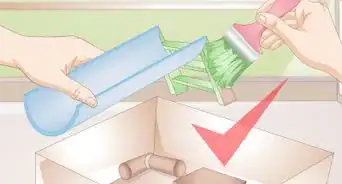
- Dyes in tissue, wrapping, and construction paper are toxic and often harmful to hamsters. Newspapers are generally safe to use in a pinch since the dye is toxic only in immense quantities, but stick to printer paper if you wish to avoid all dye.
- If you wish to use colored paper, test it first by dipping it in water. If the ink doesn’t run, it is most likely safe to use.
- Use paper longer than the tube so you are able to close up the tube’s ends.
-
4Glue the paper covering to the cardboard tube with non-toxic glue. Get a bottle of white glue meant for children or heat up a glue gun. Roll the tube up tightly in the paper, adjusting it so the holes align. Then, spread a small dab of glue along the free edge of the paper. Press it against the wrapped tube for several seconds to glue it in place.[4]
- Always check the label on the glue to make sure it says non-toxic. Use as little of the glue as possible to reduce the amount your hamster may nibble by accident.
- Be careful when using a hot glue gun. Hold the nozzle over the paper, not against it. Move your fingers out of the way to prevent burns.
- Alternatively, skip the glue. Wrap the roll up tightly, then twist the ends of the paper together by hand. The toy may fall apart sooner, but your hamster will still be able to have fun with it.
-
5Let the glue cure for about 24 hours. If you’re using hot glue, it will begin solidifying within a few minutes. Set the toy on a stable surface in open air. Position the glued side down so it doesn’t pull apart while the glue dries.[5]
- Place a paper towel or a craft mat underneath the toy as needed to protect surfaces from leaking glue.
-
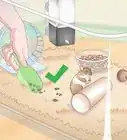
6Place your hamster’s favorite treats in the roll. Hamsters love sunflower seeds, so drop a few of them through the holes in the tube. Fruits and vegetables are a great choice as well. Try adding apples, berries, lettuce, or spinach. Even cooked eggs and whole grain bread will make your hamster happy.[6]
- Before you put a new treat in the tube, research it online to make sure it’s safe for hamsters.
- Be careful with food that spoils, such as produce. Check the tube every day to remove old treats.
-
7Tie the paper around the tissue roll with twine. Scrunch the loose paper together against the ends of the tube. Wrap the paper tightly with a safe type of rope such as twine, hemp, or sisal. Your toy will look like a piece of candy ready to be unwrapped by your hamster![7]
- Choose your rope carefully. Avoid dyed yarn and strings. Also, don’t use anything harmful your hamster may swallow, such as thin string or wire.
-
8Place the toy in your hamster’s cage or playpen. Set it near your hamster and watch it get curious. It will be able to detect the treats through the holes you cut. Refill the toy when you wish to give your hamster a treat and make a new toy once the old one starts to degrade.

Creating a Cardboard Box Toy
-
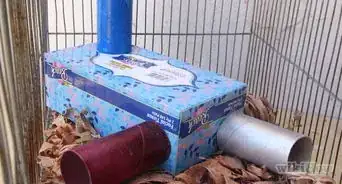
1Trim the flaps off a cardboard box with scissors or a utility knife. Unfold the cardboard box and lay it flat. Peel off any tape holding the flaps in place. Then, remove the flaps so your hamster has plenty of space to move through the container.[8]
- Make the toy out of plain cardboard. Avoid using tissue boxes or other types of cardboard with ink, since ink can be harmful to your hamster if it is chewed and swallowed.
-
2Measure and trim the box if needed to fit it in a cage. If you make the toy out of a big cardboard box, cut it to size with scissors or a utility knife. Choose a good spot for the toy, then use a tape measure to determine how much space you have available. Mark these measurements on the cardboard before cutting it.[9]
- To reduce the amount of measuring and cutting you need to do, use smaller boxes like tissue boxes. Save bigger boxes for toys left out of a cage, such as those placed inside a playpen.
- Another way to make use of a bigger box is to cut it into panels. Trim the panels so they’re all the same size, then stack them and glue them together to create a box-shaped house.
-
3Cut holes in the middle of the container to create entrance holes. Make a hole in the middle of each panel. Each hole needs to be at least as big as your hamster so it is able to exit and enter the cardboard box. Making the holes bigger and in a variety of shapes is a great way to customize the box.[10]
- To easily make the holes, bend the container and poke a hole in the middle of the cardboard panel. Then, use the small hole to cut out the shape you desire.
-
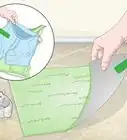
4Decorate the box by gluing non-toxic wrapping paper to it. Before using any paper, dip it in water first. If the ink runs, it isn’t safe to use. When you have the right paper, spread non-toxic white glue or hot glue in a thin layer over the cardboard. Push the paper against the cardboard to stick it in place.[11]
- To avoid any risk of your hamster consuming toxic dye, leave the wrapping paper off. Instead, use non-toxic markers or paint to color the box. Glue white paper to the box and color that if you don’t want to draw directly on the cardboard.
-
5Leave the glue for 24 hours to dry if you used any. The glue will begin curing within a couple of hours. Wait for it to completely solidify so the decorations don’t fall off when your hamster starts climbing on its new toy.[12]
- Waiting is important, especially if you used a hot glue gun.
-
6Cut holes if any of the decorations cover the holes in the box. Run your fingers over the box to find the holes you cut in the cardboard. Use scissors or a sharp knife to poke through the excess wrapping paper. Work carefully to avoid damaging the box or its decorations.[13]
- For the best results, poke through the paper with a sharp tool, then finish cutting out the hole with a pair of scissors.
-
7Set the box up near your hamster and let it play. Place the box in the hamster’s cage or playpen. Make sure it is able to reach the holes and that the holes are big enough for it to fit through. Then, watch your hamster have plenty of fun exploring its new toy![14]
- If the box is too tall for your hamster, take it back out of the cage or playpen. Trim the ends of the cardboard as needed.


Creating a Platform
-
1Select flat cardboard and cardboard rolls without ink marks. No matter what type of cage you have, you have the ability to install a platform in it. For an inexpensive and easy way to make a platform, use cardboard. Get a big piece of cardboard for the platform’s surface and about 5 or 6 toilet paper rolls to use as supports.[15]
- Wood is the best choice for building sturdy platforms. Hamsters also enjoy chewing on wood platforms to hone their teeth.[16]
- For wood platforms, look for pre-cut pieces of wood at an art supply store. Alternatively, use a table saw to fashion your own wood pieces. Make sure you wear proper safety gear, such as goggles and a dust mask, if you operate a saw.
-
2Measure the cage’s dimensions to determine the platform’s size. Pick a space for the platform. Use a tape measure to note the length, width, and height of the available space where you plan on fitting the platform. Write these measurements down so you have them when you start crafting the platform.[17]
- Platforms also work well outside of a cage, such as in a playpen. Take the same measurements to build the platform to the size you desire.
-
3Mark the cardboard and cut it to the size you desire with scissors. Trace the dimensions for the platform onto the piece of cardboard with a pencil. Get a strong pair of scissors or a sharp utility knife to cut the cardboard cleanly. Test the cardboard in the cage to ensure it fits properly.[18]
- If you intend on putting the platform in a wire cage, leave the platform longer to rest it on the wires. Leave an extra 1 in (2.5 cm) on the ends so the cardboard overlaps the wires.
-
4Glue the toilet paper rolls to the bottom of the platform. Lay the cardboard on a flat surface with the bottom side face up. Set a cardboard tube in each corner, trimming them down as needed to make the platform low enough for your hamster to reach. Then, set another tube in the middle of each of the longer ends. Spread a non-toxic glue around the rim of each tube to glue it to the platform.[19]
- If you’re making a wood platform, look for wood spools for an easy way to create legs. Wood blocks also work well. Since wood platforms are sturdy, you only need 4 of them to put underneath the platform’s corners.
- Use a non-toxic glue. White bottled glue and white glue gun sticks are generally safe. Spread the glue thinly so your hamster doesn't turn it into a snack.
-
5Dry the glue for up to 24 hours before moving the platform. Set the platform out in open air in a location where it won’t be disturbed. Give the glue plenty of time to cool off and harden. When you’re done, test the platform to make sure it feels stable.
-
6Place the platform in the cage and secure it to the walls as needed. Slide the platform into the cage if you plan on installing it there. For a wire cage, slip the ends of the cardboard between the wire bars. If you have a glass cage, place some transparent duct tape around the platform’s edges to help hold it in place.[20]
- Test the platform. If it feels wobbly, support it with tape. Also, glue more cardboard tubes or wood pieces to the bottom for extra support.
-
7Color the platform and add decorations to customize it. When your hamster gets tired of its new toy, add some new facets to it. Use non-toxic paints to give the platform color, or try making some extra platforms. For example, glue a cardboard tube or wood cylinder to the top of the platform, then top it with a second, smaller platform for your hamster to explore.[21]
- Make all sorts of different projects, including ladders and staircases. For a simple staircase, cut out a long strip of cardboard. Glue white card stock to the underside to make it stable. Then, fold it in half to create the ramp.
- Use only non-toxic decorations. Colored paper and yarn have dye that may harm your hamster. If you use paper to decorate, such as to cover the top of the platform, test it by dipping it in water first. If the dye runs, don’t use it!


Community Q&A
-
QuestionHow do you train a hamster that runs away when you try to touch it?
 Community AnswerPut your hand above it for a while, talk to it, and let it get used to your scent and voice. Let it see you give it treats.
 -
QuestionHow do I tame a scared hamster?Community AnswerTry putting treats or pieces of food on the top of your hand and letting the hamster climb on you get used to you. Be very patient with your hamster. There's more information here: Train Your Hamster.
-
QuestionIs it safe for hamsters to eat tissues?
 Chloe HYCommunity AnswerIt's safe, because they don't eat tissues, they just rip it.
Warnings
- Choose your toy components carefully. Items like glue and tape can harm a hamster. Make sure you use non-toxic material. Use non-toxic substances like glue sparingly so it don’t clog up your hamster if it chews the toy.⧼thumbs_response⧽
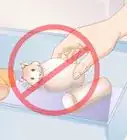
- Mesh and other wires are unsafe. Hamsters can slip through these components and get tangled up in them.⧼thumbs_response⧽
- Dyes are unsafe for hamsters. Avoid dyed fabrics and paper as much as possible. If you plan on using dyed paper, dip it in water to make sure the dye doesn’t run. If it doesn’t run, it is safe to use in small quantities.⧼thumbs_response⧽
Things You'll Need
Making a Toilet Roll Toy
- Toilet roll
- Paper
- Scissors or utility knife
- Non-toxic glue
- Treats
Creating a Cardboard Box Toy
- Thin cardboard box
- Tape measure
- Pencil
- A pair of scissors
- Decorative paper or other supplies
- Non-toxic glue
Building a Platform
- Cardboard tubes
- Cardboard
- Measuring tape
- Pencil
- Scissors or utility knife
- Non-toxic glue

References
- ↑ https://www.youtube.com/watch?v=3g5UFV8pkHo&feature=youtu.be&t=29
- ↑ https://www.youtube.com/watch?v=3g5UFV8pkHo&feature=youtu.be&t=106
- ↑ https://www.youtube.com/watch?v=NuPeyD6w-CI&feature=youtu.be&t=143
- ↑ https://www.adhesives.org/adhesives-sealants/adhesive-selection/types-of-glue-glue-tips
- ↑ https://www.adhesives.org/adhesives-sealants/adhesive-selection/types-of-glue-glue-tips
- ↑ http://www.pethealthnetwork.com/all-pet-health/small-animal-health-care/top-10-ways-keep-your-hamster-healthy
- ↑ https://www.youtube.com/watch?v=K6z4D3oAYh4&feature=youtu.be&t=22
- ↑ https://www.youtube.com/watch?v=mQayrLU7pTU&feature=youtu.be&t=12
- ↑ https://www.youtube.com/watch?v=6koO9ITLlXU&feature=youtu.be&t=39
- ↑ https://www.youtube.com/watch?v=-ToUDBTyiWU&feature=youtu.be&t=28
- ↑ https://www.youtube.com/watch?v=Y2BHo9Hei5E&feature=youtu.be&t=149
- ↑ https://www.youtube.com/watch?v=6koO9ITLlXU&feature=youtu.be&t=183
- ↑ https://www.youtube.com/watch?v=6koO9ITLlXU&feature=youtu.be&t=189
- ↑ https://www.youtube.com/watch?v=BhPCy2LCsQE&feature=youtu.be&t=231
- ↑ https://www.youtube.com/watch?v=p0qzIW4ftcI&feature=youtu.be&t=5
- ↑ https://www.youtube.com/watch?v=0TdIShBdmQY&feature=youtu.be&t=16
- ↑ https://www.youtube.com/watch?v=kSnaQfyHa_Y&feature=youtu.be&t=46
- ↑ https://www.youtube.com/watch?v=p0qzIW4ftcI&feature=youtu.be&t=35
- ↑ https://www.youtube.com/watch?v=0TdIShBdmQY&feature=youtu.be&t=75
- ↑ https://www.youtube.com/watch?v=kSnaQfyHa_Y&feature=youtu.be&t=144
- ↑ https://www.youtube.com/watch?v=0TdIShBdmQY&feature=youtu.be&t=157
About This Article

To make a toy for your hamster, start by wrapping some non-toxic paper, like printer paper, around an empty toilet paper roll and gluing it onto the roll. Then, cut small holes out of the toilet paper roll so you can fill it with treats for your hamster. Next, put some treats inside the roll, and tie off the ends of the paper with twine so the treats don't fall out. Finally, place the toy in your hamster's cage and watch it try to get the treats out of the small holes. To learn how to make a platform toy for your hamster's cage, scroll down!