This article was co-authored by Pippa Elliott, MRCVS. Dr. Elliott, BVMS, MRCVS is a veterinarian with over 30 years of experience in veterinary surgery and companion animal practice. She graduated from the University of Glasgow in 1987 with a degree in veterinary medicine and surgery. She has worked at the same animal clinic in her hometown for over 20 years.
There are 12 references cited in this article, which can be found at the bottom of the page.
wikiHow marks an article as reader-approved once it receives enough positive feedback. In this case, 92% of readers who voted found the article helpful, earning it our reader-approved status.
This article has been viewed 74,355 times.
Making a do-it-yourself hamster playground will give your pet a nice break from its normal cage. It can also be entertaining for you, your friends, and your family to watch it have fun with its toys and obstacles. Use cardboard boxes to make a big playpen, or find the biggest cardboard box you can to make a multi-level space for your hamster to explore. Fill it with your hamster’s toys, or make a city for it run around in using smaller boxes and tubes. With a little help from a parent or other adult, you can even make a hamster slide from common items you can find at the hardware store.
Steps
Making a Collapsible Cardboard Pen
-
1Get medium or large cardboard boxes. Use either two large cardboard boxes or four medium sized boxes. Go to a nearby store, or ask your parents to take you. Try to find boxes that are as clean as possible.[1]
- If you want a pen with higher sides, go with four medium boxes. Otherwise, two large boxes will be fine, especially for a small pet like hamster.
-
2Flatten the box. Once you’ve found some boxes, flatten each out if the store you got them from didn’t already. Do this by undoing the flaps that fold together to make the bottom, or if cut them if they’re taped. Once the boxes are broken down, cut a corner where two sides come together, so that the boxes lay out complexly flat.[2]
- Use scissors or a craft blade, and ask an adult to help you if you’re not allowed to use sharp objects without supervision.
Advertisement -
3Cut off the lids. After you’ve completely flattened the boxes, cut off the lid flaps that used to be the tops and bottoms. You can either discard the flaps once you’ve cut them off, or save them to use them for another project. After cutting off the flaps, you should just be left with long, cardboard rectangles.[3]
- If you’re using four boxes, just flatten each and cut the flaps off of each box the same way you’d do for two big boxes.
-
4Make four long strips. If you’re started with two large boxes, cut each in half length-wise, or horizontally. Use a ruler or yardstick and a pen to make a line down the center to guide you. You should be left with total of four long strips.[4]
- If you started with four medium sized boxes, you can just use the rectangular strips as they are after you cut off the flaps.
-
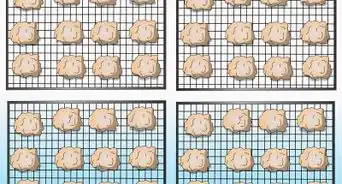
5Cut slots in each strip. Take each long, rectangular cardboard strip and mark out a line about an inch from the end. If you lay out each strip flat, the line should go from the top to the center on two strips, and from the center to the bottom on the other two. These will fit together to form the pen’s borders.[5]
- Don’t cut the slots too thick, or they won’t fit together snugly and the pen won’t be as stable.
-
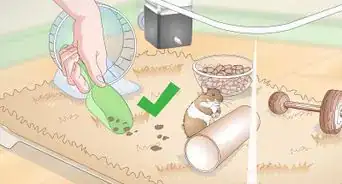
6Put the pen together. Find an area of your house with a hard floor surface, preferably tile so it won’t absorb any messes your pet might make. Give the floor a quick sweep and wipe it down with a wet paper towel to make sure there’s no crumbs or anything you wouldn’t want your hamster to eat. Line the strips’ slots up, and fit them together so they’re snug.[6]
-
7Fill the pen with your hamster’s favorite toys. Grab any toys that are removable from your pet’s cage, and place them in its pen. Use any other hamster toys you might have, such as tubes, dens, or plastic balls. Make rooms using tissue boxes by cutting out doors so the hamster can get in or out, or fold up the flaps you cut off the boxes to make little hamster teepees.


Using a Large Cardboard Box
-
1Find a large box. Visit a nearby grocery or department store. Tag along with mom or dad next time they go shopping. Ask someone who works at the store for the biggest box they have in the back.
- If you get a box from a grocery store, make sure doesn’t have any food, grease, or dirt stains.
- Department or electronics stores are great because their boxes usually don’t have any grime that sometimes come with grocery store big boxes.
-
2Cover the box’s bottom. Place a soft old towel at the bottom of the box. Cover the towel with a hamster-friendly bedding or litter. These include wood shavings, shaved corn cob, coarse sand, and other materials that you can find at your local pet store that are marked hamster-safe.[7]
- Make sure the litter is marked chemical free and safe for pets.
- Stay away from straw, because the tough strands can hurt the hamster’s cheeks.
- Also avoid fluffy bedding products like cotton wool because they can stuck in the hamster’s toes and feet.
-
3Create multiple levels. Use smaller boxes, like tissue boxes, to create levels for your hamster to explore. Cut off lids so the boxes don’t have tops and bottoms, then cut out little doors for the hamster to get in or out. If you use tissue boxes, make sure you get rid of all its plastic and serrated, or sharp, edges at the opening.


Filling the Pen with Hamster Toys
-
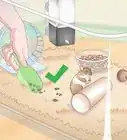
1Use toys and tubes from the hamster cage. Make sure to fill your hamster's new playground with toys, whether you built a multi-level box playground, or made a collapsible pen. If you keep toys and obstacles in your hamster cage that are removable, grab them so it can play in its new playpen or box. Use a tray to put treats in your pen, too. Try putting them around the pen in various places for your hamster to find.
-
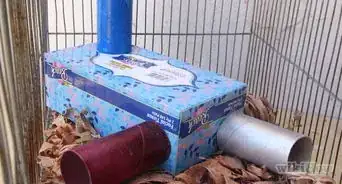
2Use cardboard tubes to create tunnels. Use an empty paper towel or toilet paper rolls to make tunnels for your hamster. Make sure that they’re big enough for your pet to get through. Create a bigger tunnel system by pushing the cardboard rolls into any other hamster tubes you might have, like ones made out of either a chewable material or out of plastic.
-
3Cut out entrances and exits on little boxes. Stock up on empty tissue boxes, cereal boxes, boxes that hold canned soda, and other household cardboard boxes. The size of these smaller boxes will depend on the size of the box or pen you used for the playground. Cut doors in them and make a little city for your hamster to explore.
-
4Make a hamster slide. Take a trip to the hardware store, or have your parents bring you. Find a short length of flexible, plastic tubing for plumbing. Use the largest tubing you can find: one with the longest circumference, or longest around. Cut it in half length-wise so you’re left with two long slide shapes. [8]
- If you or a parent is handy with wood, you can make a ladder for the slide with a small wood frame or box. Use non-toxic glue to attach 5 to 10 wooden dowels for the ladder’s rungs. You can also get an adult to drill holes through the wooden frame and use a hammer to tap the dowels through them.[9]
- Use a small, solid square of wood for the slide’s top platform. Drills holes and use screws or dowels to attach it to the wooden ladder, or glue them together using non-toxic glue.[10]
- Have an adult drill holes through the slide shape and the wood square, and use a screw to attach the slide to the square’s underside. Sand out a groove in the platform so the slide fits better. Make sure the pointy end of the screw doesn’t poke through the top side of the wood square.[11]
- Finally, if you’d like to add some color, use food coloring and water to stain the wood parts of your hamster’s new slide.[12]


Warnings
- Don’t use sharp objects or any power or woodworking tools without adult permission, assistance, or supervision.⧼thumbs_response⧽
Things You'll Need
- Cardboard boxes of various sizes
- Scissors or craft knife
- Yardstick or ruler
- Pen or marker
- Towel and hamster bedding
- Toilet/kitchen roll tubes
- Any hamster toys you have on hand
- Large flexible plastic plumbing tubing
- A small wooden frame or box
- 5 to 10 wooden dowels
- Power drill
- Screwdriver
- Non-toxic glue
- Food coloring

References
- ↑ https://www.youtube.com/watch?v=6d2eUTe2vC8&feature=youtu.be&t=38
- ↑ https://www.youtube.com/watch?v=6d2eUTe2vC8&feature=youtu.be&t=50
- ↑ https://www.youtube.com/watch?v=6d2eUTe2vC8&feature=youtu.be&t=55
- ↑ https://www.youtube.com/watch?v=6d2eUTe2vC8&feature=youtu.be&t=69
- ↑ https://www.youtube.com/watch?v=6d2eUTe2vC8&feature=youtu.be&t=117
- ↑ https://www.youtube.com/watch?v=6d2eUTe2vC8&feature=youtu.be&t=126
- ↑ http://www.rspca.org.uk/
- ↑ https://www.youtube.com/watch?v=vrQXLY6TJFI&feature=youtu.be&t=140
- ↑ https://www.youtube.com/watch?v=vrQXLY6TJFI&feature=youtu.be&t=161
About This Article