This article was co-authored by Mia Rubie. Mia Rubie is a Nail Artist and the Owner of Sparkle San Francisco, a nail studio based in San Francisco, California. She has over eight years of nail artist and management experience and is known for her push-the-envelope designs and artistic eye for colors. Her clients include Sephora, Target, and Vogue. Her work has been featured in the San Francisco Chronicle and StyleCaster. She holds a BBA focusing on Entrepreneurial and Small Business Operations from San Francisco State University. You can find her work on her Instagram account @superflynails.
There are 8 references cited in this article, which can be found at the bottom of the page.
This article has been viewed 43,527 times.
A flawless manicure can be the perfect accessory to any outfit. Unfortunately, making your nail polish look great can be a real a challenge. It starts with selecting the right polish to complement your skin and fit the occasion, but also requires preparing your nails and applying the polish in the right way. Once the polish in on your nails, you must also take care to ensure that it stays looking great. It might take a little longer to get the perfect manicure, but you'll definitely be happy with the results.
Steps
Choosing Your Nail Polish
-
1Select a polish shade that flatters your skin tone. The first step in perfecting your nail polish is choosing the right shade. You want to use a color that complements your skin tone, so the polish flatters your overall appearance.[1]
- For fair and light skin tones, sheer pink nude, classic blue-toned red, bright pink, cool dusty rose, lavender, and navy are pretty options.
- For medium skin tones, beige nude, orange red, peachy pink, sky blue, and deep grape are attractive shades.
- For dark skin tones, sheer beige or cream nude, deep wine or crimson, bright fuschia, dark berry, and cobalt are flattering polish colors.
-
2Pick the right finish. Nail polish comes in a variety of finishes, including creme, metallic, matte, and glitter. Some finishes will draw more attention to your polish than others, so consider the type of statement that you want to make with your manicure.
- Creme nail polish is usually the standard option. It provides solid, shiny color that is ideal for both formal and casual occasions.
- Metallic nail polish has a rich, shiny finish that resembles metal. It can be very striking, but metallic polishes have a tendency to streak so take your time when applying them.
- Matte nail polish offers no shine, so the color has a natural appearance. It can be very chic, but also provides a low-key look that is ideal if you don’t want your polish to stand out too much.
- Glitter nail polish provides large, eye-catching chunks of glitter than are usually suspended in a clear base. It offers an extremely striking look and can be layered over colored polish for a bolder look. The drawback to glitter polish, however, is that it can be extremely difficult to remove.
Advertisement -
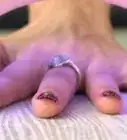
3Think about incorporating designs. While you can simply paint the polish over your nails as a solid color, you may want to add some flair to your look. Consider adding polka dots, stripes, or other patterns to your nails. You can also use nail gems and rhinestones to add some bling to your manicure.
- You can add a pattern to all of your nails or to just a select few, such as the ring finger on each hand.
- Nail polish pens often make it easier to add dots, stripes, and other designs to your nails. You can find them in a variety of shades to match any look.
- To add polka dots to your nails, it helps to have a dotting tool that you dip in polish and press onto your nails. If you don’t have one, you can use a toothpick to carefully add dots to your nails.
- For clean, even lines, it helps to use striping or medical tape, which won’t leave residue behind, to mark off your nails.
- If you want to do nail artwork, such as paint shapes like hearts, stars, or flowers, purchase nail art brushes. They have fine tips, so you can be as precise as you need.
- If you aren’t particularly artistic, you can buy nail stickers that often have fun shapes and designs that you can add to polished nails.


Readying Your Nails
-
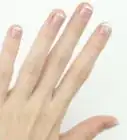
1Clean your nails. In order for the polish to go on smoothly, your nails must be clean. Use nail polish remover to take off any old polish that may be on your nails. If your nails are bare, wash your hands to ensure that there is no dirt, oil, or other residue on your nails.[2]
- Acetone-free polish remover is less drying on your nails and skin, so it’s usually a better choice. However, if you’re removing glitter or other difficult to take off polish, remover with acetone can take it off more easily.
-
2Shape your nails. Once your nails are clean, you want to make sure that they’re in a flattering shape. Clip them if necessary, or use a crystal nail file or gentle emery board to file them into a flattering shape and to the length that you prefer.[3]
- A slightly rounded shape is the most classic option. It helps elongate short or wide fingers, but it’s flattering on most people.[4]
- An oval shape works well if you have long nails or wide nail beds.
- A square shape is most flattering on short nails or nails with wide beds.
- A "squoval" shape, or a combination of the oval and square shapes, has a minimal look that is flattering on all hand and nail types.
- The almond and stiletto nail shapes are more dramatic and tend to look best on long, slim fingers.
-
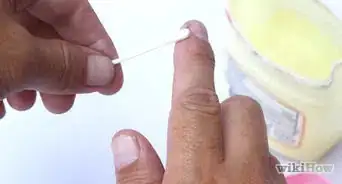
3Push back any excess cuticle around the nail. When your nails are an appropriate shape and length, use a metal cuticle pusher from a manicure kit to carefully push back back the cuticle, or the thin band of skin at the bottom of the nail. Be careful not to push the cuticle too roughly, though, or it may affect nail growth.[5]
- If you don’t have a metal cuticle pusher from a manicure kit, you can use an orange stick. It is made of wood and available at most drugstores and beauty supply stores.
-
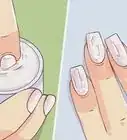
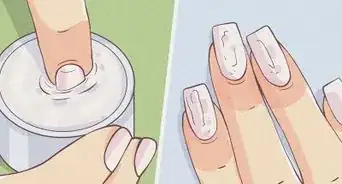
4Apply a base coat. Even if your nails are in good shape, a base coat is an essential step in making your polish look great. It smooths the surface of your nails and provides a base for the polish to stick to. Paint a single layer of base coat on your nails before your polish and allow it to dry for 2 to 3 minutes.[6]
- A base coat can also help your polish last longer on your nails and prevent dark polishes from staining your nails.


Applying the Polish
-
1Roll the polish bottle between your hands. Nail polish can sometimes separate when it sits in storage, so you should make sure it's mixed before applying it. Roll the bottle back and forth between your two hands to gently mix it.[7]
- Never shake a bottle of nail polish to mix it. That can add air bubbles that lead to bumps when you paint on the polish.
-
2Get a good size bead of polish on the brush. When you’re ready to paint your nails, pull the brush out of the bottle. Make sure that there is a decent size bead of polish on the brush so it will easily spread out once you touch the brush to your nail. Guide the bead so it applies near the base of your nail.[8]
- To get the right amount of polish, pull the brush out of the bottle and wipe it off on the inside of the bottle's opening. Next, redip just the tip of the brush into the polish to get a precise bead that won't run down the brush and flood your cuticles when you apply it.
- While you want a decent amount of polish on the brush, be sure that there isn’t too much. If you apply a thick layer of polish, it will be more likely to smudge, chip, or nick.
-
3Paint the polish on each nail in three stripes. When it comes to actually applying the polish, aim to do so in three single stripes. Starting at the base of your nail, apply a stroke on the left of the nail and one to the right. Finally, paint a stripe down the center of the nail so it’s completely covered.[9]
- Don’t worry if the polish is streaky after you paint the stripes. Applying additional coats will help smooth out the finish.
-
4Allow the polish to dry for a few minutes. In most cases, your polish is going to require additional coats to get the finish or color depth that you want. For the best results, let the first coat of polish dry for 2 to 3 minutes before applying another coat.[10]
- If you plan to use more than two coats of polish, let it dry for a couple of minutes between each coat.
-
5Clean up any mistakes with nail polish remover. If you get any polish on your cuticles or the other skin surrounding the nail, pour a small amount of nail polish remover in the cap of its bottle. Dip a small, angled eyeliner brush into the remover, and run it along the skin to remove any stray bits of polish.[11]
- Be sure the polish has dried for a couple of minutes before trying to correct mistakes. You may smudge the polish on the nail itself if it's still wet.
- Check that your liner brush is clean before you dip in the nail polish remover.
- If you don't have an eyeliner brush to use, a pointed cotton swab can also work well.
-
6Apply additional coats of polish if necessary. Some polishes may apply streaky on the first coat or go on sheer so they require more polishes for opaque color. If your first coat doesn’t provide the coverage and finish that you want, apply a second coat just as you did the first.[12]
- It’s best not to apply more than 3 coats of nail polish. The more polish that you apply, the more likely your nails are to smudge and chip.
-
7Finish off your nails with a top coat. To ensure that your polish lasts for as long as possible, it’s essential to apply a top coat. The top coat also adds extra shine to your manicure for the most flattering look. After you’ve applied the final coat of polish, paint on a single layer of top coat.[13]
- Read the top coat’s instructions to see when to apply it. You can apply some to wet polish because they actually help the polish dry faster. Other top coats require waiting for the polish to dry for 30 seconds to 2 minutes before applying them.
- If you're wearing a matte polish, skip the top coat. It will add a shiny finish that will spoil the matte finish of the polish.
-
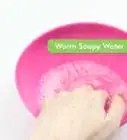
8Dip your nails in cold water. You want your polish to dry as quickly as possible to avoid possible smudges and chips. To hurry the process along, dip your fingers in a bowl of cold water after you’ve applied the top coat. That will help the polish harden and dry more quickly.[14]
- Don’t hold your fingers under cold running water. The force of the water can smudge or damage the polish’s finish.


Keeping Your Polish Looking Great
-
1Stay out of the shower right after applying polish. While cold water can help dry your polish more quickly, hot water can damage a manicure by causing the polish to bubble or smudge. Wait at least an hour after polishing your nails to take a hot shower.[15]
-
2Avoid polishing your nails before you go to sleep. Nail polish typically appears to dry within 30 minutes. However, it can take up to 24 hours for it to set completely so you can damage your manicure if you toss and turn in bed right after you polish. To avoid smudges, try to polish your nails at least 2 to 3 hours before you plan to go to sleep.[16]
- Setting your polish with cold water can help if you want to go bed shortly after painting your nails.
-
3Wear rubber gloves for household chores. Exposing your hands to hot water, harsh dish soaps, and other household cleansers can ruin a manicure. To preserve the look of your nail polish, always wear protective gloves when you’re doing house work, such as washing dishes.[17]


Expert Q&A
Did you know you can get expert answers for this article?
Unlock expert answers by supporting wikiHow
-
QuestionHow can I make my nail polish look better?
 Mia RubieMia Rubie is a Nail Artist and the Owner of Sparkle San Francisco, a nail studio based in San Francisco, California. She has over eight years of nail artist and management experience and is known for her push-the-envelope designs and artistic eye for colors. Her clients include Sephora, Target, and Vogue. Her work has been featured in the San Francisco Chronicle and StyleCaster. She holds a BBA focusing on Entrepreneurial and Small Business Operations from San Francisco State University. You can find her work on her Instagram account @superflynails.
Nail ArtistInvest in a good base coat and top coat! All nail polishes are not created equal, and the quality stuff is always going to look better. Also, make sure you shape your nails properly based on the shape you prefer. Square is fine, but I personally prefer a rounder shape to give your nails a natural look. If your nails aren't shaped, they're not going to look good even if you have some great polish.
Support wikiHow by unlocking this expert answer.
-
QuestionWhat is the most attractive nail polish color?Mia RubieMia Rubie is a Nail Artist and the Owner of Sparkle San Francisco, a nail studio based in San Francisco, California. She has over eight years of nail artist and management experience and is known for her push-the-envelope designs and artistic eye for colors. Her clients include Sephora, Target, and Vogue. Her work has been featured in the San Francisco Chronicle and StyleCaster. She holds a BBA focusing on Entrepreneurial and Small Business Operations from San Francisco State University. You can find her work on her Instagram account @superflynails.
Nail ArtistIt depends on your skin tone. Just like with clothes, pick a shade that looks flattering with your skin tone.Support wikiHow by unlocking this expert answer.
-
QuestionShould I wash my hands before painting my nails?Mia RubieMia Rubie is a Nail Artist and the Owner of Sparkle San Francisco, a nail studio based in San Francisco, California. She has over eight years of nail artist and management experience and is known for her push-the-envelope designs and artistic eye for colors. Her clients include Sephora, Target, and Vogue. Her work has been featured in the San Francisco Chronicle and StyleCaster. She holds a BBA focusing on Entrepreneurial and Small Business Operations from San Francisco State University. You can find her work on her Instagram account @superflynails.
Nail ArtistYes! Dirt, oils, and other residue on your nails can make it hard for the nail polish to stick. Always clean your nails before you paint them to help your manicure last longer and look better.Support wikiHow by unlocking this expert answer.
Things You’ll Need
- Nail clippers
- Crystal nail file or emery board
- Metal cuticle pusher or orange stick
- Base coat
- Nail polish in a flattering color
- Top coat
- Cold water

References
- ↑ Mia Rubie. Nail Artist. Expert Interview. 23 April 2020.
- ↑ Mia Rubie. Nail Artist. Expert Interview. 23 April 2020.
- ↑ Mia Rubie. Nail Artist. Expert Interview. 23 April 2020.
- ↑ Mia Rubie. Nail Artist. Expert Interview. 23 April 2020.
- ↑ http://www.paulaschoice.com/expert-advice/body-care/_/how-to-give-yourself-a-manicure-at-home
- ↑ http://www.cosmopolitan.com/style-beauty/beauty/how-to/a5101/things-about-painting-your-nails-you-might-not-know/
- ↑ http://www.cosmopolitan.com/style-beauty/beauty/how-to/a5101/things-about-painting-your-nails-you-might-not-know/
- ↑ http://www.cosmopolitan.com/style-beauty/beauty/how-to/a5101/things-about-painting-your-nails-you-might-not-know/
- ↑ http://www.cosmopolitan.com/style-beauty/beauty/how-to/a5101/things-about-painting-your-nails-you-might-not-know/
- ↑ http://www.allure.com/story/manicure-nail-polish-mistakes
- ↑ http://www.lacquerized.com/2010/02/clean-up-in-6-easy-steps.html
- ↑ http://www.allure.com/story/caution-with-excessive-polish
- ↑ http://stylecaster.com/beauty/top-nail-polish-mistakes/
- ↑ http://www.cosmopolitan.com/style-beauty/beauty/how-to/a5101/things-about-painting-your-nails-you-might-not-know/
- ↑ http://stylecaster.com/beauty/top-nail-polish-mistakes/
- ↑ http://stylecaster.com/beauty/top-nail-polish-mistakes/
- ↑ https://www.leaf.tv/articles/how-to-make-your-nail-polish-last-longer-look-shiny/
About This Article