This article was co-authored by Natasha Dikareva, MFA. Natasha Dikareva is a San Francisco, California based sculptor, and installation artist. With over 25 years of ceramics, sculpting, and installation experience, Natasha also teaches a ceramic sculpture workshop titled "Adventures in Clay" covering concept development, hand-building techniques, texture, and glazing techniques. Her work has been featured in solo and group exhibitions at the Beatrice Wood Center for the Arts, Abrams Claghorn Gallery, Bloomington Center for the Arts, Maria Kravetz Gallery, and the American Museum of Ceramic Art. She has taught at the University of Minnesota and the American Indian OIC School. She has been awarded the Excellence Award at the 1st World Teapot Competition, Best in Show at the 4th Clay & Glass Biennial Competition, and a Grand Prize at the American Museum of Ceramic Art. Natasha holds an MFA from the University of Minnesota and a BFA from Kiev Fine Arts College.
There are 12 references cited in this article, which can be found at the bottom of the page.
This article has been viewed 63,046 times.
Practicing ceramics is a relaxing pastime that really allows creativity to blossom. For beginner ceramic students, one of the first projects they learn is how to make coiled objects such as bowls or pots. Coiled pots are relatively easy to construct and simply require coils to be stacked on top of each other to build the object. By following these simple techniques, you can make your very own custom coiled pot.
Steps
Wedging The Clay
-
1Situate your work surface. Most clay workers like to work on smooth, firm, and non-porous surfaces while handling and molding their clay.[1] Work surfaces can be large countertop-like tables made of glass, acrylic, or marble, or smaller surfaces like individual ceramic tiles, plexiglass sheets, or wooden slabs about 12 x 12”. The smaller work surfaces help for moving projects around.[2]
- For making pots, especially pots made from coils, it’s sometimes easier to work on a turntable on which your smaller work surface can be applied. That way, you can spin your project around as you coil.[3]
- However, if you plan to use a turntable, you will put your clay or smaller work surface on the turntable after you have prepped all of your clay (base and coils) and are ready to start laying down the coils.[4]
- Wax paper and foil can also function as work surfaces, but if you plan to be roll out any of your clay, the wax paper or foil needs to be taped down so it doesn’t move.[5]
- For help on finding and deciding the right work space for your project, visit any craft store and ask one of the employees for some advice.
-
2Gather your tools. Near your work surface, you will need a small cup of water for slipping the clay, a clay needle tool for scoring, a soft piece of sponge for smoothing the clay surfaces, either a wooden or metal rib to help smooth out blending bumps in the clay, and a small roller to flatten your base.[6]
- Keep these tools off to the side until you’re finished wedging the clay and are ready to use them.
- Alternatively, you can use an ordinary kitchen fork to score the clay if you don’t have a clay needle tool.[7]
Advertisement -
3Rip off your chunk of clay. Rip off a chunk of clay from your clay bag that’s about the size of an orange.[8] This will be the first piece of clay that you wedge, but depending on how big you want to make your pot, you may have to wedge a few more.
-
4Throw your clay into a cube. Hold the chunk of clay with both of your hands and throw it onto your clean work surface from about 24” above.[9] The surface of the clay that hits your work surface will be flattened from the impact. Peel the clay off of your work space, and again throw the clay to flatten a side.
- Repeatedly throw the clay, focusing on turning and rotating the clay piece to flatten the sides and form a uniform cube.
-
5Wedge your cube of clay. It’s important to wedge your clay before you start shaping it, because air bubbles in the clay will cause your piece to explode while drying in the kiln. Position the clay so one of the flat faces of the cube is facing you.[10] Stand on your feet so you have more power to push on the clay. Place both heels of your hands on the corner side of the face of the cube and push down, then forward. Peel the front of the cube off of your work surface back toward you, and push that side down and forward.[11] Keep peeling back the front portion of the clay and pushing it down and forward. Wedge your clay in this way approximately ten times.
- It’s customary and recommended to repeat the cubing process and wedging process at least twice just to be sure that all the air bubbles have be removed from the clay.[12]
- If some of the clay is sticking to your work surface as you push down on it, simply place the chunk of clay on top and drag it away. The stuck clay will adhere to the larger chunk.[13]


Making The Base of The Pot
-
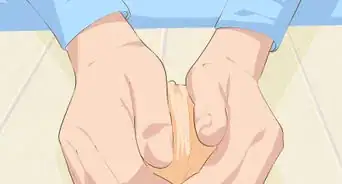
1Make your rough base. Hold your chunk of clay in both hands. Use your fingers to gently pinch and flatten the clay, rotating the clay in your hands as you pinch.[14]
- Rotating the clay will make all sides of the clay relatively even. This will be your rough base.
-
2Flatten the clay on your work surface. Place your piece of clay on your work surface. Use the heel of your hand to flatten your piece of clay even more. The base should be about ¼ inch in thickness, and at least 3 inches in diameter.[15] [16] For a rough measurement, ¼ inch is about as thick as your pinky. Once you have flattened out your piece of clay, consider using a small roller to smooth out the base’s surface.
- You can also flatten out and stretch the clay by throwing it onto your work surface.[17] Simply pick up your piece of clay, hold it in one hand, then turn your hand over and throw the clay onto your work surface.
- The clay should resemble a pancake. Do this as many times as you need to get the clay to its appropriate thickness.
-
3Shape your base. At this point, the edges of your base will be uneven. Try to make your base as even as possible. This could mean making the base a perfect circle, or making the base into an even oval.[18]
- With either shape you choose to start with, use a needle tool to slice off irregular edges of the base.
- If you want to make your base into a perfect circle, consider placing a glass or cup onto your base and tracing around the edge. This is an easy way to make a perfect circular base.[19]
-
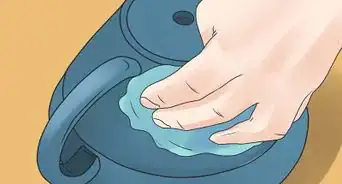
4Refine the base. Once you have your base traced out, consider smoothing out its edges. If you have a soft sponge, dip it in your water and wring out excess water. Then, gently drag the sponge around the outer edges of the base to smooth out any nicks and burrs created while tracing the base shape.[20]
- This same smoothing technique can be done using your finger dipped in water.
- You don’t want to add too much water to the base with your finger, you just want to smooth out any rough edges.


Making The Coils
-
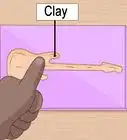
1Form a fat cylinder. Rip off another piece of clay from your clay bag and use your hands and fingers to pinch and squeeze it into a cylindrical shape.[21] This shape doesn’t have to be perfect; it just has to be in a rough cylinder so you can start rolling it out on your work surface. One fat cylinder will make many coils.
- Once you have your rough cylinder, softly twist the ends of the cylinder in the opposite direction from one another, almost as if you’re wringing out a cloth.[22]
- This doesn’t have to be extreme twisting, just enough to give your cylinder a bit of a twisted appearance in the clay. This twist will help the clay roll out evenly and keep its circular shape.
-
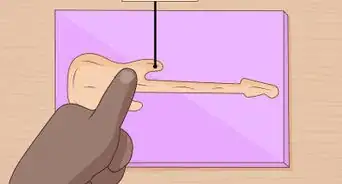
2Roll the cylinder with your hands. Place the rough cylinder on your work surface and position both of your hands in the middle of the cylinder. Roll the cylinder forward and backward underneath your hands, making sure the cylinder makes a complete 360° rotation.[23] As you roll the cylinder, spread your hands out to the ends of the cylinder. This will elongate the cylinder making it look more like a coil. When you get to the ends of the coil, bring your hands back to the center and continue rolling the coil and pulling your hands out to the edges.
- Eventually, the coil will get long enough that you can rip it in half and continue rolling to make more coils.[24] The bigger you’re planning on making your pot, the more coils you will need.
- Your coils should be about as thick as your pinky finger, but there can be some slight variation. If you roll your coils too thin, they will start to dry and crack.[25]
-
3Fix any irregularities. If you notice a flat spot forming in the coil, stop rolling and twist the ends of the coil opposite from each other and continue rolling.[26] Adding too much pressure to one section of the coil as you roll causes a flat spot.
- Make sure the coils are as even in thickness as possible.[27] If you see a thinner or thicker section of your coil, you are not adding equal pressure as your roll. Fix the thicker section of the coil by adding more pressure with your hands as you roll that area.
- Fix the thinner section of the coil by bringing your hands together as you roll rather than spreading your hands out. This will bring some clay back toward the thinned out area.[28]


Assembling The Coil Pot
-
1Score the edge of the base. Use your needle tool, kitchen fork, or serrated edge of your rib tool to gently scrape at the top edges of the base where your first coil will be laid.[29] Scratch at the base surface in both directions (crisscross appearance) to create a rough surface for the coil to grip and adhere to.
-
2Score the first coil. You will also need to slightly score the bottom of the coil that will be laid on top of the base.[30] Again, this creates a coarse surface so both the coil and base can adhere to each other.
-
3Slip the base. Once the base is scored you need to slip it. That means adding a little bit of water onto the scoring to act as glue.[31] You can use your damp sponge or your finger dipped in water to add slip onto the scored edge of the base.
-
4Lay down the first coil. Place the scored coil on top of the scored edge of the base. Once you have laid the coil all the way around the base, overlap the coil ends. Use your needle tool to slice through the overlapped ends of the coil diagonally.[32] Remove the excess ends, and use your fingers to connect and blend the two remaining ends of the coil together.[33]
- The two remaining ends of the coil should match up evenly because they were cut at a diagonal.
-
5Blend the inside of the coil and base. Use your finger to push down and blend the interior edge of the coil to the base of your pot.[34] As you push down on the clay from the inside of the coil, use your other hand to support the outside of the coil, as the pushing can slightly disturb the coil you have laid.[35]
- Once you have blended the entire coil, consider, using your finger to smooth out all the little ridges made by the blending.
-
6Add more coils. After your first coil is laid, continue the process of scoring and slipping as you add more coils.[36] Gently score the top of the first laid coil, and add a little bit of slip. Lay down your next coil, slicing the ends of the coil off diagonally, and connecting the remaining ends of the coil.
-
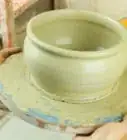
7Manipulate the shape of the pot. As you add coils, you can either widen or narrow the shape of the pot. If you want to widen the shape of the pot, lay down upcoming coil on the outer edge of the coil beneath it.[39] Eventually, the pot will slowly widen. In the same way, if you want to narrow the shape of the pot, lay down the upcoming coil on the inner edge of the coil beneath it. Keep adding coils to your pot until it reaches your desired height.
- If you are widening your pot, your coils will eventually need to be longer. If you are narrowing your pot, your coils will become shorter.[40]
- To make the widening or narrowing of the pot more gradual, the coils must be laid down on the outer or inner edge of the previous coil in small increments. The bigger the increments between each laid coil, the more abrupt and drastic the angle of the widening or narrowing will be.
-
8Finish the pot. Once you are finished building your pot, decorate the top coil or lip of the coil to complete your pot. You can stamp shapes into the coil, you can use your fingers to pinch a design into the coil, or you can leave it as is.[41] Finishing the pot is really all about your personal and artistic preference.
- When you are ready to dry your pot, read the instructions that came with the clay on how it must be dried.[42] Some clay can harden and dry by being left out and air-dried, but most clay needs to be fired in a kiln.


Community Q&A
-
QuestionI have no talcum powder. What else could I use instead?
 Community AnswerYou may be able to use cornstarch, or perhaps even baby powder if your are desperate.
 -
QuestionI don't have a kiln, so where would I fire it?Community AnswerYou must use a kiln in order to properly dry out and bake your project. Try to look around your town for local pottery studios, they may bake it for you for free or at a low cost.


References
- ↑ http://www.glassattic.com/polymer/tools_Dremels_worksurfaces.htm
- ↑ http://www.glassattic.com/polymer/tools_Dremels_worksurfaces.htm
- ↑ https://www.youtube.com/watch?v=SA-rGYh2UH0
- ↑ https://www.youtube.com/watch?v=YB6GFo0M92g
- ↑ http://www.glassattic.com/polymer/tools_Dremels_worksurfaces.htm
- ↑ https://www.youtube.com/watch?v=th8yLtFjZ58
- ↑ https://www.youtube.com/watch?v=th8yLtFjZ58
- ↑ https://www.youtube.com/watch?v=GNZhkHJ1ozE
- ↑ https://www.youtube.com/watch?v=GNZhkHJ1ozE
- ↑ https://www.youtube.com/watch?v=GNZhkHJ1ozE
- ↑ https://www.youtube.com/watch?v=GNZhkHJ1ozE
- ↑ https://www.youtube.com/watch?v=GNZhkHJ1ozE
- ↑ https://www.youtube.com/watch?v=GNZhkHJ1ozE
- ↑ https://www.youtube.com/watch?v=YB6GFo0M92g
- ↑ http://www.lakesidepottery.com/Pages/Pottery-tips/Making-a-clay-coiled-pot-Lakeside-Pottery-Tutorial.htm
- ↑ http://www.handsoncrafts.org/coilpot/howtocp.htm
- ↑ https://www.youtube.com/watch?v=YB6GFo0M92g
- ↑ https://www.youtube.com/watch?v=YB6GFo0M92g
- ↑ http://www.handsoncrafts.org/coilpot/howtocp.htm
- ↑ https://www.youtube.com/watch?v=YB6GFo0M92g
- ↑ https://www.youtube.com/watch?v=SA-rGYh2UH0
- ↑ https://www.youtube.com/watch?v=YB6GFo0M92g
- ↑ https://www.youtube.com/watch?v=SA-rGYh2UH0
- ↑ https://www.youtube.com/watch?v=YB6GFo0M92g
- ↑ http://www.handsoncrafts.org/coilpot/howtocp.htm
- ↑ https://www.youtube.com/watch?v=YB6GFo0M92g
- ↑ Natasha Dikareva, MFA. Ceramics & Sculpting Instructor. Expert Interview. 1 June 2021.
- ↑ https://www.youtube.com/watch?v=YB6GFo0M92g
- ↑ https://www.youtube.com/watch?v=th8yLtFjZ58
- ↑ https://www.youtube.com/watch?v=YB6GFo0M92g
- ↑ https://www.youtube.com/watch?v=th8yLtFjZ58
- ↑ https://www.youtube.com/watch?v=SA-rGYh2UH0
- ↑ https://www.youtube.com/watch?v=YB6GFo0M92g
- ↑ https://www.youtube.com/watch?v=YB6GFo0M92g
- ↑ https://www.youtube.com/watch?v=SA-rGYh2UH0
- ↑ https://www.youtube.com/watch?v=th8yLtFjZ58
- ↑ https://www.youtube.com/watch?v=YB6GFo0M92g
- ↑ Natasha Dikareva, MFA. Ceramics & Sculpting Instructor. Expert Interview. 1 June 2021.
- ↑ https://www.youtube.com/watch?v=YB6GFo0M92g
- ↑ http://www.lakesidepottery.com/Pages/Pottery-tips/Making-a-clay-coiled-pot-Lakeside-Pottery-Tutorial.htm
- ↑ http://www.handsoncrafts.org/coilpot/howtocp.htm
- ↑ http://www.handsoncrafts.org/coilpot/howtocp.htm
About This Article

To make a coil pot, start by flattening a chunk of clay and shaping it into a circle for the base. Next, form another chuck of clay into a thick cylinder, roll it so it’s about the thickness of your pinky, and rip it into coils. After that, use your needle tool to scrape the edge of the base and the bottom of the first coil to create rough surfaces that will stick to each other. Then, put a little water on the scored surfaces to act as glue, and lay the coil on the base. Make sure you blend the pieces together before continuing to add coils to get your desired height and width. For tips on how to prevent air bubbles in your clay by wedging it, scroll down!