Explore this Article
Co-authored by
wikiHow Staff
X
This article was co-authored by wikiHow Staff. Our trained team of editors and researchers validate articles for accuracy and comprehensiveness. wikiHow's Content Management Team carefully monitors the work from our editorial staff to ensure that each article is backed by trusted research and meets our high quality standards.
The wikiHow Tech Team also followed the article's instructions and verified that they work.
This article has been viewed 783,893 times.
Learn more...
This wikiHow teaches you how to make a color image look more like a sketch using Adobe Photoshop.
Steps
Part 1
Part 1 of 6:
Preparing the Image
-
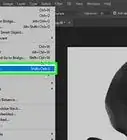
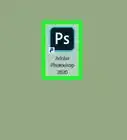
1Open an image in Photoshop. To do so, double-click on the blue app icon that contains the letters "Ps," click on File in the menu bar at the top of the screen, click on Open... and select the image.
- Original images with higher contrasts allow for a more realistic sketch effect.
-
2Click on Layers in the menu bar.Advertisement
-
3Click on Duplicate Layer… in the drop-down and click on OK.


Advertisement
Part 2
Part 2 of 6:
Adding Shadows
-
1Click on Background copy in the Layers window on the right side of the screen.
-
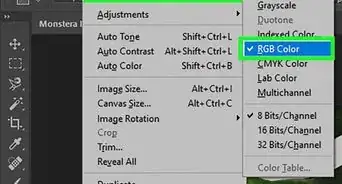
2Click on Image in the menu bar.
-
3Click on Adjustments in the drop-down.
-
4Click on Invert in the drop-down.
-
5Click on Filter in the menu bar.
-
6Click on Convert for Smart Filters in the drop-down and click on OK.
-
7Click on Filter in the menu bar.
-
8Click on Blur in the drop-down.
-
9Click on Gaussian Blur… in the drop-down.
-
10Type 30 in the "Radius:" field and click on OK.
-
11Click on the "Normal" drop-down in the Layers window.
-
12Click on Color Dodge.


Advertisement
Part 3
Part 3 of 6:
Changing to Black & White
-
1Click on the "Create new fill or adjustment layer" icon. It's a half-filled circle at the bottom of the Layers tab.
-
2Click on Black & White….
-
3Click on ⏩ in the upper-right corner of the dialog box to close it.
-
4Click on Select in the menu bar, then click on All.
-
5Click on Edit in the menu bar, then click on Copy Merged.
-
6Click on Edit in the menu bar, then click on Paste.


Advertisement
Part 4
Part 4 of 6:
Adding Heavy Lines
-
1Click on Filter in the menu bar, then click on Filter Gallery….
-
2Click on the "Stylize" folder.
-
3Click on Glowing Edges.
-
4Slide the "Edge Width" slider all the way to the left. It's on the right side of the window.
-
5Slide the "Edge Brightness" to the middle.
-
6Slide the "Smoothness" slider all the way to the right.
-
7Click on OK.
-
8Click on Image in the menu bar.
-
9Click on Adjustments in the drop-down.
-
10Click on Invert in the drop-down.
-
11Click on the "Normal" drop-down in the Layers window.
-
12Click on Multiply.
-
13Click in the "Opacity:" field in the upper-right of the Layers window.
-
14Set the opacity to 60%.


Advertisement
Part 5
Part 5 of 6:
Adding Detail Lines
-
1Click on Select in the menu bar, then click on All.
-
2Click on Edit in the menu bar, then click on Copy Merged.
-
3Click on Edit in the menu bar, then click on Paste.
-
4Click on Filter in the menu bar, then click on Filter Gallery….
- Do not select the "Filter Gallery" option at the very top of the "Filter" drop-down menu, this re-applies the most recenly used filter from the Filter Gallery.
-
5Click on the "Brush Strokes" folder.
-
6Click on Sumi-e.
-
7Adjust the brush strokes. Set "Stroke Width" to 3; "Stroke Pressure" to 2; and "Contrast" to 2.
-
8Click on OK.
-
9Click on the "Normal" drop-down in the Layers window.
-
10Click on Multiply.
-
11Click in the "Opacity:" field in the upper-right of the Layers window.
-
12Set the opacity to 50%.


Advertisement
Part 6
Part 6 of 6:
Adding Paper Texture
-
1Click on Layers in the menu bar.
-
2Click on New… in the drop-down then click on Layer….
-
3Click on the "Mode:" drop-down and click on Multiply.
-
4Click on OK.
-
5Press Ctrl+← Backspace (PC) or ⌘+Delete (Mac). This fills the layer with a white background color.
-
6Click on Filter in the menu bar, then click on Filter Gallery….
- Do not select the "Filter Gallery" option at the very top of the "Filter" drop-down menu, this re-applies the most recenly used filter from the Filter Gallery.
-
7Click on the "Texture" folder.
-
8Click on Texturizer.
-
9Click on Sandstone in the "Texture:" drop-down. It's on the right side of the window.
-
10Change the "Relief" setting to 12 and click on OK.
-
11Click in the "Opacity:" field in the upper-right of the Layers window.
-
12Set the opacity to 40%.
-
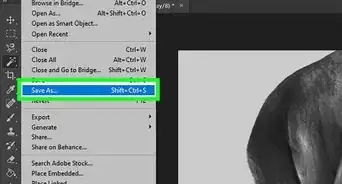
13Save your image. Do so by clicking on File in the menu bar and Save As…. Name your file and click on Save.


Advertisement
You Might Also Like
How to
Adjust Brightness in Photoshop
 Convert an Image into a Line Drawing: Easy Photoshop Tutorial
How to
Insert an Image in Photoshop
 How to Trace an Image in Photoshop on Windows or Mac
 4 Easy Ways to Insert a Bullet Point in Adobe Photoshop

How to
Add a Hyperlink to a Jpeg in Photoshop
How to
Install Plugins in Adobe Photoshop
 3 Ways to Simply Import Fonts to Photoshop
How to
Import an Image Into Photoshop

How to
Design an ID Card Using Adobe Photoshop
 Easily Unlock Any Layer in Photoshop: Even the Background Layer

How to
Add Text in Photoshop
 How to Rotate Objects in Photoshop: Using Image Rotation or Transform
How to
Make a Gradient in Photoshop
Advertisement
About This Article

Co-authored by:
wikiHow Staff
wikiHow Staff Writer
This article was co-authored by wikiHow Staff. Our trained team of editors and researchers validate articles for accuracy and comprehensiveness. wikiHow's Content Management Team carefully monitors the work from our editorial staff to ensure that each article is backed by trusted research and meets our high quality standards. This article has been viewed 783,893 times.
How helpful is this?
Co-authors: 52
Updated: September 15, 2021
Views: 783,893
Categories: Featured Articles | Adobe Photoshop | Photo Craft Projects
Advertisement