This article was co-authored by wikiHow staff writer, Amy Bobinger. Amy Bobinger has been a writer and editor at wikiHow since 2017. She especially enjoys writing articles that help people overcome interpersonal hurdles but frequently covers a variety of subjects, including health and wellness, spirituality, gardening, and more. Amy graduated with a B.A. in English Lit from Mississippi College in 2011 and now lives in her hometown with her husband and two young sons.
There are 7 references cited in this article, which can be found at the bottom of the page.
This article has been viewed 15,221 times.
Learn more...
Vampires are a popular dress-up option for kids and adults alike, and of course, no vampire costume is complete without a cape! Luckily, learning how to make a vampire cape yourself is easy, and you'll just need a few basic supplies, including your sewing machine, two pieces of fabric, a piece of cord for the tie, and fabric stabilizer, which is a stiff material you'll use to reinforce the collar.
Steps
Measuring the Fabric and Collar
-
1Use 1 1⁄2 yd (1.4 m) each of red and black fabric for an adult cape. Measure a square of black fabric that's 1 1⁄2 yd (1.4 m) squared—so 1 1⁄2 yd (1.4 m) long and 1 1⁄2 yd (1.4 m) wide. Then, repeat the same measurements for a piece of red fabric, which will be the lining of the cape.
- If you need to know how to make a cape for a child, start with 1 yd (0.91 m) each of the red and black fabrics, instead.
- If you'd like to make your cape larger or smaller, adjust the measurements as needed.
- Use a stiff but drapey material like cotton or wool for the outer black fabric, and add a sheen to the cape by choosing red satin for the lining.
-
2Measure the widest part of your neck to get your collar length. Use a fabric tape measure to take a measurement around the widest part of your neck. Hold the tape measure loosely, and round up to the nearest number—this will be the length of your collar.[1]
- For instance, if your neck measures 16 in (41 cm), you would cut your collar to be about 16 in × 4 in (41 cm × 10 cm).
Advertisement -
3Cut a collar shape out of fabric stabilizer. Once you have your collar measurements, trace the top and 2 sides of a rectangle fitting those dimensions. However, instead of a straight line across a bottom, make a concave curve so the collar will sit comfortably on your neck.[2]
- You can play around with the height of the collar if you like, but about 4 in (10 cm) is a good standard size.
- If you don't want to freehand the collar shape, you can download and print a free collar template online.[3]
-
4Stack your 2 pieces of fabric with the right sides together. Most fabric has a right side, meaning the side that is meant to be facing outward when the garment is finished. Place your black and red fabrics together with the edges lined up, so that the right sides of each fabric are facing in.[4]
- For instance, if the black fabric is on the bottom and the red is on top, the right side of the black material should be face-up, and the red should be face-down. When the cape is finished, the red will be on the inside of the cape, and the black will be on the outside.
-
5Pin the collar about 1⁄2 in (1.3 cm) from the top of the fabric. With the fabric laid flat in front of you, place the collar-shaped stabilizer horizontally across the top edge of the fabric, or the side furthest away from you. Leave a gap of about 1⁄2 in (1.3 cm) at the top of the material. This will be your seam allowance.[5]
- You should only need 2 or 3 pins to secure the collar.


Cutting and Sewing the Cape
-
1Cut along the sides of the collar and out to the edge of the cape. Leaving about 1⁄2 in (1.3 cm) on either side of the collar for the seam allowance, cut carefully down along the sides to the corners of the stabilizer. Then, turn the scissors and cut horizontally all the way to the edge of the material. This will leave you with the shape of your cape—one long rectangle, which is the body of the cape, with a smaller rectangle on top, for the collar.[6]
- Be sure to cut neatly through both layers of fabric.
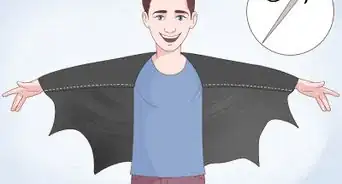
Tip: If you want your vampire cape to have more of a bat shape, try cutting large half-circles along the bottom of the cape to give it a scalloped appearance.[7]
-
2Place pins around the edges of the fabric. Once you've cut out the basic cape shape, pin your two pieces of fabric together. This will help prevent them from shifting around as you sew.[8]
- Pin the stabilizer collar in place, as well.
-
3Lay your cord along the bottom of the collar shape and tuck the edges. Take a piece of twisted trim cord that's about 2 yd (1.8 m) long and lay it alongside the bottom of the piece of stabilizer you cut out. Pin the cord in place, then tuck in the excess between the red and black layers of fabric.[9]
- The cord will go all the way around the collar, and you'll use the ends to tie the cape when you wear it. You can make the cord longer or shorter, as you prefer.
- You can find decorative trim cord wherever sewing supplies are sold—just choose a style that suits you! For instance, try using red, black, or gold cord for your vampire cape.
-
4Sew almost all the way around the edges of the cape. Using a straight stitch on your sewing machine, sew all the way around the sides of your cape and collar. However, leave about 6 in (15 cm) unattached at the bottom of the cape so you can still turn the cape right-side-out—you'll finish sewing this closed later.[10]
- Also, be careful not to sew over the loose, tucked-in cord in your collar.
-
5Turn your cape right-side-out and press it. Use the open piece at the bottom of the cape to turn the fabric so the right sides are facing outward. Then, use your iron to press the fabric neatly.[11]
- Pressing the fabric will get rid of any wrinkles, of course, but it will also help flatten your seams, so your finished project will look better.
-
6Topstitch all the way around the edges to finish your cape. Once you've turned the fabric right-side-out, go back around the outside seams with a topstitch. This will give you a neater finish and will close the 6 in (15 cm) you left at the bottom of the cape. In addition, it will also give the cape a little more stability.[12]
- Don't forget to test out the cape by giving it a good twirl! Adding a good spooky laugh won't hurt anything, either.
- Wear your cape with a tuxedo shirt, black pants, and dress shoes for a Dracula-worthy costume. To elevate the look even more, wear a shirt with a ruffled collar, and add a brooch to the collar of the cape!


Things You'll Need
- 1–1 1⁄2 yd (0.91–1.37 m) black fabric like cotton or wool
- 1–1 1⁄2 yd (0.91–1.37 m) red fabric like satin
- 2 yd (1.8 m) of decorative trimming cord
- Tape measure
- Fabric chalk
- Pen or pencil
- Scissors
- Fabric stabilizer
- Pins
- Sewing machine
- Thread
- Collar template (optional)
References
- ↑ https://youtu.be/KdSm-ebm7eE?t=16
- ↑ https://www.threadsmagazine.com/2008/11/03/making-sense-of-stabilizers
- ↑ https://youtu.be/WxF-fXc2zek?t=9
- ↑ https://shannon-brinkley.com/blogs/shannon-brinkley-studio-1/fast-easy-diy-vampire-cape?page=6
- ↑ https://shannon-brinkley.com/blogs/shannon-brinkley-studio-1/fast-easy-diy-vampire-cape
- ↑ https://shannon-brinkley.com/blogs/shannon-brinkley-studio-1/fast-easy-diy-vampire-cape
- ↑ https://www.theguardian.com/lifeandstyle/2009/oct/30/halloween-costumes-kids
- ↑ https://shannon-brinkley.com/blogs/shannon-brinkley-studio-1/fast-easy-diy-vampire-cape
- ↑ https://shannon-brinkley.com/blogs/shannon-brinkley-studio-1/fast-easy-diy-vampire-cape
About This Article