wikiHow is a “wiki,” similar to Wikipedia, which means that many of our articles are co-written by multiple authors. To create this article, 18 people, some anonymous, worked to edit and improve it over time.
This article has been viewed 139,759 times.
Learn more...
Looking for simple and easy projects to make hearts from paper? There are many different ways to make hearts out of paper and these can be used for decorations, gifts or ornaments. They are simple to make and great projects for kids as well. By following a few steps you will have a lovely heart made out of paper!
Steps
Making a Paper Heart Ornament
-
1Make this paper heart ornament for a quick and simple hanging heart decoration. These heart ornaments are beautiful and only take a few minutes to create, making them ideal for garlands. They consist of strips of paper bent into a heart shape.
- You will need: sturdy paper, scissors, stapler, paper hole puncher, and twine.
-
2Cut nine strips of paper. Use sturdy paper, like construction paper or patterned scrapbook paper. You will need nine strips in four different lengths, and each strip should be 2 inches (5 cm) wide.
- Three strips should be 10 inches (25 cm) long.
- Two strips should be 12.5 inches (32 cm) long.
- Two strips should be 15.75 inches (40 cm) long.
- Two strips should be 19.75 inches (50 cm) long.
Advertisement -
3Stack the strips on top of each other in the correct order. The strips need to be piled together in a specific order so that the proper pattern forms in your heart.
- Pile four of the strips on top of each other from smallest to largest until you have used one of each size. The largest should be on the bottom with the smallest on top.
- Flip the pile over so that the largest is on top. Place another of the smallest strips on top of the first 19.75 inch (50 cm) strip. This newest strip will stay at the center and will help you to hang your heart.
- Pile the remaining strips on top of the others from largest to smallest, until all the strips have been used. This means the largest will go on top of the smallest that you have just placed down with the rest on top. You will end up with the smallest on top once more.
-
4Staple the strips together. Make sure the bottoms of all the strips are evenly lined up with one another. Put a single staple through the bottom to hold the strips together.
-
5Bend the strips one by one down to the base of the stack of papers. Hold the stack together at the bottom, near your lowest staple, and bend the pieces of paper toward your fingers. Starting with the smallest strip on each side, bend each of the strips down to the staple at the base of the stack of papers.
- Bend each of the four strips on the right side starting with the smallest and ending with the longest. Bring them down to the right side of the staple at the base of the stack.
- Bend the corresponding four strips on the opposite side down and to the left.
- Leave the center strip straight and hold the stack together with thumb and forefinger at the base of the heart.
- Be careful not to crease the paper as you bend it.
-
6Staple the base of the heart together. This will keep all the strips in their bent position. Use as many staples as necessary to hold the bent strips of paper in place.
- You may also need to add staples further along the stem to help form and maintain the heart shape. These staples might be visible so it is your choice whether to add them to your heart or not.
-
7
-
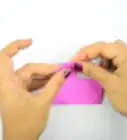
8Insert twine through the hole. Place a long string, ribbon, piece of yarn, or piece of twine through the hole and tie it into a loop. You can use this loop to hang your heart ornament.
-
9Hang your ornament. Now that your heart is complete you can hang it in a location of your choice. You can also make additional ornaments and connect them into a garland if you wish.


Creating a Paper Heart Chain
-
1Use the paper heart chain to create a line of hearts from a single piece of paper. The paper heart chain will create a line of identical hearts that are all connected together. This chain is quite easy and is a good project for kids.[1]
- You will need: paper, scissors, pencil/crayon/marker/pen, string, tape, things to decorate with.
-
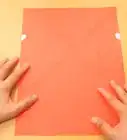
2Choose a piece of paper. You can use any size paper, but the most convenient size to use is a standard letter size or A4 sheet of paper, from which you can make two chains of hearts. Choose a color that appeals to you and your preferences.
- Fold and unfold the sheet of paper in half lengthwise. Cut along the crease to divide it into two even halves.
- Be very careful to give young kids only blunt, child safe scissors to use.
- You only need one half to complete the chain, but you can save the other half and use it to create a second chain, if desired.
-
3Fold the strip accordion-style. Starting from one short end of the paper, fold the strip back-and-forth, making each fold roughly 1.25 inches (3.175 cm) wide.
- Vary this width according to your preferences. For a standard letter size sheet of paper, this width will create a chain of about four hearts. Wider folds will create fewer hearts.
- Fold the paper over once.
- On the next fold, fold the two-layer thick edge of paper under the rest of the paper.
- Repeat this over-and-under folding pattern until the entire strip has been folded up.
-
4Draw half a heart on the top fold. The middle of the heart should face the folded side of the top segment. The curved outer edge should go over the side of the paper.
- In other words, the other edge will not be completely outlined. If you do complete the outline, the chain will fall apart once you cut it out. Do not cut this edge completely.
-
5Cut around the outline. Use sharp scissors to cut around the outline of the half-heart. Leave the paper tightly folded as you cut.
- Make sure that there are some folded edges on both sides of the half heart shape. If you trim away or try to round out the outer edge of the heart, you will end up disconnecting the heart chain.
- You can also cut out small section from the inside of the heart. These will create cutouts inside your hearts, similar to making a paper snowflake. Make sure that these cutouts do not alter the outside shape of the heart.
- Always be careful when using scissors. Do not injure yourself and give children only child-safe scissors to use.
-
6Unfold the chain. Carefully unfold the segments to reveal a chain of connected hearts.
-
7Trim off excess paper. There will usually be extra paper after the last heart. This will look like a partial or incomplete heart so it is best to simply remove this section.
-
8Decorate as desired. You can decorate the heart chain with paint, glitter, stickers, stamps, or just about anything else.
- If you have made cutouts in your heart you can glue tissue paper or cellophane onto the back to create a stained glass effect.
- For a longer chain, you can start out with a longer strip of paper or connect several smaller chains together with string or tape.


Making a Stuffed Paper Heart
-
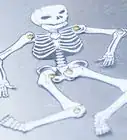
1Use this method to create a stuffed heart out of paper. The stuffed heart will be larger and heavier than the other paper hearts and is thus excellent for larger decorations or gifts. The edges are stitched together and the heart can be decorated as much as you like.[2]
-
2
-
3Trace the shape of half of a heart on one side of one paper with the center of the heart along the creased side of the paper. If you feel confident in your ability to free-hand draw the heart, you can do so without a pattern or template. Otherwise, find some sort of template that you can trace.
- You can use a heart-shaped cookie cutter or paper weight as a template, or you can print a heart template onto standard printer paper and cut it out to use as a template.
-
4Cut out your heart. Cut along the outline you traced and unfold the paper to reveal a symmetrical heart.
-
5Use the heart you have just cut to create another heart in the other paper. Fold the heart in half once more and use this shape to trace the same half of a heart outline on the other paper. Cut out the second heart as well. You should now have two hearts that look the same.
-
6Decorate the heart. If you plan to decorate the paper heart at all, you should do so before sewing and stuffing. You can decorate you heart with stamps, stickers, markers, colored pencils, crayons, paint, glitter, craft sequins or anything you can think of.
-
7Poke evenly spaced holes along the edge. Use a thick sewing needle to poke small holes in even intervals along the perimeter of the heart. If young children are completing this project then they should use a slightly blunted needle for safety.
- You could also use a paper piercer or the sharp pointed end of a compass instead of a sewing needle.
- Make sure that the two pieces of paper are stacked and pierced in the same places.
- Pierce near the edge but not so close that the edge of the paper may rip. About ½ inch or 1.25 cm would work well.
-
8Stitch the holes together for ¾ of the way around the heart. Thread a sewing needle and start stitching the two paper hearts together, weaving the thread in and out of the holes you pierced. Only sew up 3/4 of the holes so that you can still stuff the heart.
- Use thick thread or two to three pieces of thread wrapped together.
- Begin your stitches from the back, toward the bottom tip of the heart.
- Do not pull the thread taut through the first hole. Instead, leave about 3 inches (7.6 cm) of thread free and loose at the start of the heart.
- You can also stitch using the blanket stitch. Which will provide a nice edging for your heart as shown in the picture. The blanket stitch involves tying the thread to the first hole and then pushing the needle through both layers of the heart. Before tightening the thread, bring it up through the loop created around the edge. Tighten the thread and that is a blanket stitch.
-
9
-
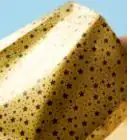
10Stitch the heart closed. Stitch the remaining holes closed. Tie the two ends together in the back of the paper heart. You should now have a lovely decorated stuffed heart to admire!


Weaving a Paper Heart Basket
-
1Use the woven paper heart for ornaments or as a small basket for treats. These are beautiful little hearts that double as small baskets. You can hang these from the tree and add small treats inside as gifts.[3]
-
2Obtain two pieces of paper. These should be two different colors to weave a nice pattern for your heart. Traditional colors are white and red although you can use any combination you prefer. Choose paper that is a medium weight.
- Too thick of paper will make it difficult to complete the weaving.
- Too thin of paper will not hold up as a basket.[4]
-
3Cut the paper to your preferred size. If you are using standard letter size or A4 paper then you can fold them in half “hamburger style” or width-wise. Then cut a straight line from the center of the folded edge to the center of the non-folded edge on both sheets. You will use one rectangle of each color.
- The size of the papers can be varied according to your preferences, because it will change the size of your finished heart.
- Keep the two pieces folded in half.
-
4Place one folded piece on top of the other at a 90-degree angle. The top piece will be vertical while the bottom is horizontal. Their left edges should meet evenly so that the sideways piece is sticking out to the right. Draw a thin line in pencil on the sideways piece along the edge of the vertical piece.
-
5Place the rectangles directly on top of each other so that the creases are on top of one another. Make sure the two pieces are facing the same way. You will want the piece with the pencil line on top so that you can see it.
-
6Draw thin lines in pencil from the bottom of the folded piece of paper up to the dotted line. Draw multiple straight lines along the paper up to the original line. This will divide the paper into strips partway along its length. Cut along these lines through both of the folded pieces of paper.
- Make sure your strips are at least ½ inch (1.25 cm) wide or else they may break easily. The size and number of your strips does not matter, it is all personal preference. Keep in mind, however, that the size and number of strips will change the difficulty of weaving. For kids, try to create only three strips to begin with.
-
7Cut a curved end around the top of the folded papers. While both folded papers are still on top of one another, cut the end without the strips in a curve. These curves will create the two upper curved parts of the heart. These edges should now look like half an oval.
-
8Turn one piece of paper to the side at a 90-degree angle once again. Turn one piece of paper so that it is horizontal while the other paper remains vertical. The rounded edge on the vertical piece should be towards the top while the rounded edge on the horizontal piece should be facing right.
- The two creased edges should form a 90-degree angle in the bottom left-hand corner.
-
9Weave the strips together. Weaving this heart is different than normal weaving because you will be weaving the strips “through” and “around” rather than “under” and “over.”
- Take the top strip on the horizontal paper and weave it through the first strip on the vertical paper. “Through” here means in between the two layers of that strip.
- Now take that same top strip and put it around the second strip on the vertical piece of paper. “Around” here means that the two layers will go above and below the second strip on the vertical piece of paper. Alternatively, you can rather think of it that the second strip on the vertical paper is going in between the two layers of the top strip on the horizontal paper.
- Continue taking the top strip of the horizontal piece of paper through and around the strips on the vertical folded paper. This top strip should now be woven through all the other strips.
- Take the first strip (on the right side) from the vertical piece of paper and continue weaving it through and around the remaining horizontal strips. Since the first vertical strip is already around the first horizontal strip, you will next take it through the second horizontal strip and continue until the end.
- Continue with all the strips weaving them through and around the others until all the rows and columns are woven.[5]
-
10Open your basket. Now that all the rows of strips are woven through the others, you should have a completed woven heart. Open up the basket by inserting a finger between the two layers of paper. You can fill this basket with whatever treats or other small items you choose.
-
11Add a handle or strap. Cut a long piece of matching paper to the length that you wish your handle to be. Use tape or staples to attach the handle to either side of the inside of the heart.[6]
- Alternatively, you can poke a hole in the top center of the heart and string a ribbon or twine through it. Tie a knot in the two ends of the ribbon and you will have a nice handle or string from which to hang the heart.
- If you poke holes you can also add small grommets to make the heart look more polished, although this is not necessary.
Printable Heart Template

Warnings
- Be careful to keep sharp objects away from young children. Make sure scissors and needles are blunt tipped so that they do not injure themselves. Alternatively, have an adult help with the cutting and poking steps.⧼thumbs_response⧽
Things You'll Need
Paper Heart Ornament
- Construction paper or patterned paper
- Stapler
- Paper hole punch
- Twine, yarn, or string
Paper Heart Chain
- Paper
- Pencil
- Scissors
- Embellishments
Stuffed Paper Heart
- Thick paper
- Heart template
- Pencil
- Embellishments
- Scissors
- Thick sewing needle
- Thread
- Stuffing
Woven Paper Heart
- Two pieces of differently colored paper (or felt)
- A pen or pencil
- Scissors
- Glue or a stapler

References
- ↑ http://www.firstpalette.com/Craft_themes/Special_Occassions/Valentines_Day/paperheartchain/paperheartchain.html
- ↑ http://www.thescrapshoppeblog.com/2012/01/stuffed-paper-hearts.html
- ↑ http://www.littleexplorers.com/crafts/Heartbasket.shtml
- ↑ http://thecraftysisters.com/2012/12/01/ornament-advent-woven-paper-heart-ornament/
- ↑ http://www.littleexplorers.com/crafts/Heartbasket.shtml
- ↑ http://www.craftideas.info/html/swedish_paper_hearts.html
About This Article
To make a heart chain out of paper, start by cutting a piece of paper in half lengthwise. Then, take one half of the paper and fold it accordion-style, starting at one of the shorter ends. Next, use a pencil to draw half of a heart on the top fold so that the middle of the heart is facing the folded edge. Finally, cut around the outline you drew and unfold your heart chain. To learn how to make a stuffed paper heart, scroll down!