This article was co-authored by wikiHow Staff. Our trained team of editors and researchers validate articles for accuracy and comprehensiveness. wikiHow's Content Management Team carefully monitors the work from our editorial staff to ensure that each article is backed by trusted research and meets our high quality standards.
The wikiHow Video Team also followed the article's instructions and verified that they work.
This article has been viewed 106,590 times.
Learn more...
Sewing a hoodie may seem like a daunting project, but it is easier than you might think. You will need some special materials and tools to make the hoodie, such as an old sweatshirt to use as a guide, some fabric, and a sewing machine. You will also need some basic sewing skills. You can use any kind of fabric you like to make your hoodie and you can customise your hoodie to suit your style and needs.
Steps
Cutting Out Your Fabric Pieces
-
1Choose your fabric. Not all types of material will work for making a hoodie, so it is important to choose your fabric carefully. You can go with a heavy or lightweight fabric depending on how warm you want the hoodie to be.
- For example, you could go with fleece or a thick stretch cotton (sweatshirt material) for a warmer option. Or, you could go with a jersey or t-shirt material for a lightweight hoodie.
- Make sure to buy more material than you think you will need. Two yards will likely suffice for an adult sized hoodie.
-
2Use an old hooded sweatshirt to cut the body pieces. You do not need a pattern to make a hoodie. You can simply use an old hooded sweatshirt as a guide. Lay out your hooded sweatshirt on top of your doubled up fabric. Then, fold in the arms and hood so that you just have the body of the sweatshirt to outline. Trace around the body piece of the hoodie about 1” (2.5 cm) from the edges to provide a seam allowance.
- Choose an old hooded sweatshirt that is similar to the one you want to create. This will help to ensure that you get the right measurements.
- If you find it difficult to work around the hood and arms, then you can also use a t-shirt as a guide.[1] However, you will still need the sweatshirt to use as a guide for the other parts of the hoodie.
Advertisement -
3Trace the arms of your sweatshirt to get the arm pieces. Unfold one of the arms of your sweatshirt. Then, line up the top part of your sleeve with the folded edge of the fabric and the armpit area of the sleeve with the other edge of your fabric. Use your chalk to trace about 1” (2.5 cm) from the bottom of the sleeve and the wrist area to provide adequate seam allowance. Then, cut along the chalk lines.[2]
- Make sure that you do not cut along the folded edge. Leave this intact.
- Repeat this process again to create the other sleeve piece.
-
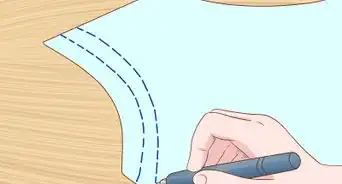
4Follow the outline of the hood to get the hood pieces. Next, fold your fabric again so that you have four layers. Then, arrange the hood so that the edges of the hood are aligned and the hood is on its side. Lay the hood part of your sweatshirt on top of your stack of fabric, but do not worry about lining it up with the fold. Trace the shape of the hood onto the top layer of fabric with chalk, and then cut through all four layers following the chalk line.[3]
-
5Cut two strips for the wristbands. Make sure that the fabric is folded in two layers. To create the wristband pieces, unfurl one of your sleeve pieces and then line up the edge with your folded fabric. Then, trace along the outer edges of the end (wrist area) of the sleeve. Extend the lines from the end of the sleeve so that the strip will be about 4 inches (10 cm) wide. Then, cut along the edges to create the two wrist pieces.[4]
- Wristbands are optional. If you prefer to leave them off, then you can skip this step and just hem the ends of your sleeves instead.
-
6Make a long strip for the bottom band of the sweatshirt. Keep the fabric folded in two layers. Then, cut out a 4” (10cm) wide strip of fabric that is the same length as the total length of the bottom of your body pieces combined. To find this amount, measure the bottom of one of your body pieces and then double it.[5]
- For example, if the bottom of one of your pieces is 20” (51 cm), then you will need to cut out a strip that is 40” (102 cm) long.
- The bottom band is optional. If you would like to leave it off, then you can just skip this step and then just hem the bottom of your sweatshirt piece.
-
7Create the pocket piece. The pocket piece looks like a rectangle with curves at the two top corners. You can use the pocket on an existing sweatshirt to help you get the shape, or just create the shape freehand. You can make the pocket as large or as small as you like.[6]
- The pocket is optional as well. If you don't want a pocket, then skip this step.


Sewing Your Hoodie Pieces
-
1Pin the wrong sides of your body pieces together. Line up the edges of your body piece so that the right sides are facing each other and place pins along the sides and top of the shoulders. Leave the armpit, neck, and bottom areas open. Then, sew along the pinned areas about ½” (1.3 cm) from the edges. Remove the pins as you go.[7]
-
2Sew along the bottom edges of the sleeves. Next, take one of your sleeve pieces and then line up the long edge so that the right sides are facing each other. Pin along the edge, but leave the armpit area and the wrist area open. Then, sew along the pinned edge about ½” (1.3 cm) from the raw edge of the fabric.
- Repeat the same process for the other sleeve.
- Make sure to remove the pins as you go.
-
3Pin and sew the hood lining and outer hood pieces. Take two pieces of your hood fabric and pin the curved edges together. Leave the front and bottom edges of the hood open. Make sure that the right sides of the fabric are lined up. Then, repeat the same process with the other two pieces and sew about ½” (1.3 cm) from the raw edges of the fabric.[8]
-
4Attach the hood pieces. Next, turn one of the pieces right side out and slide the piece into the other piece. Line up the outer edges of the hood pieces (the parts that will go around your face) and pin them together. Do not worry about pinning along the bottom edges of the hood pieces. Then, sew about ½” (1.3 cm) from the raw edges of the fabric where you have placed the pins.[9]
- Remove the pins as you go.
- After you have sewn the edges of the hood pieces together, turn the final piece so that the right sides of the fabric are exposed. The seams should be hidden.
-
5Sew the short ends of the wrist and bottom band pieces. Next you will need to sew together the short edges of the wrist and bottom band pieces. Line up the short edges of each of the pieces so that the right sides are facing each other. Then, sew these pieces about ½” (1.3 cm) from the edges.[10]
- After you finish sewing the short edges of the wrist and bottom band pieces, you can flip these right side out.
- Remember that you can skip this if you do not want to have wrist pieces and/or a bottom band.
-
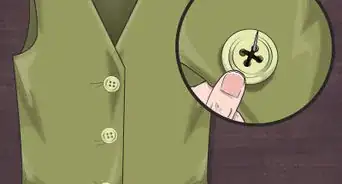
6Hem the pocket. Hemming the straight edges of the pocket should be easy, but you may want to cut a notch in the center of the curved edges to make it a bit easier to hem these. Fold over about ½” (1.3 cm) of the fabric around the edges of the pocket piece. The wrong sides should be lined up with each other and the raw edge should be hidden. Use pins to hold the edges in place. Then, sew along the edges and remove the pins as you go.[11]
- If you have decided to leave out the pocket, then you can skip this step.
Assembling Your Hoodie
-
1Pin and sew your arm pieces to the body piece. Line up the edges of the sleeves with the armholes on your body piece so that the right sides of both pieces are facing each other. Pin the pieces in place and then sew along the edges about ½” (1.3 cm) from the edges.[12]
- Remove the pins as you go.
- Sewing around the arm openings may be a little tricky. Start at the top shoulder and then sew down towards the bottom of the armhole. Then, restart at the shoulder on the opposite side of the armhole and work down again to sew the other side.
-
2Attach the hood piece to the body piece. Next, you will need to connect the hood piece to the body piece. To connect these pieces, line up the bottom edge of the hood with the neckline so that the raw edges of both pieces are lined up and the right sides are lined up. Pin the pieces together and then sew along the edges about ½” (1.3 cm) from the raw edges.[13]
- Make sure that the hood piece goes all the way around the neckline. You may need to gather the piece slightly to do this. To ensure that the hood is even, pin the edges so that the front parts of the hood are centered in the front of the body piece.
-
3Pin and sew the pocket onto the front of the body piece. To connect the pocket, pin it onto the front of the body piece so that the pocket is centered. Make sure that the body piece is turned right side out and the right side of the pocket is facing out as well. Pin along the flat edges of the pocket and leave the curved edges unpinned. Then, attach the pocket to the front of the body piece by sewing along the pinned edges.[14]
- Make sure that you only sew the pocket to the top layer of fabric.
- You can skip this if you do not wish to have a pocket.
-
4Line up the raw edges of the wrist pieces with the ends of the sleeves. To attach the wrist pieces to the ends of the sleeves, fold the wrist pieces in half width-wise so that the wrong sides are facing each other and the raw edges are lined up. Then, pin along the raw edges of the wrist pieces to the raw edges of the sleeves and sew about ½” (1.3 cm) from the edges.[15]
- Remove the pins as you sew.
- You can skip this and just hem the sleeves if you do not wish to have wristbands. To hem the sleeves, fold about ½” (1.3 cm) of the fabric over so that the raw edges will be hidden. Then, sew the edges to secure them.
-
5Attach the bottom band with the bottom of the sweatshirt. Fold the bottom band width-wise so that the wrong sides are facing each other and the raw edges are lined up. Then, pin the bottom band to the bottom of the body piece so that the raw edges are lined up. Sew about ½” (1.3 cm) from the edges.[16]
- You can skip this and just hem the bottom of the body piece if you do not want a bottom band.

Adding a Zipper
-
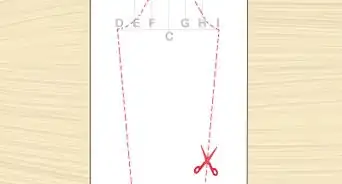
1Cut down the center of the hoodie. Adding a zipper is optional, but you can add one if you like. Get a zipper that is long enough to cover the entire body of your sweatshirt. For example, if your body piece is 30” (76 cm) long, then get a zipper that is 30” (76 cm) long. To make a space for the zipper, cut from the center of the neckline to the bottom of the body piece. Make sure to cut a straight, even line.
- Zippers come in many different lengths, so you should have no problem finding a zipper that is the right length for your sweatshirt. However, if you cannot find a zipper in the exact size, then get one that is the closest in length to the sweatshirt without being longer than the sweatshirt.
- If you added a pocket, you can cut all the way through it. You will be sewing the zipper to either side and creating two pockets in the process.
-
2Pin the zipper to the right sides of the fabric. Next, unzip the zipper and pin the zipper in place. Make sure that the fabric edges of the zipper are lined up with the raw edges of your body piece. Do this on both sides of the body piece opening.[17]
-
3Sew the zipper in place. Sew a straight stitch about ½” (1.3 cm) from the edges of the zipper and body piece. Remove the pins as you go.[18]
- When you finish attaching the zipper, your hoodie will be ready to wear. Try it on and see how it looks!

Community Q&A
-
QuestionHow do I make a hoodie with a zipper that zips up all the way to the hood?
 ZackTop AnswererFold the hood in half to find the center. Get a zipper long enough to reach from the waist of the hoodie to the center of the hood. Follow the rest of the instructions in the article for adding a zipper.
Things You'll Need
- Old hooded sweatshirt
- Chalk
- Fabric
- Scissors
- Pins
- Sewing machine
- Thread
- Zipper (optional)


References
- ↑ http://www.craftstylish.com/item/30695/how-to-make-a-mens-fleece-hoodie/page/all
- ↑ https://www.youtube.com/watch?v=KVlJ4g7fA0E
- ↑ https://www.youtube.com/watch?v=KVlJ4g7fA0E
- ↑ https://www.youtube.com/watch?v=KVlJ4g7fA0E
- ↑ https://www.youtube.com/watch?v=KVlJ4g7fA0E
- ↑ http://www.craftstylish.com/item/30695/how-to-make-a-mens-fleece-hoodie/page/all
- ↑ https://www.youtube.com/watch?v=KVlJ4g7fA0E
- ↑ https://www.youtube.com/watch?v=KVlJ4g7fA0E
- ↑ https://www.youtube.com/watch?v=KVlJ4g7fA0E
- ↑ https://www.youtube.com/watch?v=KVlJ4g7fA0E
- ↑ https://www.youtube.com/watch?v=KVlJ4g7fA0E
- ↑ https://www.youtube.com/watch?v=KVlJ4g7fA0E
- ↑ https://www.youtube.com/watch?v=KVlJ4g7fA0E
- ↑ https://www.youtube.com/watch?v=KVlJ4g7fA0E
- ↑ https://www.youtube.com/watch?v=KVlJ4g7fA0E
- ↑ https://www.youtube.com/watch?v=KVlJ4g7fA0E
- ↑ https://www.craftsy.com/blog/2017/05/how-to-sew-a-hoodie/
- ↑ https://www.craftsy.com/blog/2017/05/how-to-sew-a-hoodie/
About This Article

To make a hoodie, start by cutting out the body, arms, and hood from a fabric, like fleece or cotton, using an old sweatshirt as a guide. Next, pin the 2 body pieces so the right sides are facing each other, and sew them together 1/2 inch away from the edges to allow for the seam. Then, sew the arm and hood pieces together, and sew them onto the body. Finish by hemming the sleeves and the bottom of the body piece, and flipping the hoodie right side out. For tips on how to attach a zipper to your hoodie, read on!