This article was co-authored by wikiHow Staff. Our trained team of editors and researchers validate articles for accuracy and comprehensiveness. wikiHow's Content Management Team carefully monitors the work from our editorial staff to ensure that each article is backed by trusted research and meets our high quality standards.
This article has been viewed 59,220 times.
Learn more...
Masks are a fun and simple craft for kids, although adult supervision is best for the parts that involve cutting. You can make a monkey mask by printing out a template, which you can color, cut eye holes out of, and attach a string to hold the mask on. You can also use a paper plate to make a monkey mask from scratch. Be sure to include ears, a mouth, and large holes for your eyes.
Steps
Making a Mask From a Template
-
1Find a template. Using a premade template will be a little faster than constructing the mask from scratch. Various sites offer mask templates. With this option, all you have to do is color it in and cut it out.[1]
- This will also make it easier to get various kinds of monkey masks such as a simple ape or a lemur.
- Search for monkey mask templates and pick whichever option you like best.
- Check out a good option at http://www.firstpalette.com/tool_box/printables/monkeymask.html.
- You could also use the one at http://www.woojr.com/printable-animal-masks-monkey-mask/.
-
2Print the template onto sturdy cardstock. You can use regular paper if that is all you have, but making the mask with cardstock is sturdier so the mask will last longer. White cardstock is probably your best option, but if you are in a pinch for time you could use tan or brown so you do not have to color it.Advertisement
-
3Print the template using black ink. You may also find a mask template that is already colored in, and if you do not mind using colored ink to print, you can save time that way too. Check out the dimension that the mask will print to make sure that it is big enough to fit your head. Making it fill most of a standard 8 ½ x 11 piece of paper should do.
-
4Color the template with brown and tan. If you want the monkey to be festive or exotic, you can use other colors. This is the part where you can be creative to get the look you find most interesting. Using markers is the quickest way to get a good color.
- If you want an even nicer look, you could use craft paint. The majority of the face should be brown, while some areas around the ears, mouth, and nose might be colored tan.
- If you find a template that has the mouth open at all, you can color it with red.
-
5Cut around the outline of the mask. Make sure you use sharp scissors and take your time during this step. Carefully cut just inside the printed outline so that none of the outline is left on the mask. Cut slowly so that you finish with a smooth outline, not a wavy or crooked one.[2]
-
6Use a razor knife to cut out the eye holes. A razor knife can cut circles around the eye holes much more easily than scissors. Set the mask down on a cutting board or a piece of cardboard and carefully cut out the eye holes.[3]
- Always be sure to use a sharp, clean blade so you can get a smooth cut. Sharp blades are safer than dull blades.
- Depending on the template, you most likely have some freedom in regards to how much of the eye you want to cut out. You can cut small pupil holes and leave the rest of the eye colored in, or you can cut the entire circle of the eye out so you'll see most of the eyes of whoever wears the mask.
-
7Put a piece of clear tape under each ear on the back of the mask. You will be cutting holes which you will feed some string through to hold the mask. The purpose of this tape is to strengthen the paper so that the holes do not rip out when the string pulls on the mask.
-
8Attach a string or rubber bands to hold the mask. With the razor knife, cut a small hole through the tape and paper just under each ear. Feed a piece of yarn, elastic string, or rubber band through each hole.[4]
- You can either make a small knot which will keep the string from slipping out of the hole, or you can loop the string around the outer edge of the mask tying it in a knot.
- You can attach a separate string to each hole, which would tie in the back of the head, or you can tie one string connecting both holes. Make sure the string is long enough to fit around the wearer's head.
- If you use rubber bands, you will loop them around your ears when you wear the mask.
-
9Skip the string and use a popsicle stick. Another option is to skip the strap altogether and simply glue a popsicle stick to the bottom of the mask, which allows you to hold the mask up to your face without it being stuck there.


Making a Paper Plate Mask
-
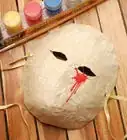
1Color the whole plate brown. You will probably want the eating side of the plate to be the face, but it is up to you exactly how you want the mask to look. If you want to use more than one shade of brown you can add depth to the face.[5]
- You can use craft paint if you have some handy or you want to buy some. You can also use a brown marker. Crayon or colored pencil will work but will not give you a full color.
- If you paint it, let it dry as directed by the paint bottle. You'll probably need at least 20 minutes.
-
2Draw a heart shape on the flat part of the plate. Make a straight line from edge to edge on the plate. Start about one inch down the line and draw the left curve of the heart up to the edge of plate and extending down to one inch from the bottom of the center line. Repeat for the right side of the heart.
-
3Cut the heart shape from the middle of the plate. It is not important for the bottom of the heart to be perfect, as it will be covered up. Just make sure the top has two nice curves. These will form the top of the opening for the eyes. It may work best to use a razor knife with the plate sitting on a cutting board or a piece of cardboard.
- Do not throw this piece away because you will be using it again soon.
-
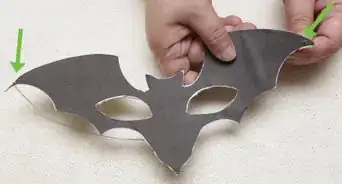
4Cut half circles from the heart shape for ears. You can use scissors this time since you are not cutting out of the middle. You can cut perfect half-circles, or you can make them more oblong and ear-shaped.
- Since monkeys often have large ears, it is okay to exaggerate the size of the ears a little bit. The size of the ears is up to you.
- It may be easiest to simply cut the rounded tops off of the heart and use these pieces as the ears of the mask.
-
5Cut smaller half circles from a piece of tan or cream paper. These half circles will be the inner part of the ear that is lighter than the rest. You can cut them in the exact same shape as the ear pieces you just cut, or you can shape them more like an inner ear with curves.
- If you do not have tan or cream paper, you could cut the inner ear from the heart shape and color the unpainted part tan.
- You could also cut from white paper and color the shapes tan.
-
6Glue the ear pieces together and then glue to the face. Using a glue stick is best because it dries faster and makes less of a mess. Line the small half-circles up on the big half-circles and glue in place. Then glue the whole ear to the back of the mask in the proper place, with the brown part matching the brown of the face.
-
7Make an oval out of the tan paper. Using the tan paper from before, cut out an oval shape, which will be the mouth and the nose of the mask. You can draw the shape first, or you can simply cut an oval shape out of the paper.[6]
- If you do not have tan paper to use, white paper will work, but you will need to color it tan so it looks right.
- Make the oval large enough that when you attach it to the paper plate, the heart shape you previously cut will be completely covered except for where the eyes are.
- On the other hand, you want to make sure that the oval is does not take up more than half of heart shape from top to bottom. If the area where you cut the heart shape from is seven inches or so, your oval should probably be about three inches tall, and four inches wide.
-
8Draw a mouth and a nose on the oval. The long side of the oval should be horizontal. The mouth can look however you want it to. It could be a fairly straight line across the oval, or could be a smile, or you could even draw it so it looks like the mouth is open.
- The nose can just be two nostrils or two curves with nostrils under them.
- You do not have to scrutinize this part too closely, as people will be able to tell it is a mouth and nose.
-
9Attach the mouth and nose to the face. Using a glue stick, glue the tan paper toward the bottom of the heart that you cut out of the plate previously. Do not put the mouth too far down, but make sure it covers the bottom of the shape you cut out.
- A little glue on each end of the oval should hold it in place.
-
10Attach a popsicle stick to the bottom. This will allow the wearer of the mask to hold the mask in place rather than having it sit right against their face.[7]
- You can also cut holes just under the ears and tie a string through them to hold the mask in place.
-
11Finished.


Things You will Need
- Cardstock
- Brown or tan paint (or markers)
- Scissors
- Razor knife (utility knife)
- Cutting board or cardboard
- Clear tape
- String, rubber bands, elastic string
- Popsicle stick
- Paper plate
- Tan or cream paper
- Glue stick
References
- ↑ http://www.firstpalette.com/Craft_themes/Animals/animalmasks/animalmask.html
- ↑ http://safetytoolboxtopics.com/Small-Tools/utility-knife-safety.html
- ↑ http://safetytoolboxtopics.com/Small-Tools/utility-knife-safety.html
- ↑ http://www.woojr.com/printable-animal-masks-monkey-mask/
- ↑ https://www.activityvillage.co.uk/paper-plate-monkey-mask
- ↑ https://www.activityvillage.co.uk/paper-plate-monkey-mask
- ↑ http://www.dltk-teach.com/rhymes/monkeys/mask.htm
About This Article