This article was co-authored by wikiHow staff writer, Hannah Madden. Hannah Madden is a writer, editor, and artist currently living in Portland, Oregon. In 2018, she graduated from Portland State University with a B.S. in Environmental Studies. Hannah enjoys writing articles about conservation, sustainability, and eco-friendly products. When she isn’t writing, you can find Hannah working on hand embroidery projects and listening to music.
There are 14 references cited in this article, which can be found at the bottom of the page.
The wikiHow Video Team also followed the article's instructions and verified that they work.
This article has been viewed 80,595 times.
Learn more...
Making your own pom poms for your craft and DIY projects is a breeze! Classic pom pom DIYs are done with a piece of cardboard, but that method doesn’t work for everyone. If you’d like to make your pom poms a different way, you can create large ones with just your fingers or small ones with the prongs of a fork. In just a few minutes, you can make the personalized pom poms of your dreams!
Steps
Hand
-
1Hold up 4 fingers. You won’t need your thumb to make your pom pom, so just hold your hand out like you’re counting to 4. This will be the width of your pom pom, so you can expect one as big as your fingers are wide.[1]
- Your final pom pom will be about as big as the palm of your hand.
-
2Wrap one end of yarn around your fingers and secure it with your thumb. Grab your yarn end, but keep it attached to the ball of yarn for now. Wrap the yarn around all 4 of your fingers one time, then hold the end down with your thumb. You won’t need to do this the entire time—just until the pom pom can stay together on its own.[2]
- You can use heavy yarn, light yarn, or even wool yarn. It’s up to you!
- For a super cute pom pom, try using yarn that switches colors (also called variegated yarn).
Advertisement -
3Keep wrapping yarn around your fingers until you’re happy with the thickness. It’s time to get winding! Keep wrapping your yarn end around your hand until your pom pom looks big enough. For smaller pom poms, go around at least 50 times; for larger ones, about 100 times should do it.[3]
- The thickness of your pom pom is totally up to you, so keep winding until it feels right.
-
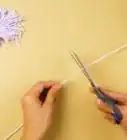
4Cut the end of the pom pom off the ball of yarn. When you’re satisfied with the size of your pom pom, go ahead and snip it off the ball of yarn. Make sure you’re using sharp scissors so you don’t have to struggle with this part, especially since you only have one free hand![4]
- If the angle is too difficult, ask a friend for help.
-
5Snip off a second piece of yarn that’s about 6 in (15 cm) long. Keeping the pom pom on your hand for now, cut off another piece of yarn separate from your pom pom. Again, since you only have one hand free, you might need to ask for some assistance.[5]
- If you think your pom pom will hold, you can delicately slide it off your hand and set it down as you cut out your second piece of yarn.
-
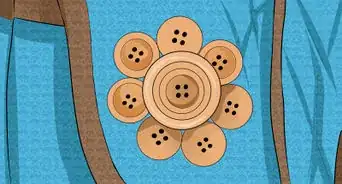
6Tie the second piece of yarn through the center of your pom pom. Thread one end of your shorter piece of yarn through the center of your pom pom (in between your fingers and the yarn). Bring the end out the other side, then tie the loose ends together in a tight double knot.[6]
- This is what will hold your pom pom together and give it its classic round shape.
-
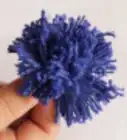
7Cut the sides of your pom pom to make it fluffy. Slide your pom pom off your hand and grab your scissors again. Insert the blade into the center of your pom pom, then cut both loops to make your yarn puff up. If all goes well, you should have a round-looking pom pom that holds together in the center.[7]
-
8Trim your pom pom until it looks perfect. If any of the center yarn is hanging off, trim that up a little bit. Then, you can go in with your scissors and snip your pom pom here and there until it’s perfectly round. Now you can use your pom pom in crafts and decorations![8]
- The finished look is totally up to you, so don’t stop snipping until you’re happy.


Fork
-
1Wrap one end of yarn around the prongs of a fork. Hold your fork in one hand so that the prongs face upwards, then start looping the end of your yarn around the bottom prongs. Keep your yarn attached to the ball for now so it’s easier to keep wrapping.[9]
- Fork pom poms are a little bit smaller; they usually end up being 1 in (2.5 cm) wide.
- Try to use a skinny, lightweight yarn for these pom poms so they’re light and delicate.
-
2Keep wrapping the yarn until your pom pom is big enough. You can wind your yarn around the prongs until you think your pom pom looks perfect. For a smaller pom pom, you might need to wind about 30 times; for a bigger one, 50 times should do the trick.[10]
-
3Snip the end of the yarn. When you feel like your pom pom is done, grab your scissors and cut the end of the yarn to free it from the ball (you don’t need to leave a tail). Keep your thumb on the tail end of the yarn so your pom pom doesn't unravel before you tie it off.[11]
- If it’s too awkward to cut your yarn and hold your fork at the same time, carefully set your fork down and use your scissors with both hands (or just get a friend to help).
-
4Cut another piece of yarn that’s about 4 in (10 cm) long. Using the same ball of yarn, cut a smaller piece that’s just a big wider than the center of your pom pom. It doesn’t have to be perfect, since you can trim it up later.[12]
-
5Thread the second piece through the middle of your pom pom. Grab one end of your short piece of yarn and insert in between the middle prongs of the fork. Bring it up through the center of your pom pom, then tie the 2 ends together in a tight double knot to tie your pom pom up.[13]
- The center of your pom pom should be pinched together just slightly.
-
6Slide the pom pom off the fork and snip the loops. Since your pom pom will hold together now, you can take it off the prongs of the fork. Use your scissors to cut the 2 loops on either side of the center to puff the yarn up and make that classic pom pom shape.[14]
- You can also trim off the tail end of the yarn that’s holding your pom pom together in the center.
-
7Trim your pom pom down to the size you’d like. If your pom pom doesn't look perfect yet, grab your scissors and start snipping. Trim the sides down until they’re all uniform and cut off any trailing ends that you don’t like. Now you can make more pom poms or use this one in your craft project![15]
- Fork pom poms are tiny, so they’re easy to make a lot of.


Community Q&A
-
QuestionHow do I increase the size of a pom-pom?
 Community AnswerYou can increase the size of a pom-pom by wrapping the yarn around a larger, even number of fingers. Using four fingers would increase the size of your pom-pom, however, it will take more yarn to produce it.
 -
QuestionWhy when I cut it loose, do the strings fall out?
 Community AnswerThis is most likely because the separate string you used before cutting (used to tie the loops) was not tied tightly. It’s a good idea to tie it as tightly as you can and make at least two or three knots.
Things You'll Need
Hand
- Yarn
- Sharp scissors
Fork
- Yarn
- Fork
- Sharp scissors
References
- ↑ https://www.youtube.com/watch?v=daJyhdIEJ1s&feature=youtu.be&t=15
- ↑ https://www.youtube.com/watch?v=daJyhdIEJ1s&feature=youtu.be&t=20
- ↑ https://www.youtube.com/watch?v=PWGpSRZ56z4&feature=youtu.be&t=11
- ↑ http://fashion.telegraph.co.uk/news-features/TMG11105179/How-to-make-a-pom-pom-with-Wool-and-The-Gang.html
- ↑ https://www.youtube.com/watch?v=daJyhdIEJ1s&feature=youtu.be&t=47
- ↑ http://fashion.telegraph.co.uk/news-features/TMG11105179/How-to-make-a-pom-pom-with-Wool-and-The-Gang.html
- ↑ https://www.youtube.com/watch?v=PWGpSRZ56z4&feature=youtu.be&t=30
- ↑ https://www.youtube.com/watch?v=daJyhdIEJ1s&feature=youtu.be&t=85
- ↑ https://www.youtube.com/watch?v=PWGpSRZ56z4&feature=youtu.be&t=161
- ↑ https://www.youtube.com/watch?v=aA8LRIllHD4&feature=youtu.be&t=30
- ↑ https://www.youtube.com/watch?v=PWGpSRZ56z4&feature=youtu.be&t=173
- ↑ https://www.youtube.com/watch?v=aA8LRIllHD4&feature=youtu.be&t=102
- ↑ https://www.youtube.com/watch?v=PWGpSRZ56z4&feature=youtu.be&t=175
- ↑ https://www.youtube.com/watch?v=aA8LRIllHD4&feature=youtu.be&t=152
- ↑ https://www.youtube.com/watch?v=PWGpSRZ56z4&feature=youtu.be&t=209
About This Article