X
wikiHow is a “wiki,” similar to Wikipedia, which means that many of our articles are co-written by multiple authors. To create this article, volunteer authors worked to edit and improve it over time.
This article has been viewed 19,154 times.
Learn more...
PicsArt is a free photo editing app available on the Apple App Store, Microsoft store, and Google Play store. Once you've downloaded it, you can start editing photographs and make a text design with ease.
Steps
Part 1
Part 1 of 4:
Getting Started
-
1Open PicsArt. Click on the purple/pink cross. It is going to show a pop up with four options. The four options are Edit, Collage, Draw and Camera. Click on "Edit".
- If it does not give you those four options, you may have to scroll down and pick a color background for the next step.
-
2Review the image options: "Free Images", "Camera" or "Background". You can pick any background. You are given the option to pick from a numerous amount of backgrounds. For example, you can pick a color background.Advertisement
-
3Add your text. After you have picked a background, you will see a menu with different options. The "Text" one will allow you to make a text design. When your text is typed out, you are given the option to left align, right align and center text.
-
4Adjust your text. You are able to change your font before and after you are done typing. You can also bold your font if desired. If you click "Apply" and you realize you do not like it, then you can select the text and change your font and or text again.
- When you are done you click on the check mark that is on the top right hand side. Your text will now be the middle of the screen.
-
5Adjust the spacing as desired. If your text is not selected yet, select it. You will now see a menu which includes options for "Font", "Color", "Stroke", "Opacity", "Blend", "Shadow" and "Spacing". Click on "Spacing". Slide the bar to your desired spacing; if in doubt, try 35. Your text is now spaced out.
- If you notice, you are given two options when you click on spacing. "Character Spacing" is the adjustment of the horizontal white space between the letters in a block of text. "Line Spacing" is the adjustment of the vertical space between lines of text.
-
6Use stroke. If you would like to add an outline around your text then you would use the tool named "Stroke". Select a color of your liking and adjust the bar to the size of outline you would like around your text.
- If in doubt, slide the bar to 50. Click "Apply" in the top right hand corner to save your work.


Advertisement
Part 2
Part 2 of 4:
Adding and Modifying Stickers
-
1Add stickers if desired. PicsArt has a lot of options if you would like to add stickers on your text. For example, if you type "Water" in the search bar then you will find a lot of water stickers. You have the option between the free stickers and the premium stickers (the crown on the bottom of a sticker means they are premium).
- If you would like to have a sticker inside your text, pick a sticker of your liking and place it over the text. Read the about the following tools for more information regarding this.
-
2Adjust your sticker with the opacity tool. If you want your sticker to be more transparent, you would use the opacity tool that is provided. Select the sticker and click on the opacity tool, and slide the bar to the amount of opacity desired.
- Select the opacity of your sticker. If in doubt, use 50.
-
3Use the blend tool. Select "Blend" and click on "Multiply" so it blends in with the text. The blending tool lets you use "Normal", "Multiply", "Color burn", "Darken", "Lighten", "Screen", "Overlay", "Soft light", "Hard light", "Difference".
- Normal: No special blending takes place, only opacity effects these.
- Darken: This applies to multiple and color burn as well.The result darkens the image. White is invisible on the Blend layer.
- Lighten: This applies to screen as well. The result lightens the image. Black is invisible on the Blend Layer.
- Contrast: This includes overlay, soft light and hard light. Increases Contrast by 50% and gray is invisible on the blend layer.
- Comparative: This involves difference. The difference between images is apparent.
-
4Change the effect by using the eraser. If you would like to make your sticker look like it is only inside your text, click on the "Eraser" which is on top, next to the cross. Erase around the text, so it looks like it is only inside the text. When you are done, click "Apply".


Advertisement
Part 3
Part 3 of 4:
Applying Tools
-
1Apply a mask. If you would like to add a mask, click on the "Mask" option that is on the menu. You can look around at the options given. PicsArt has categorized the masks by type/look.
-
2Apply brushes. PicsArt gives you the option to use brushes. This tool allows you to choose between a basic brush, dotted line brush, soft brush, design/shape brush.
- The "Basic Brush" is used mainly to doodle. If you want to draw something on your images, this would be the brush to use.
- The "Dotted Brush" is designed to draw a dotted line. If desired, you can use this brush on your images.
- The "Soft Brush" almost looks like a neon brush. It creates a white inner line with a dispersed effect of the edges.
- The 'Design/Shape Brush" is used to display shapes instead of just lines. PicsArt gives you the option to pick from 26 different designs, including neon stars, yellow roses, butterflies and galaxy.
-
3Apply frames. This tool is designed to create or add a frame to your images. Here are some of the options that are offered.
- Birthday frames: If desired, you are given the option to add a birthday frame to your images. Some of the frames say "Happy Birthday" and some have candles or a cake.
- Colorful frames: These frames are colorful with different shapes such as circle, square, triangle and rectangle.
- Love frames: They have some with quotes and color and some simple love frames that are just white with text.
-
4Apply a "Shape Mask". A shape mask is used to mask images with mathematical designs. Mathematical shapes are not the only shapes that are used. For example, there are fruits and animals.
- Resize the shape if needed: You can resize the shape you have picked to make it bigger or smaller. When you have picked a shape, you are given a little arrow and you drag it to increase or decrease the size of the shape. With this arrow you can increase or decrease width and height.
- Adjust the BG color of the shape: BG stands for background. This tool is to change the background color of the shape. The default color is white. If you decide you want to change the BG color, tap on the option of BG color and you will see a color dialogue box appear. You can now pick the color you desire.
- Customize the BG pattern of the shape: BG pattern is similar to BG color. It has the same task to change the background. BG pattern allows you to use patterns as a mask from the available patterns. You also get the option to use your own image from your gallery. They have about 20 different patterns.


Advertisement
Part 4
Part 4 of 4:
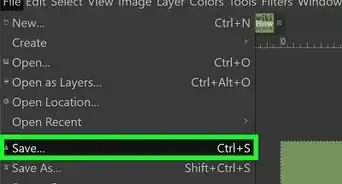
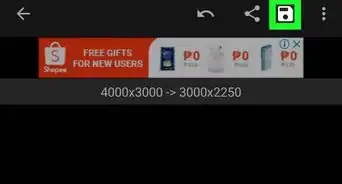
Saving


About This Article
Advertisement