This article was co-authored by wikiHow staff writer, Darlene Antonelli, MA. Darlene Antonelli is a Technology Writer and Editor for wikiHow. Darlene has experience teaching college courses, writing technology-related articles, and working hands-on in the technology field. She earned an MA in Writing from Rowan University in 2012 and wrote her thesis on online communities and the personalities curated in such communities.
This article has been viewed 41,284 times.
Learn more...
Since iTunes works for both Mac and Windows computers and is the most popular music manager and player, this wikiHow will show you how to move your music from your computer to your iPhone with iTunes. The easiest way to transfer your music between devices is by using iTunes on all your devices with a single Apple ID and syncing over Wi-Fi. If that doesn’t work for you, you can use iTunes to manually move your music between your computer and iPhone. If you want to share your library between multiple Apple IDs, you can look at this wikiHow article on how to set up home sharing in iTunes.
Steps
Moving Music Manually with iTunes
-
1Open iTunes on your computer. You’ll find this in your Start Menu or Applications folder. With this method, you can move music from your computer to iPhone without syncing, so you will not lose songs that are on your iPhone but not on your computer.
- If you don’t have iTunes on your computer, you can download it from https://www.apple.com/itunes/download/. Mac machines should have iTunes already installed.
-
2Connect your iPhone to your computer. You’ll want to use the USB cable that came with your phone. One end of the cable connects to your phone and the other end plugs into your computer.[1]Advertisement
-
3Click the cell-phone icon in the upper left of iTunes. iTunes will change to show you what’s on your phone.
-
4Click Summary. You’ll see this in the list under your iPhone’s name and icon.
-
5Click to check the box next to “Manually manage music and videos.” This will disable automatic syncing, so you can add or delete music from your iPhone.
-
6Click the back arrow above your iPhone’s name and icon. This will navigate you back to your music lists.
-
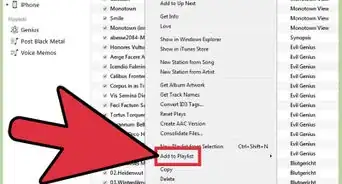
7Navigate to the song/artist you want to move to your iPhone. You can navigate through your iTunes based on Artist, Genre, Songs, and Albums.
- Music must be added to your iTunes library on your computer before you can transfer it to your iPhone.


Moving Music Automatically with iTunes
-
1Open iTunes on your computer. You’ll find this in your Start Menu or Applications folder. Using this method, your iPhone will sync with your computer, and you will lose songs that are located on your iPhone but not on your computer.
- If you don’t have iTunes on your computer, you can download it from https://www.apple.com/itunes/download/. Mac machines should have iTunes already installed.
-
2Connect your iPhone to your computer. You’ll want to use the USB cable that came with your phone. One end of the cable connects to your phone and the other end plugs into your computer.[2]
-
3Click the cell-phone icon in the upper left of iTunes. iTunes will change to show you what’s on your phone.
-
4Click Music. You’ll see this in the list under your iPhone’s name and icon.
-
5Click to select the box next to “Sync Music.” A box will pop up warning you that all the songs on your iPhone will be replaced with the songs in this iTunes library.
-
6Click Remove and Sync. All the music on your iPhone will be replaced with the music in your iTunes library.
- You can continue with the defaults that sync your entire library or you can select to sync only selected playlists, artists, albums, and genres. This will give you the ability to control what is transferred between your computer and iPhone.
-
7Click Sync or Apply. This may take a few minutes.


Syncing Over Wi-Fi
-
1Open iTunes on your computer and mobile device. Using this method, your iPhone will sync with your computer each time they are on the same Wi-Fi network, and you will lose songs that are located on your iPhone but not on your computer.
-
2Make sure your phone’s and computer’s iTunes accounts are the same. On an iPhone, open Settings, then tap on your name and photo. The email listed is your Apple ID.
- On your computer, go to the iTunes Store, and your Apple ID will be under the “Apple ID Account” header.
-
3Make sure your phone and computer are on the same Wi-Fi network. Your phone will only sync with your computer when it’s on the same Wi-Fi network.
-
4Connect your iPhone to your computer. You’ll want to use the USB cable that came with your phone. One end of the cable connects to your phone and the other end plugs into your computer.[3]
-
5Click the cell-phone icon in the upper left of iTunes. iTunes will change to show you what’s on your phone.
-
6Click Summary. You’ll see this in the list under your iPhone’s name and icon.
-
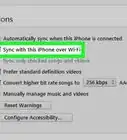
7Click to select “Sync with this iPhone over Wi-Fi”. Every time your phone and computer are on the same Wi-Fi network, the phone is plugged in, and your computer has iTunes open, they will sync.[4]
-
8Click Apply. Now your iPhone's iTunes music library will sync with your computer's iTunes music library every time they share a Wi-Fi network, your iPhone is plugged in to charge, and iTunes is open on your computer.


References
About This Article

1. Open iTunes and plug in your iPhone.
2. Click the cell phone icon.
3. Click Summary.
4. Click to check the box next to Manually manage music and videos.
5. Click the back button.
6. Drag and drop your music from your iTunes library to your iPhone icon.