This article was co-authored by wikiHow Staff. Our trained team of editors and researchers validate articles for accuracy and comprehensiveness. wikiHow's Content Management Team carefully monitors the work from our editorial staff to ensure that each article is backed by trusted research and meets our high quality standards.
There are 8 references cited in this article, which can be found at the bottom of the page.
This article has been viewed 29,952 times.
Learn more...
Painting is one of the best ways to transform glass ornaments into color, festive decorations. As long as you have acrylic craft paints and a place to dry your ornaments, painting them is quick and easy. When it comes to painting ornaments, your options are limitless: you can create beautiful monochromatic bulbs, swirled ornaments with multiple colors, or even glittery masterpieces. With the right technique and materials, you can give your glass ornaments a whole new look in time for special events!
Steps
Making Solid or Marbled Glass Ornaments
-
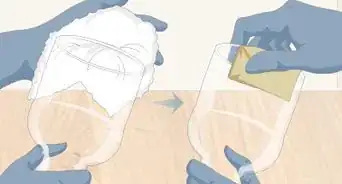
1Clean the interior with rubbing alcohol or vinegar. Remove the ornament's top and pour in a small amount of rubbing alcohol or vinegar. Swirl the liquid around until it coats the whole surface, then pour out any excess liquid into the sink.[1]
- Let the ornament air dry, which should take several hours, face down before painting the interior.
- Set the ornament top aside somewhere safe, as you'll put it back on after painting it.
-
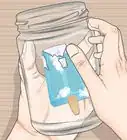
2Pour acrylic paint into the ornament's opening. Begin with a small, coin-sized amount to avoid squirting in too much excess. You can always add more for a brighter, more opaque color.
- Remove the ornament's top for this and the rest of the painting process.
Advertisement -
3Cover the opening with a paper towel and swirl the paint around. While pressing the paper towel over the opening, tilt the ornament back and forth to spread the paint around the surface. If you didn't add enough paint to spread around the ornament, squirt more into the opening as needed.[2]
-
4Squirt in additional colors, if desired. If you want to paint your ornament several colors, add another color after swirling around the first color for a few minutes. Spread the second and additional colors around using the same technique for an even, swirled pattern.[3]
- Limit yourself to 2-3 paints per ornament, as any more can create a muddled color.
-
5Shake the ornament to completely cover the interior. After you've coated about half of the interior, cover the opening tightly with the paper towel and shake the ornament back and forth. Check the painting progress between shakes, positioning the ornament in a way that the paint coats the entire surface.[4]
- Stop shaking after you've coated the surface completely if you've added 2 or more colors, as too much shaking can muddle the color.
-
6Set the ornament in a paper cup and let it dry for 24 hours. When you've finished painting the ornament, turn it upside down and put it in a paper cup to catch drips. Place the paper cup somewhere it can set undisturbed for 24 hours while it dries.[5]
- The ornament has to be upside down while it dries to get rid of excess paint. If it dries right-side up, excess paint can pool in the bottom and prevent it from drying.[6]
- After you've dried the ornament, reattach the top and hang it with the rest of your decorations.


Creating Mercury Glass Ornaments
-
1Spray the inside of the ornament with spray paint. Remove the ornament's cap and hold the nozzle over the ornament's inside opening. Spray the ornament's interior until the entire surface is coated in spray paint.[7]
- Although you can use any spray paint color, mirrored spray paint mimics mercury glass best.
-
2Swirl the spray paint around the interior. Holding the ornament in your hand, shake the ornament gently to spread any excess paint around the inside. This will prevent excess spray paint from pooling in the bottom and create a more even coat.[8]
-
3Mist the inside with a water-vinegar solution. Fill a spray bottle with 1 part vinegar and 2 parts water. Hold the spray bottle's nozzle over the ornament opening and mist the ornament's inside until the surface is covered with small water droplets.[9]
- You don't have to wait for the paint to dry before misting.
-
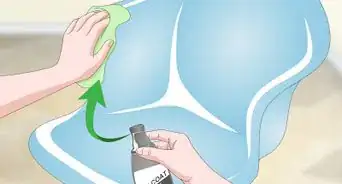
4Apply 2-3 more coats of spray paint and let the ornament dry. After misting the interior, spray 2-3 more coats of spray paint over the interior surface. Turn the ornament face down on a flat surface and leave it to dry for about 24 hours before using it as a decoration.[10]
- Let each additional coat dry for 30-60 minutes before applying another one.


Adding More Decorations
-
1Pour glitter inside for a sparkly look. Squirt a glitter adhesive inside the ornament opening and swirl it around the entire surface. Pour glitter in through the opening and, covering the hole with a paper towel, shake the ornament vigorously to spread the glitter.[11]
- Add the glitter before painting the ornament if you want it to stand out more.
-
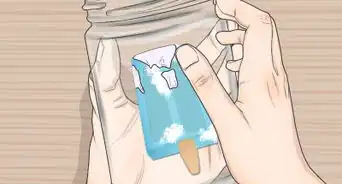
2Fill the ornament with pom poms, beads, or other decorations. Filling ornaments can be a great way to add a personal touch after painting. You can add traditional holiday decorations or small items that have personal meaning to you. As long as they fit through the opening, you can add them inside.
- Keep in mind that after you paint the glass, it may be translucent but won't be see-through. Choose items that you don't need to see clearly to appreciate as a decoration.
-
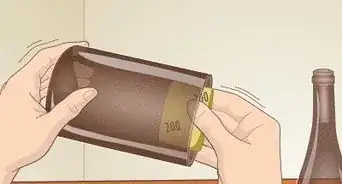
3Spray paint a stencil on the outside for more intricate patterns. Make a stencil and adhere it to the ornament's surface with painter's tape. Spray 2-3 coatings of paint over the surface, allowing the paint to dry for up to 60 minutes between coats.
- You can also use stencil letters to spell a message like "Christmas 20--" or "Wishing you a happy wedding!"
-
4Attach a ribbon to the top for easy hanging. After painting the glass ornament, loop a ribbon through the ornament's top. Tie the ribbon with a knot or bow to secure it tightly in place when you're ready to hang the ornament.[12]
- Choose a ribbon color that matches the ornament or your decorative theme.
-
5Tie yarn around the ornament for a rustic, handmade flair. Glue one end of the yarn to the ornament and wrap it around the surface in one direction. After wrapping one side of the ornament, switch sides and wrap another area until you cover the entire surface in yarn.
- Glue down the other end of the yarn after wrapping to hold it in place.
- Choose a color that matches or complements the color you painted the ornament. If you painted your ornament red, for example, wrap it in green string.


Community Q&A
-
QuestionHow do I attach the top without scratching the paint inside the ornament?
 T. ChinsenTop AnswererIt is not always possible to avoid scratching the interior paint. Coating the top and adding sealant at the top opening may minimize any scratches. As an option, put matching paint on the wire and carefully put it into the ornament while it is still wet.
Things You'll Need
Making Solid or Marbled Glass Ornaments
- Vinegar or rubbing alcohol
- Acrylic paints
- Paper towel
- Paper cup
Creating Mercury Glass Ornaments
- Spray pain
- Water
- Vinegar
- Spray bottle
Adding More Decorations
- Glitter
- Glitter adhesive
- Pom poms or beads
- Stencil
- Spray paint
- Ribbon
- Yarn
- Glue


References
- ↑ https://www.crafts-for-all-seasons.com/paint-swirled-ornament.html
- ↑ https://happyhooligans.ca/pour-painted-christmas-ornaments/
- ↑ https://happyhooligans.ca/pour-painted-christmas-ornaments/
- ↑ https://www.crafts-for-all-seasons.com/paint-swirled-ornament.html
- ↑ https://todayscreativelife.com/how-to-make-glitter-painted-glass-ornaments/
- ↑ https://sarahhearts.com/paint-filled-ornaments/
- ↑ https://h2obungalow.com/mercury-glass-christmas-tree-ornament/
- ↑ http://thefrugalhomemaker.com/2012/11/28/diy-mercury-glass-ornaments/
- ↑ http://www.allthingsgd.com/2014/11/faux-mercury-glass-ornaments-diy/
- ↑ https://h2obungalow.com/mercury-glass-christmas-tree-ornament/
- ↑ https://todayscreativelife.com/how-to-make-glitter-painted-glass-ornaments/
- ↑ https://happyhooligans.ca/pour-painted-christmas-ornaments/
- ↑ https://www.buzzfeed.com/swelldesigner/39-ways-to-decorate-a-glass-ornament-22zb?utm_term=.prybQkRJX#.eeWwLOm8N
- ↑ https://happyhooligans.ca/pour-painted-christmas-ornaments/
About This Article