This article was co-authored by wikiHow Staff. Our trained team of editors and researchers validate articles for accuracy and comprehensiveness. wikiHow's Content Management Team carefully monitors the work from our editorial staff to ensure that each article is backed by trusted research and meets our high quality standards.
There are 12 references cited in this article, which can be found at the bottom of the page.
This article has been viewed 41,109 times.
Learn more...
Sand dollars are a flat species of sea urchin that regularly wash up on shore and can be painted to create awesome trinkets. If you are getting fresh sand dollars from the beach, you’ll have to clean and prepare them before they are ready for paint. Once they are clean, you can use watercolor or acrylic paint to create your design. If you use your imagination and follow the right steps, you can create a piece of art on a sand dollar!
Steps
Cleaning and Hardening Sand Dollars
-
1Submerge the sand dollars in fresh water to clean them. Place the sand dollars in a container filled with fresh water. As the sand dollar sits, the water should start to get brown. When the water gets to be a murky brown, replace it with fresh water and submerge the sand dollars again. Keep swapping out the water and submerging the dollars in fresh water until it stops turning brown.
- Fully cleaning the sand dollars could take anywhere from 1-3 hours.
- Sand dollars can be found in shallow water, in the sand on a beach, or under seaweed.
-
2Soak the sand dollars in a bleach and water solution for 5-10 minutes. Pour 1 part bleach and 3 parts cold water into a bucket or container to create your solution. This process will whiten off-white or brownish sand dollars. Wear a pair of rubber gloves and carefully place the sand dollars into the solution to bleach them.[1]
- Do not soak the sand dollars in the bleach solution for too long or they can crumble.
Advertisement -
3Rinse off the sand dollars and let them dry. Run the sand dollars under cold water from your faucet to remove the bleach and water solution. Leave the sand dollars in a sunny place for 1-2 hours to dry them. Let the sand dollars completely dry before moving onto the next step.[2]
-
4Create a 1:1 mixture of water and PVA glue. Pour the PVA, or white glue, into a container and add an equal amount of water. Mix the solution together with a wooden stick or a brush until the glue and water are mixed thoroughly. Applying this solution will harden the sand dollar and make it easier to paint on.
- Elmer’s Glue-All is a popular type of PVA glue.
-
5Coat the sand dollars with the glue and water solution. Dip a paintbrush into the glue and water solution. Apply the solution liberally over the top surface and underside of the sand dollars with large, broad strokes.
-
6Lay the sand dollars on 2 chopsticks and let them dry. Lay 2 chopsticks or toothpicks on a table so that they are parallel to each other. Then, lay the sand dollar over the sticks so that the chopsticks or toothpicks prop the sand dollar off the surface of the table. This will serve as a makeshift stand and will prevent the solution from coming off the bottom of the sand dollar.


Applying the Paint
-
1Decide whether to use watercolor or acrylic paint. Watercolors will give your design a muted, cloudy image, while acrylic paint will produce richer, more vibrant colors. If you want a more precise design that’s easier to control, use acrylic paint. If you like more abstract and blended designs, use watercolors.[3]
- The way that these paints act on canvas or paper is similar to how they will react on your sand dollar. If you’ve painted with these mediums before, use your past experience to determine what kind of paint to use.
-
2Fill a cup up with water and sit it next to your workstation. You need water to clean off your brush when switching colors. You’ll also need to use water to mix and apply watercolor paint. When the water starts to get a murky brown or gray, empty the cup in your sink and refill it with fresh water.[4]
-
3Squeeze the paint onto a palette if you’re using tubed paint. If you’re using paint from a tube, you’ll need a wooden, paper, or plastic palette to mix your paints. Unscrew the cap from the paint and slowly squeeze the bottom of the tube over your palette. Squeeze 1-2 drops of paint for every color that you want to use.[5]
- You only need 1-2 drops of paint when starting off.
-
4Create a design on the sand dollar with a pencil. Softly drawing an outline will help give you an idea of what kind of design you want before you start painting. After you're done creating the outline, you can fill in your drawing with different colors.[6]
-
5Dip your brush in water. Make sure that the end of your brush is fully saturated. You’ll need a decent amount of water to activate watercolor paint and keep acrylic paint from drying out.[7]
-
6Dip your brush into the paint. Take the brush and swirl it around in the paint to transfer it onto your brush. Once your brush is loaded with paint, you can start applying it to the sand dollar.
-
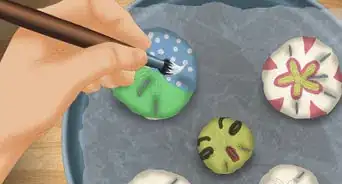
7Apply paint to the sand dollar with small strokes. Use small strokes at first to see how the paint reacts to the sand dollar. Follow along with the outline that you drew or follow the natural contours of the sand dollar. If you’re using watercolor, you’ll have less control over how the paint will react once it makes contact with the sand dollar.[8]
- Clean your brush in the cup of water before you switch colors or it could make your design look murky and brown.
- If you want to paint the top and bottom surface of the sand dollar, make sure you let it dry before flipping it over.
- If you're using acrylic paint, let the paint dry before applying a second coat so that the colors don't blend together.
-
8Let the sand dollar dry. Sit the sand dollar out for 3-4 hours and let it fully dry. Touch the surface of the sand dollar to make sure that the paint has dried before handling it or you may smudge the paint.


Enhancing Your Designs
-
1Blend colors together when using watercolors. Watercolors are meant to blend together for an abstract look. Play around with how the colors blend together and bleed into the sand dollar to create a design.[9]
- Take notice of the natural contours of the sand dollar and make strokes along natural lines and creases.
-
2Apply a second coat of paint for bold colors. Use your brush and go over sections of the sand dollar with the same color that you put down for your first coat. This will deepen colors and make them pop. You can do this with both watercolor and acrylic paint.[10]
-
3Decorate the painted sand dollar with a marker. Use a fine point felt-tip marker to create additional designs on the surface of the sand dollar once it has dried. You can write your name, a quote, or embellish your current design.[11]
-
4Use glitter acrylic paint to make your sand dollar pop. Glitter acrylic paint can make your sand dollars sparkle. If you want to add a glitter effect to your sand dollars, purchase this special paint online or at an arts & crafts store, then use it as you would regular acrylic paint.[12]
-
5Coat the sealer in a polymer acrylic varnish to make it shiny. Adding an acrylic varnish on top of the dried paint will seal in the colors and will give the sand dollar a shiny finish. Purchase a polymer varnish online or at an arts and crafts store and read the directions before using it. Then, apply a coat over the top surface and underside of the sand dollar. Let it dry overnight before handling it.[13]
- Some polymer varnishes need to be mixed with water before they are used.
- Polymer varnishes can either be sprayed onto the sand dollar or applied with a paint brush.


Things You’ll Need
Cleaning and Hardening Sand Dollars
- Bucket or plastic container
- Water
- Bleach
- Rubber gloves
- PVA glue
- Chopsticks or toothpicks
Applying the Paint
- Watercolor or acrylic paint
- Cup
- Water
- Palette
- Brush
Enhancing Your Designs
- Sharpie markers
- Glitter


References
- ↑ http://www.seashells.org/sanddollarspreserve.html
- ↑ http://www.seashells.org/sanddollarspreserve.html
- ↑ http://www.jerrysartarama.com/blog/what-kind-of-paint-should-i-use/
- ↑ https://thepostmansknock.com/painting-with-watercolors-for-beginners/
- ↑ https://www.prekinders.com/using-tube-watercolors/
- ↑ https://youtu.be/rSpVpIDBogs?t=1m53s
- ↑ https://www.art-is-fun.com/how-to-stop-acrylic-paint-from-drying-too-fast
- ↑ https://youtu.be/HmJCYDtbh4I?t=22s
- ↑ https://youtu.be/HmJCYDtbh4I?t=1m
About This Article

Before you paint sand dollars, make sure to clean and harden them. To do this, soak the sand dollars in water for 1-3 hours, changing the water when it turns brown. Then, briefly submerge them in a bleach and water solution and rinse them off. Once they have been rinsed, let them dry for 1-2 hours and then use a paint brush to cover them with a light layer of PVA glue. After the glue has dried, add acrylic paint for precise designs or watercolors for more abstract or muted designs. For tips on decorating your sand dollar with glitter or markers, read on!