X
wikiHow is a “wiki,” similar to Wikipedia, which means that many of our articles are co-written by multiple authors. To create this article, volunteer authors worked to edit and improve it over time.
This article has been viewed 24,786 times.
Learn more...
As surprising as it may seem, it is possible to paint with glue. It's a fun way to create interesting patterns and textures, and it's usually a cheap and easy way to entertain the kids if you've already got the items in your craft supplies.
Steps
Method 1
Method 1 of 2:
Glue-resist painting
In this method, the glue resists being painted on and can form the image through the paint.
-
1Select a design. Keep the design simple so that it is easy to draw but be sure to include its main elements, such as facial features, numbers, arrows, rays, whiskers, petals, and so forth. Good designs include a star, the moon, the sun, a flower or a clock. Shapes are good too, as are simple outlines of vehicles and animals.
-
2Draw the design onto the paper. Using a pencil, draw the design. If you make any errors, simply erase them until the image is as you wish.
- This step can be skipped if you're super confident that you can draw the design using just the glue.
Advertisement -
3Go over the design with the glue. Follow each of the lines carefully, leaving a good, even amount of glue on each line of the drawing.
-
4Let the glue dry. The drying time may be indicated on the label, otherwise it's best to leave it overnight. That way, you can be absolutely sure it has dried thoroughly.
-
5Check that the glue has dried. The next day, check that the glue has completely dried. When you're sure that it has, get ready to paint.
-
6Dip the sponge into water to wet it. Squeeze out excess water, you don't want any drips on the painting.
-
7Dip the damp sponge into the watercolor paint you've chosen.
-
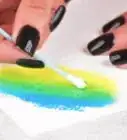
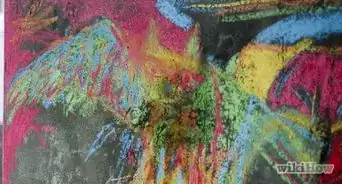
8Wipe the painted side of the sponge over the glued-on side of the paper. Wipe it across gently, eventually covering the whole piece of paper. You'll notice that the paint does not stick to the glue design, allowing it to clearly show through, revealing the color used for the paper underneath.
-
9Set aside to dry when completely painted. Once dry, the glue-resist painting is ready to hang.


Advertisement
Method 2
Method 2 of 2:
Wet glue painting
In this method, the glue forms the base and spreading medium for the paint colors.
-
1Place the plastic lid down on the workspace. Ensure that the lipped edge faces upwards, as this will stop the glue from spilling over the edges.
-
2Pour the white glue across the lid. Add a decent amount, as the glue will form the background for this decorative item. Tilt the lid to let it fill across the whole lid space.
-
3Add color. Add a drop or two of food coloring or liquid watercolor in one corner of the glue. The coloring will immediately run a little, but that's okay. Stick to only one to two drops at most.
-
4Add another drop or two of a different food coloring or liquid watercolor into another corner.
-
5Continue adding the different colors until the whole glued area has been colored. By this stage, you'll have multiple colors.
-
6Use a toothpick to swirl the colors around nicely in the glue. Do not combine the colors too much, or else you'll just get a boring, murky brown. Swirl just enough to create a pretty design and leave it at that.
-
7Set aside to dry. The food coloring will continue to spread a bit, forming its own interesting pattern and shape. The drying will take at least a day and probably more likely two to three days. When the glue begins to peel away from the container lid, it is dry.
-
8Punch a hole into what is to be the top of the dried glue painting. Thread a piece of string or ribbon through the hole and tie into a loop, using a firm knot.
-
9Hang the wet glue painting where it will catch the sun. A window is a very good spot to choose.


Advertisement
Things You'll Need
Glue resist painting:
- Quality brightly colored paper, suitable for painting on
- Pencil and eraser
- Craft glue, best from a squeezable container
- Watercolor paint in a dark color of your choice
- Sponge (clean, just for painting purposes)
Wet glue painting:
- White craft glue
- Food coloring or liquid watercolors
- Toothpicks
- Plastic lids off food containers
- Hole puncher
- String or ribbon for hanging
References
- http://babbledabbledo.com/art-for-kids-cosmic-suncatchers/ – research source for method 2
About This Article
Advertisement