This article was co-authored by wikiHow Staff. Our trained team of editors and researchers validate articles for accuracy and comprehensiveness. wikiHow's Content Management Team carefully monitors the work from our editorial staff to ensure that each article is backed by trusted research and meets our high quality standards.
wikiHow marks an article as reader-approved once it receives enough positive feedback. In this case, 86% of readers who voted found the article helpful, earning it our reader-approved status.
This article has been viewed 265,849 times.
Learn more...
A bridge is a small wooden device that supports the strings on a violin. It's not uncommon for the bridge to shift itself over time and you may have to periodically replace a bridge due to wear and tear. Rarely, a bridge might even fall off. Placing a bridge on a violin is a fairly simple process. With some patience, you can easily put a violin bridge in place on your own.
Steps
Positioning the Bridge
-
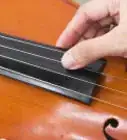
1Identify the e-string and g-string side. A violin bridge is a small piece of wood. The bottom of the bridge is usually a straight line, while the top is arched slightly. When you're examining your bridge, you'll notice one side of the arch is slightly higher than the other. The lower side is the e-string side, and the taller side is the g-string side. When you put the bridge in place, make sure the e-string comes over the e-string side, and the g-string comes over the g-string side.[1]
- If you don't know which strings are which, when the violin's head is facing your body, the g-string will be the string farthest to the left. The e-string will be the string farthest to the right.[2]
-
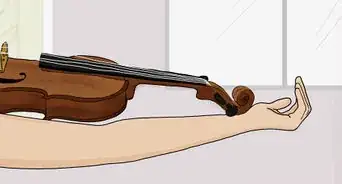
2Loosen the strings slightly. To avoid snapping a string while placing the bridge, loosen the strings slightly. You loosen violin strings by turning the tuning knobs on the end of the violin. Strings should be loose enough that you can easily pull them up and down, allowing them to be lifted up enough to slip the bridge under the strings.[3]Advertisement
-
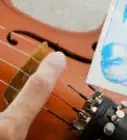
3Place the bridge between the F-holes. The F-holes are two f-shaped holes found near the end of the violin's head. When you slide the bridge under the strings, make sure it's between the two F-holes. The bridge should be placed at roughly the midway point of the f-holes. Imagine you're drawing a line from one f-hole to the next, starting at the small horizontal line running through one f-hole and stretching out to meet the small horizontal line running through the other f-hole. This imaginary line should run through the violin bridge.[4]
-
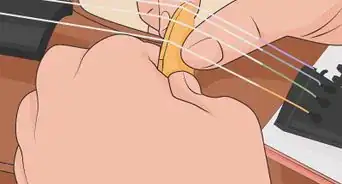
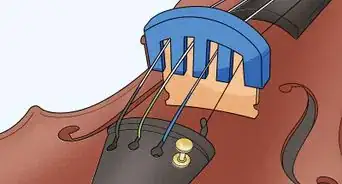
4Put the violin strings in the knobs of the bridge. The violin bridge has four small knobs running across the top. The four violin strings fit into these knobs, keeping the bridge and the strings in place. Gently feed one violin string at a time into the knobs on the bridge.[5]
-
5Tighten the strings. Now you can retighten your strings to keep the knob in place. Gently turn each knob on the bottom of the violin. It's a good idea to use one hand to hold the bridge in place while tightening the strings, to prevent it from falling over. Tighten the strings until they are secure enough to keep the bridge in place while still having a very slight amount of slack.[6]


Checking the Bridge
-
1Make sure the bridge is standing at a 90-degree angle. Once you've placed your bridge, you'll want to check to make sure its placement is correct. Lay your violin down on a flat surface. Get down to the violin's level. The side of the bridge facing the violin's tailpiece should stand at a roughly 90 degree. The other side of the bridge should be sloped forward slightly.[7]
- If the bridge is not forming a 90-degree angle, you may have put it in place backwards. You'll have to remove the bridge and start over.
-
2Check to make sure the bridge is in the center of the violin. Your bridge should be in the center of the violin. It should not be too far to the left or right. If your bridge is leaning to the right or the left, gently push it until it's in the center of the violin.[8]
- You can simply eyeball to see if the bridge is in the center by glancing at the violin from a bird's eye angle. If you want to be extra sure the bridge is positioned correctly, however, you can use a ruler or measuring tape to measure the length of each end of the bridge to the end of the violin. The measurements should be roughly equal.
-
3Make sure the bridge falls roughly in the middle of the f-holes. The bridge should be between the f-holes, roughly falling between the middle of each hole. The bridge may have slipped slightly while you were tightening the strings, so once again check. Make sure you can draw an imaginary line through the center of each f-hole that runs through the bridge. If the bridge has moved, gently slide it up or down until it's in the right place.[9]


Avoiding Bridge Issues in the Future
-
1Hold the bridge when tuning. Bridges often fall out of place during tuning. To prevent this from happening, make sure you hold your bridge in place with one hand when tuning.
-
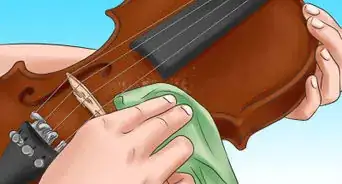
2Replace strings individually. On occasion, you will need to replace the strings of your violin as they break and wear down over time. In this case, make sure to replace strings individually. Removing more than one string at once can cause the bridge to fall out of place.[10]
-
3Have a professional (or your instructor) place your bridge. Take your violin to an instrument shop, preferably the one where you bought your violin. A professional there will also sand it, if necessary, and make sure it's the right size for your violin. Your instructor might also be able to do the same.[11]


Community Q&A
-
QuestionIs it possible to put so much rosin on the bow that it will not work properly?
 Community AnswerExcessive rosin will just make a mess on the instrument you're bowing. Try to keep it moderate and always clean the rosin from the instrument before it hardens.
 -
QuestionWhat does it mean if there's no sound when crossing strings with the bow?
 Community AnswerYou might need to put rosin on your bow. Rosin allows the bow hairs to grip the strings when dragged across, creating the vibrations that make the sound. If you go up and down the bow a few times with some rosin, it should make noise.
 -
QuestionI have an electric violin that was given to me. The bridge is in properly, but it's nearly impossible to play the A string without hitting the E string. Can I cut the nob in slightly to lower the E string?Community AnswerNever ever make renovations like that on your instrument! Talk to a luthier, they will find you a bridge that better suits your needs.

References
- ↑ https://www.youtube.com/watch?v=uMlcEwJDrLo
- ↑ http://www.get-tuned.com/how-to-string-a-violin.php
- ↑ https://www.youtube.com/watch?v=uMlcEwJDrLo
- ↑ https://www.youtube.com/watch?v=uMlcEwJDrLo
- ↑ https://www.youtube.com/watch?v=uMlcEwJDrLo
- ↑ https://www.youtube.com/watch?v=uMlcEwJDrLo
- ↑ https://www.violins.ca/info/tune_a%20_violin_avoiding_bridge_snap.html
- ↑ https://www.violins.ca/info/tune_a%20_violin_avoiding_bridge_snap.html
- ↑ https://www.violins.ca/info/tune_a%20_violin_avoiding_bridge_snap.html
About This Article

A bridge is a small piece of wood that supports the strings on a violin. Placing one on your violin is easy once you know how. Start by loosening your strings slightly by turning the knobs on the head. Then, place your bridge between the F-shaped slits in your violin. Make sure the flat side of the bridge is facing down with the lower edge facing to your left. You also need the bridge to be at a 90-degree angle to the violin. Once you’ve lined it up, fit the strings into the bridge’s grooves and gently tighten them. The strings will hold the bridge in place. For more tips, including how to avoid future issues with your bridge, read on!