This article was co-authored by Lana Starr, AIFD and by wikiHow staff writer, Janice Tieperman. Lana Starr is a Certified Floral Designer and the Owner of Dream Flowers, a floral design studio based in the San Francisco Bay Area. Dream Flowers specializes in events, weddings, celebrations, and corporate events. Lana has over 14 years of experience in the floral industry and her work has been featured in floral books and magazines such as International Floral Art, Fusion Flowers, Florist Review, and Nacre. Lana is a member of the American Institute of Floral Designers (AIFD) since 2016 and is a California Certified Floral Designer (CCF) since 2012.
There are 10 references cited in this article, which can be found at the bottom of the page.
This article has been viewed 48,246 times.
Cold weather may put a temporary end to your garden, but your beautiful flowers can still live on! While they’re still blossoming, harvest the blooms that you’d like to preserve for longer. Once you’ve trimmed away the stems, sandwich these blossoms between 2 sheets of absorbent paper, and let them rest in a weighted book for several weeks. Once the flowers are completely dried and flattened, feel free to remove them from the book. Now, you can have remnants of your flower garden with you all year!
Steps
Harvesting Fresh Flowers
-
1Pick the flowers that you’d like to preserve in the late morning. Go outside and examine your favorite blossoms after the early morning dew has dried off. Try to select flowers in their prime for harvest, instead of wilting or budding blooms. Depending on the flower, cut or pluck the stem from the garden to harvest it.[1]
- Flowers with thicker stems, like roses, will need to be removed with pruning shears.[2]
- Keep in mind that flowers lose some of their color as they dry out. If you'd your dried flowers to be a specific color, choose a bold-colored flower that will dry into that shade. For instance, you could dry bright pink roses if you'd like dried pink petals.
-
2Choose thinner flowers that don’t hold a lot of moisture in their petals. Search for delicate like cosmos, larkspurs, pansies, and delphiniums, since they tend to collect and hold less moisture.[3] If you want to preserve a flower with a thicker center, remove the petals to preserve separately. This includes flowers like dahlias, Rose of Sharon, zinnias, or French marigolds.
- Flowers with thicker centers won’t flatten as easily, and they tend to collect more moisture.
- Daisies and primroses are both good flowers to preserve using this method.
- Fall and summer flowers like roses and hydrangeas are also good options for preserving.[4]
Advertisement -
3Let the blossoms air-dry for 30 minutes before pressing them, if needed. Check the flower petals to see if there’s any lingering moisture. If you sense any dampness, lay the flowers on a flat surface with plenty of open air. After 30 minutes to an hour, tap the flower petals to see if they’re dry to the touch. Once the flowers are completely dry, set them aside for pressing.[5]
- If you press a moist flower, it will get moldy over time.
- Don’t let the flowers air-dry for too long, or they won’t be as fresh when you go to preserve them.[6]
-
4Trim the stem off each flower. Try and cut the flowers in a swift motion, so no remnants of the stem are left attached to the blossom. If you’re trimming flowers with a thick, woody stem, use a pair of small pruning shears instead.[7]
- If you’d prefer, you can also preserve the flowers with the stems attached. Keep in mind that stemmed flowers will take up more room, and leave you with less space for other blossoms.[8]
-
5Cut thicker flowers in half for easier preservation. Take a pair of scissors and cut down the center of the blossom lengthwise. Snip the flower with slow, methodical movements, working to split the blossom in half as evenly as possible.[9]
- If you’re trying to preserve roses or carnations, you’ll need to cut the blossoms in half.
- Feel free to preserve both halves of the flower!


Pressing the Blossoms
-
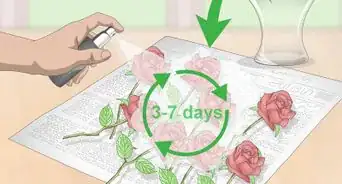
1Set 1 sheet of wax or parchment paper inside of an open book. Rip away 1 sheet of absorbent paper to use as a base for the flowers, and set it in the center of a large, thick tome. Aim for this sheet to be the size of the book’s pages, so all of the blossoms can be evenly flattened. Make sure to use an absorbent paper, like wax or parchment, instead of a paper towel.[10]
- Paper towels will imprint a quilted pattern on the flowers during the pressing process.
- You can also use plain white printer paper for this.[11]
-
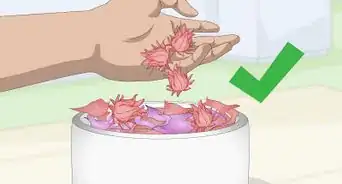
2Arrange the blossoms at least ⅛ in (0.3 cm) apart on the paper. Set the flowers onto the base sheet of absorbent paper, leaving a small amount of space between them. Try and place the blooms in a grid-like pattern, so they don’t overlap at any point.[12] Allow for a 1 inch (2.5 cm) margin on all sides of the paper.[13]
- The flowers will have a wider diameter when flattened, which is why they need to be spaced out.
- Try organizing your flowers by type or color when arranging them.
- If you’re setting down thick, halved flowers, make sure that the flat edge is resting on the absorbent paper.[14]
-
3Place 1 more sheet of wax or parchment paper on top of the blooms. Tear away an identical sheet of absorbent paper, aiming for it to be the same length and width as the original sheet. Set this piece on top of the flowers, taking special care to line up the edges. Try and keep these pieces of paper as centered as possible.[15]
- It’s okay if the absorbent sheets of paper stick out of the book. This makes it easier for you to find your flowers later on.
-
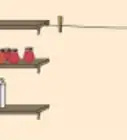
4Close the book and place a heavy item on top of it. Take a cinder block or another thick book and set it on top of the original tome. Make sure that an even amount of weight is distributed across the original book’s surface, as this will allow all of the flowers to flatten evenly. Leave the stacked book in a place where it won’t be disturbed.[16]
- If you’re stacking additional books on top of the flower-pressing book, consider using more than 1. This will help press the flowers even more.
-
5Wait 2 weeks to 1 month for the flowers to fully flatten and dry. Leave the flower-pressing book alone for several weeks. As tempting as it is to remove the flowers after 1 week, you’ll find that they won’t be flattened or dried enough for long-term storage. Instead, wait at least 2 weeks before opening the book and checking on the blossoms. If the petals are desiccated and fully flattened, then you can remove them.[17]
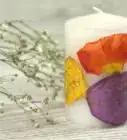
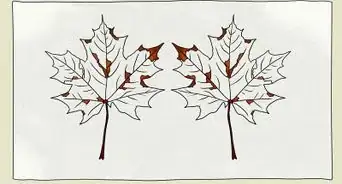
Did you know? Pressed flowers can be used in a variety of crafts. If you keep a garden journal, consider ironing the flowers between 2 sheets of wax paper so you can preserve them in your notebook.
You can also laminate flower blossoms on thin strands of paper to create a bookmark, or use the blooms in your own homemade greeting cards.

Expert Q&A
-
QuestionCan I preserve thick, bulbous flowers using this method?
 Jeanne WalkerJeanne Walker is a Florist and the Owner of Fringe Flower Company, a floral design shop that specializes in weddings, special events, and daily deliveries. Fringe Flower Company, based in Walnut Creek, California, provides customized hand-tied and vase bouquets along with potted plants, succulent gardens, tulip french buckets, and wreaths. Jeanne also conducts floral design workshops and parties throughout the San Francisco Bay Area.
FloristFlowers with a bulbous center can't be pressed easily since they're too thick, but you can still remove the petals and press just those. -
QuestionWhat kinds of flowers work well for pressing?Jeanne WalkerJeanne Walker is a Florist and the Owner of Fringe Flower Company, a floral design shop that specializes in weddings, special events, and daily deliveries. Fringe Flower Company, based in Walnut Creek, California, provides customized hand-tied and vase bouquets along with potted plants, succulent gardens, tulip french buckets, and wreaths. Jeanne also conducts floral design workshops and parties throughout the San Francisco Bay Area.
FloristDaisies turn out really nicely, as well as primroses. Violas and pansies are also easy to press. Stick with flowers that have a single petal all the way around versus numerous petals on top of each other.
Things You’ll Need
- Scissors
- Pruning shears (optional)
- Wax or parchment paper
- Printer paper (optional)
- Thick book
- Cinder block (optional)


References
- ↑ https://www.finegardening.com/article/pressing-flowers
- ↑ https://www.finegardening.com/article/tips-for-cutting-garden-roses-to-bring-them-in-the-house
- ↑ https://www.finegardening.com/article/pressing-flowers
- ↑ https://hgic.clemson.edu/factsheet/drying-flowers/
- ↑ https://newengland.com/today/living/crafts/how-to-press-flowers/
- ↑ https://www.finegardening.com/article/pressing-flowers
- ↑ https://www.popsci.com/save-dry-flowers/
- ↑ https://www.proflowers.com/blog/how-to-press-flowers
- ↑ https://www.proflowers.com/blog/how-to-press-flowers
- ↑ https://www.bhg.com/gardening/design/projects/make-pressed-flowers/
- ↑ https://www.finegardening.com/article/pressing-flowers
- ↑ https://www.bhg.com/gardening/design/projects/make-pressed-flowers/
- ↑ https://newengland.com/today/living/crafts/how-to-press-flowers/
- ↑ https://www.proflowers.com/blog/how-to-press-flowers
- ↑ https://www.bhg.com/gardening/design/projects/make-pressed-flowers/
- ↑ https://newengland.com/today/living/crafts/how-to-press-flowers/
- ↑ https://www.fs.fed.us/wildflowers/kids/activities/preservewildflowers.shtml
About This Article