This article was co-authored by Alterations Express. Alterations Express is a salon-style alteration and tailoring house with walk-in service, spacious dressing rooms, fitting specialists, and an extraordinary team of tailors and seamstresses at 13 storefront locations. With over 70 years of experience, they specialize in guiding individuals through a professional fitting, evaluating an alteration project on the spot, express alterations, and immediately providing pricing for any alteration. Alterations Express has been featured on multiple websites such as TheKnot.com.
There are 9 references cited in this article, which can be found at the bottom of the page.
This article has been viewed 65,521 times.
Eyelets can serve as a functional or decorative feature of an item. For example, you might include them as a way to lace up a bodice or thread a drawstring through a sweatshirt hood, or as a way to decorate the strap of a purse or the edge of a blouse. Although eyelets might seem difficult to put into fabric, they’re quite easy to add. You’ll need to create and position the eyelet hole carefully to ensure a good fit. Once you’ve created the hole, it’s a simple matter of putting the eyelet pieces together to secure them. You can add eyelets to an item with or without a special tool called eyelet pliers.
Steps
Using Pliers to Create Holes and Attach Eyelets
-
1Mark the fabric where you want to place the eyelet. Use a piece of chalk or fabric marker to mark the fabric where you want to place the eyelets. Create a small X over each area where you want an eyelet to go.
Tip: Eyelets hold up best with a thicker fabric, so avoid using them with a fabric that is lightweight unless you have already reinforced it with interfacing or another type of lining.
-
2Insert the cone punch and die base into opposite sides of the pliers. These are the parts of your eyelet pliers that will create a hole over the X you have marked. Select the size die and punch that you need for your eyelets. The die piece looks like a circular tube and the cone piece looks like a cone. Insert the cone piece into 1 side of the pliers and the die piece into the opposite side.
- For example, if you’re adding 1⁄4 in (0.64 cm) eyelets, then use the 1⁄4 in (0.64 cm) die and punch pieces.
- Make sure that the eyelets match the size of the pliers.
- The punch and die will pop right into the holes in the pliers.[1]
- Consult the manufacturer’s instructions for the eyelet pliers if you’re unsure what these pieces look like or how to install them.
Advertisement -
3Center the die and punch over the mark and squeeze the pliers. Once you have the die and punch in place, position the pliers so that they are over the X you marked on the fabric. Then, punch through the X with the pliers to create a hole.
- Repeat this if you need to make additional holes in the fabric.
- If any fabric gets caught in the die after you punch out a hole, use a small, straight pin to pull it out.
-
4Remove punch and die and insert eyelet holder and splitting punch. Once you have finished making the desired number of holes in the fabric, remove the die and punch pieces from the pliers and set them aside. Then, install the eyelet holder and the splitting punch opposite it. Choose the pieces for the size of eyelet you are adding.
- For example, if you’re adding 1⁄4 in (0.64 cm) eyelets, use the 1⁄4 in (0.64 cm) pieces.
-
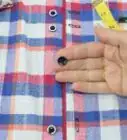
5Push the eyelet post through the hole in the fabric. Take the eyelet and insert the post in through the fabric. Position the eyelet so that the front of the eyelet is on the right (outer) side of the fabric and the post is coming through the wrong (back) side of the fabric.
-
6Squeeze the eyelet with the pliers to secure it to the fabric. Next, place the eyelet holder so that it’s up against the front side of the eyelet. Position the back of the pliers so that they are against the back of the eyelet’s post. Then, squeeze the pliers to compress the post and secure the eyelet to the fabric.
- Repeat the process to add more eyelets to the fabric.

Creating Eyelet Holes without Pliers
-
1Reinforce the fabric with fusible interfacing if the fabric is light or thin. Lay your fabric on an ironing board or other flat, heatproof surface with the wrong side (back or inner) facing up. Position the interfacing on the fabric with the shiny side facing down, and move the iron back and forth across the interfacing for about 30 seconds. Then, remove the iron and let the fabric cool before applying the eyelets.
- Don't reinforce heavyweight fabrics, such as denim or leather. Only reinforce light to medium weight fabrics.[2]
- You can purchase fusible interfacing in a craft supply store.
Tip: Read and follow the manufacturer’s instructions for the fusible interfacing you buy. There may be special instructions depending on the brand, such as how long to iron the fabric or what setting to use.
-
2Mark the fabric with a circle the size of the inside of the eyelet. This will help to ensure that you don’t make the hole too big. Use a fabric marker or chalk to draw a circle on the fabric that is smaller than the interior of the eyelet. Compare the circle to the eyelet to see if it’s the right size and adjust it if needed.[3]
- Check to see where to place the eyelet first if you’re using a pattern. Look for a circle on the pattern.
-
3Cut a small, cross-shaped hole into the fabric. Don’t cut along the edges of the circle you drew. Instead, make a small cut in the fabric at the center of the circle. Then, cut across this opening at a perpendicular angle to create a cross-shape.[4]
- It’s better to make the hole smaller than you think it needs to be and adjust it later if it’s too small. If it’s too big, you won’t be able to adjust it and the eyelet may be unstable.[5]
- If the fabric is stretchy, cut a smaller cross-shaped slit than you think you’ll need.


Securing the Eyelet without a Tool
-
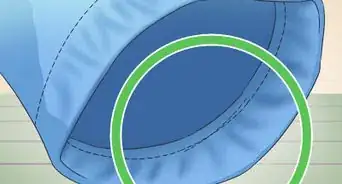
1Push the top eyelet piece into the hole on the right side of the fabric. Once you have created a hole in the fabric, take the top part of the eyelet and insert the male part of the piece through the hole. You may need to wiggle it to get it into place if it’s a snug fit.[6]
- Make the hole larger if it’s too small for the eyelet to fit through the hole. Snip along the edge of 1 of the cuts you made in the fabric to make it larger and then try to insert the eyelet again. If it’s still too small, snip to make the other cut slightly larger.
-
2Position the bottom eyelet on a hard surface. Place the bottom half of the eyelet on a hard surface, such as a concrete floor or piece of wood. Don’t place the eyelet on anything that might get damaged by hitting it with a mallet, such as a wooden table or tile counter.[7]
-
3Place the top half of the eyelet over the bottom eyelet. Next, insert the top half of the eyelet through the center of the bottom half of the eyelet. Check to ensure that the fabric is sandwiched between the 2 eyelet pieces.[8]
-
4Tap the top eyelet with a rubber mallet 2 to 3 times. Don’t hit the eyelet tool too hard. Just tap it gently a few times. This will push the top and bottom eyelet pieces together and secure the eyelet to the fabric. Check the eyelet pieces on both sides of the fabric to make sure they are pressed firmly against each other. If you see a gap, hit the eyelet 2 to 3 more times to close the gap.[9]
- Hold the edges of the fabric to help stabilize the eyelet pieces.
- Be careful not to hit your hand with the rubber mallet.
Warning: Don’t use a metal hammer to secure the eyelet pieces together as it may damage the eyelet.[10]
-
5Repeat the process until you’ve added the desired number of eyelets. If you’re using eyelets for decoration, add as many as you like along the edges of the fabric or in other specific locations. If you’re positioning the eyelets for functional use, such as threading cord or shoelace through as a closure, make sure that each eyelet you add has a match directly across from it.[11]
- For example, if you’re adding eyelets to a pair of shoes or a bodice, the eyelet holes need to be evenly spaced on both sides of the fabric and aligned so that each eyelet will have a match right across from it.


Things You’ll Need
- Chalk or fabric marker
- Scissors
- Eyelets
- Eyelet tool, such as pliers (optional)
- A rubber mallet


References
- ↑ https://www.youtube.com/watch?v=9Z6nuOMFi0I&feature=youtu.be&t=24
- ↑ https://www.youtube.com/watch?v=5q46MkwH7iE&feature=youtu.be&t=58
- ↑ https://www.youtube.com/watch?v=5q46MkwH7iE&feature=youtu.be&t=72
- ↑ https://www.youtube.com/watch?v=5q46MkwH7iE&feature=youtu.be&t=100
- ↑ https://sewguide.com/add-eyelets/
- ↑ https://www.youtube.com/watch?v=5q46MkwH7iE&feature=youtu.be&t=41
- ↑ https://www.youtube.com/watch?v=5q46MkwH7iE&feature=youtu.be&t=205
- ↑ https://www.youtube.com/watch?v=5q46MkwH7iE&feature=youtu.be&t=225
- ↑ https://www.youtube.com/watch?v=5q46MkwH7iE&feature=youtu.be&t=246
About This Article

If you want to put eyelets in fabric, you have a couple of options. The easiest option is to use eyelet pliers. Just use the pliers to punch a hole in the fabric, then use a separate attachment to insert an eyelet into the hole you made. If you don't have eyelet pliers, you can cut a cross-shaped hole in the fabric where you want the eyelet to go, then insert the eyelet by hand. Use a mallet to tap the eyelet into place, and you're done! To learn how to use eyelet pliers and insert eyelets by hand, keep reading!