This article was co-authored by wikiHow staff writer, Hunter Rising. Hunter Rising is a wikiHow Staff Writer based in Los Angeles. He has more than three years of experience writing for and working with wikiHow. Hunter holds a BFA in Entertainment Design from the University of Wisconsin - Stout and a Minor in English Writing.
There are 15 references cited in this article, which can be found at the bottom of the page.
The wikiHow Video Team also followed the article's instructions and verified that they work.
This article has been viewed 49,143 times.
Learn more...
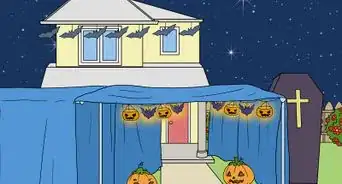
As we get into the Halloween season, you might be looking for a way to make your home a little scarier. If you want to make anyone who’s scared of creepy crawlers squirm, try adding some fake spiderwebs to your decorations. These webs are made from cotton but still look pretty realistic, and you can use them indoors or outside. We’ll help guide you through the best way to hang your webs plus a few ideas on how to decorate your home so it’s really spooky!
Steps
Installation
-
1Use scissors to cut off a section of webs. If you try and rip the webs apart, they’re going to clump together and look unnatural. When you open your package of fake spiderwebs, it will come in a rolled bundle. Pull out a length of webs that’s about the same horizontal length of the area you’re covering and keep it tight. Cut through the web with your scissors so it’s easier to work with.[1]
- Ask a helper to hold the web tight while you cut it to make it a little easier to use.
- Don’t worry if you accidentally cut the web too short since you can always add more later on.
- If you’re covering a large area, such as a fence or an entire wall, you may not need to cut the webs.
-
2Pull apart the webs to loosen the fabric. Find the loose edge or seam on the bundle of webs you just cut. Slowly pull the seam apart to spread out the webs so they aren’t clumped together. That way, the web will be a lot easier to hang and you can get an idea of how much space it will cover.[2]
- If you have trouble finding a seam running through the bundle, try grabbing the corners where you made your cut and pulling them apart.
Advertisement -
3Spread the webs out over the surface you want to cover. After you unravel the webs, drape them on top of any object you want. Pull the top corners of the web tightly towards the top of the surface and stretch the bottom corners down. It’s okay if the web doesn’t hang on securely yet since you’re just making sure it fills the space and completely covers the area you want.[3]
- If the webs don’t cover the entire object, simply cut off another section and stretch it over the empty area.
-
4Hook the edges of the webs to push pins or nails for the most secure option. Take one of the top corners of the web and pull it as thin as you can without ripping a hole in it. Loop the webs around a nail or push pin so it stays in place. Continue securing the web around the top edge before moving down the sides and toward the bottom. The web will stay more secure and won’t bunch up as much if you use more pins.[4]
- Opt for clear push pins so they’re less visible.
- The way you arrange your webs and fasteners is all up to your personal preference. If you want your webs to gather near the center, then you can put another push pin there to wrap your webs around.
- Fake spiderwebs will catch and stick onto raised or pointed areas on the surface. For example, you can easily stretch the spiderwebs over a candleholder or chandelier without additional fasteners.
-
5Stick the webs onto Velcro dots if you don’t want to damage your walls. Since the spiderwebs are made of a really thin fabric, they easily stick in the hook side of a Velcro strip. Peel the adhesive backing off of the Velcro and press it onto the surface where you want to attach your webs. Grab a few strands of the webs and push them onto the Velcro so they stay in place.[5]
- Velcro will work inside and outside.
- Spiderwebs will not stick to the loop, or soft, side of the Velcro.
-
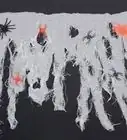
6Stretch the webs apart so they don’t clump up. While it’s okay for some of the webs to bunch up, too much can make your webs look really artificial. Look for areas where you notice the webs are thick and tease them apart with your fingers. Stretch the webs so they separate from the clump and secure the end you’re pulling to a fastener so it stays in place.[6]
- Don’t worry too much if you stretch the webs so thin they’re hard to see. Even some subtle cobwebs can make your decorations eerier.
-
7Layer the webs on top of each other to make them more visible. Take another bundle of webs and stretch it over the top of the first one. Pull the web in different directions than the first layer to add more dimension and depth to your design. Keep playing around with the webs until you’re happy with the appearance.[7]
- You can add as many layers of webs as you want.

Tips for Decorating
-
1Cover objects with webs to give them an old and dusty appearance. When you set up other Halloween decorations, you can make them a lot more frightening by dressing them up with your webs. Pull the webs tightly over things like pumpkins, chairs, lamps, or other store-bought Halloween decorations. Hook the webs around the edges of the items so they stay in place.[8]
- If you have prop skeletons or other yard decorations, spiderwebs will give them an older and scarier appearance.
-
2Stretch the webs over a fence to make it spookier. If you want to make it creepier for trick-or-treaters to walk up to your home, get enough webs to cover the entire length of a fence or handrail. Stretch the webs over the surface and secure them with push pins or by wrapping them around the natural dents in the fence. Keep the webs stretched thin so they look believable.[9]
- If the webs don’t stay in place, you can also use zip ties to secure them.
-
3Place the webs over lights to help them stand out. Before you hang up your webs, put string lights up on your walls or around the object you’re decorating. You could also attach the webs to porch lights if you’re hanging them outdoors. As you layer the spiderwebs, your lights will look dimmer and make your space feel more eerie.[10]
- You can even just put webs over regular lamps or light fixtures to add ambiance to your home.
- Fake spiderwebs can be very flammable so keep them away from lights that get really hot, candles, or jack-o’-lanterns.[11]
-
4Add plastic spiders to make your webs look more authentic. You can use spiders of various sizes to make your display even creepier. When you want to put a spider in your web, simply push the legs into the webbing and position the spider how you want it. Spread the spiders throughout the web so it looks like they’re crawling all over it.[12]
- You can buy plastic spiders online or from any Halloween store.
- Spiders work great for covering up nails or push pins so other people don’t see them.
-
5Hang the webs from the ceiling so people have to walk through them. It’s always a little scary when you accidentally walk into a spiderweb, so drape your fake webs loosely across the tops of walkways and doorways. When someone walks through, they’ll feel the webs brush against them and send a chill up their spine.[13]
-
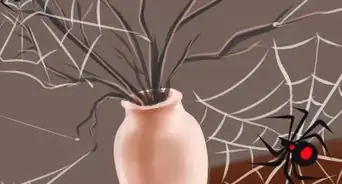
6Fill a glass container with webs and fake bugs for a scary display. Take a bundle of the webs and tease out some of the strands so it looks more natural. Stick some plastic bugs or spiders onto the outside of the bundle and push it into a glass jar or container. Place your decorations out for display to make it look like you have some creepy pets.[14]
- Put an LED light in the bottom of the jar to illuminate your jars/


Warnings
- Insects and birds can get tangled and injured in fake spiderwebs when you put them outside.[16]⧼thumbs_response⧽
Things You’ll Need
- Fake spiderwebs
- Push pins or nails
- Velcro dots (optional)
References
- ↑ https://youtu.be/Fg6G4qMTMrQ?t=7
- ↑ https://youtu.be/wnR_W8e2uf4?t=39
- ↑ https://youtu.be/1bHigUKW38A?t=197
- ↑ https://youtu.be/Fg6G4qMTMrQ?t=22
- ↑ https://www.fromhousetohome.com/entertainingdiva/decorate-with-fake-spider-webs/
- ↑ https://youtu.be/1bHigUKW38A?t=220
- ↑ https://youtu.be/fe60KAC0Lwc?t=136
- ↑ https://youtu.be/wnR_W8e2uf4?t=52
- ↑ https://youtu.be/7OvVnHk-tvw?t=165
- ↑ https://www.blueistyleblog.com/fiveminutehalloweendecoratingwithspiderwebs/
- ↑ https://universalproperty.com/avoid-halloween-home-insurance-claims-with-these-tricks
- ↑ https://youtu.be/Fg6G4qMTMrQ?t=38
- ↑ https://www.fromhousetohome.com/entertainingdiva/decorate-with-fake-spider-webs/
- ↑ https://youtu.be/wnR_W8e2uf4?t=78
- ↑ https://youtu.be/7OvVnHk-tvw?t=14
- ↑ https://www.gardenexperiments.com/its-halloween-the-dangers-of-fake-spider-webs/
About This Article