This article was co-authored by Ryaan Tuttle. Ryaan Tuttle is a Home Improvement Specialist and the CEO of Best Handyman, Inc. in Boston, Massachusetts. With over 17 years of experience, he specializes in building home service businesses, focusing on creating scalable and efficient brands. With the help of his global team, the companies have achieved over 10+ million in sales and received recognition through magazine features, and enjoy partnerships with wikiHow and Jobber field service software. Boston Magazine and LocalBest.com have named Best Handyman Boston the Best Handyman in Boston. Ryaan holds Construction Supervisor and Home Improvement Contractor Licenses.
This article has been viewed 34,084 times.
Vinyl fences are very resilient, so they don’t require a lot of maintenance. If some part does break, your fence is also easy to take apart and reassemble. The most difficult task is finding an identical replacement piece. Once you have it, you can quickly connect it to the existing parts. Your repaired fence can then serve as a feature of your home for many years.
Things You Should Know
- If a panel breaks on your vinyl fence, simply remove the top rail and panel from the section you want to replace, slide the new panels into place, and replace the rail.
- You can also replace the rail by cutting it to length, removing the damaged rail, and sliding the new rail into the holes on the fence post.
- If one of the posts gets damaged, unscrew the top rails, dig up the damaged post, set the new post in place with concrete, and reattach the rails and panels.
Steps
Replacing Fence Panels
-
1Order similar replacement panels. You can search online to find many different fence styles. If you can, contact the fence’s manufacturer to get new panels identical to the old ones. Take a picture of your fence and send it to companies to ensure you get the right panels.[1]
- Try to get replacement parts that are the same size and look as close as possible to the rest of your fence.
- Home improvement stores may also sell fence parts and repair kits.
-
2Unscrew the top rail at the ends. The top rail attaches to the closest posts. Look for a pair of screws at the ends, securing the rail to those posts. Turn the screws counterclockwise to remove them, then set them aside.[2]
- These screws may be underneath the caps on the posts. Gently lift them with a hammer and chisel if you can’t remove them by hand.
- Keep the screws in a safe spot, such as a closed container, so they can be reused later.
Advertisement -
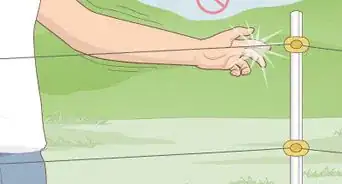
3Remove the screws from the damaged panels. Now that the rail is free, locate the screws on the panels. If your fence's panels have pickets, or vertical bars, behind them, the screws may be at the panel's ends. Turn them counterclockwise to remove them.[3]
- Not all fences have pickets or screws. Your fence's panels may be held in place with brackets, which you can slide the panels out of.
-
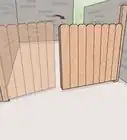
4Slide the panels out of the fence. Lift the top rail off of the panel you need to replace. Then, pull the panel up to remove it. If you took off all of the screws earlier, the panel should come off of the fence easily.[4]
- If the panel is next to a post, it may be attached with side brackets. Carefully move the panel to the side and out of the brackets.
-
5Check the alignment of the posts with a level. Before installing the new panels, make sure the fence posts are level. Hold a level against the side of each connecting post. If a post is positioned correctly, the level will be appear flat from top to bottom. Straighten the posts as needed.[5]
- If your posts are held in the ground with concrete, they most likely will not need to be adjusted.
-
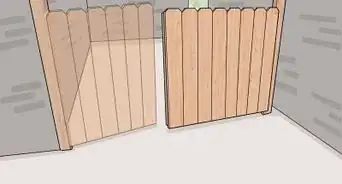
6Slide the new panels into the fence. Fit each panel over the bottom rail. Adjust the panels carefully so each is level from top to bottom. Slide them into any nearby brackets, then place the top rail over them. Make sure each panel looks evenly spaced in the fence.[6]
- In most fences, the panels will fit right next to each other without leaving a gap.
-
7Screw the panels and top rail in place. Look for the screw holes in the top and bottom ends of each panel. Use these to fasten the panels to the stabilizing pickets, if your fence has them. Finish adjusting the top rail, then tighten the screws near the fence posts to secure it in place.[7]
- If the screw holes do not line up, you can fill the existing panel holes with spray foam, then drill new holes 1 in (2.5 cm) deep.


Installing New Rails
-
1Remove the panels from the rails. If your fence’s panels fasten to pickets, remove the screws at the top and bottom of the panels first. Then, slide the panels out of the rails. Clear the rails completely.[8]
-
2Unscrew the rails from the posts. Each rail slides into holes on the posts. You will find a pair of screws holding the rails in position. Turn these counterclockwise and set them aside. Then, slide the rails off of the posts.[9]
- Store the screws in a safe location and keep the old rails in case you need to measure them.
-
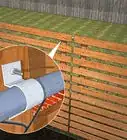
3Measure the length of rail you need. You can do this by running tape measure from 1 post to another. Remember that each rail needs to have a little extra length in order to slide into the post holes. Add about 2 in (5.1 cm) onto the length.[10]
- If you have the old rail, you can also measure it for use as an estimate.
-
4Wear safety goggles and other protective gear. Before sawing into the rails, take the proper safety precautions. Shield your eyes from debris by wearing safety goggles. Cover your mouth by wearing a respirator.
- Avoid wearing loose clothing or jewelry when operating a saw.
-
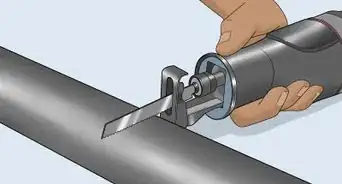
5Cut the rail to length with a circular saw. Set the new rail on a workbench. Before cutting, mark where you need to make the cuts so you get the size of rail you need. Then, carefully cut through the rail.[11]
- For the best results, choose a saw blade labeled for vinyl cutting. Fence companies and home improvement stores may sell these blades.
-
6Slide the rail into the holes on the fence posts. Make sure the brackets for the panels are on the top side. Push the rail into the post holes until the rail hangs in place. As long as the rail is the right length, it should fit.[12]
- If the rail doesn’t fit properly, check the length again. You may need to cut it a little shorter.
-
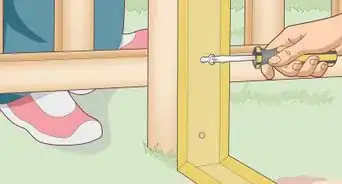
7Screw the rail to the posts. Locate the screw holes on either end of the rail. You will need a pair of screws on each side. Twist them clockwise to lock the rails in place. When you’re done, you can begin installing the vinyl panels.[13]
- The size of screws you need differ from rail to rail.
- Screws are usually included with new rails, but you can try using the screws from the old rail.


Repairing a Broken Post
-
1Unscrew the connecting rails. Each rail slides into slots on the post and is held in place with screws. Turn the screws counterclockwise to remove them. Pull both the top and bottom rails away from the post.[14]
- If you have trouble installing a post, removing the rails and fence panels completely can give you more space.
-
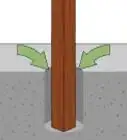
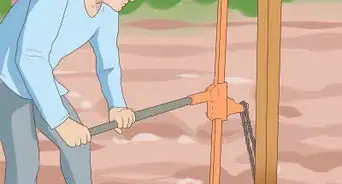
2Dig out the damaged post. Remove the old post as well as any fragments that may be in the ground. If your post was held in place with concrete, you will need to dig up the concrete to remove it.[15]
- To remove the concrete, dig out the dirt around it. You can refill the hole later.
-
3Measure where the new post will be placed. To figure out where to place the new post, measure the distance between 2 existing posts. The new post should be placed an equal distance from the last post. Mark the location with paint, tape, or another indicator.[16]
- The post needs to be even and straight or else the rails and panels will not fit correctly.
-
4Dig a hole 3 ft (0.91 m) deep in the ground. Dig out the spot you marked earlier. Make the hole about 8 in (20 cm) in diameter. You can use a tape measure to ensure the hole is the size you need.
-
5Seal the pole in place with concrete. You will need about 120 lb (54 kg) of premixed concrete for 1 post. Place the post in the hole. While someone holds the post in position, fill the the hole with concrete. Pour the concrete until it is about 4 in (10 cm) below the ground’s surface.[17]
- The other person should hold the post straight. If it doesn’t look right, adjust it quickly before the concrete solidifies.
-
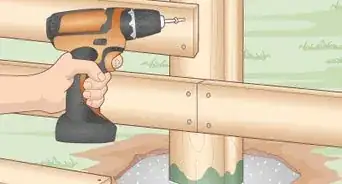
6Reinstall the fence rails and panels. Fit the fence rails into the holes on the new post, then begin sliding the panels onto the rails. Screw the rails to the inside of the post. Then, attach the panels, screwing them in place if they also use screws.[18]


Expert Q&A
-
QuestionHow can I repair a break in one of the panels on my fence?
 Ryaan TuttleRyaan Tuttle is a Home Improvement Specialist and the CEO of Best Handyman, Inc. in Boston, Massachusetts. With over 17 years of experience, he specializes in building home service businesses, focusing on creating scalable and efficient brands. With the help of his global team, the companies have achieved over 10+ million in sales and received recognition through magazine features, and enjoy partnerships with wikiHow and Jobber field service software. Boston Magazine and LocalBest.com have named Best Handyman Boston the Best Handyman in Boston. Ryaan holds Construction Supervisor and Home Improvement Contractor Licenses.
Home Improvement SpecialistYou really would want to try to remove whatever panel that is. Any repair that you would make to it would be temporary, and it would just break again over time. You could try gluing it, but really it should be replaced if possible.
Things You’ll Need
Replacing Fence Panels
- Replacement panels
- Screwdriver
Installing New Rails
- Replacement rail
- Screwdriver
- Measuring tape
- Safety goggles
- Respirator
- Circular saw
Repairing a Broken Post
- Replacement post
- Screwdriver
- Shovel
- Cement
- Water
- Mixing container
- Measuring tape


References
- ↑ https://www.familyhandyman.com/garden-structures/fences/installing-a-vinyl-fence/view-all/
- ↑ https://www.youtube.com/watch?v=Nq4y9iDPl5s&feature=youtu.be&t=51
- ↑ https://www.certainteed.com/resources/CTS%20Step-by-Step%20Install%20brochure.pdf
- ↑ https://www.certainteed.com/resources/CTS%20Step-by-Step%20Install%20brochure.pdf
- ↑ https://www.certainteed.com/resources/CTS%20Step-by-Step%20Install%20brochure.pdf
- ↑ https://www.certainteed.com/resources/CTS%20Step-by-Step%20Install%20brochure.pdf
- ↑ https://www.certainteed.com/resources/CTS%20Step-by-Step%20Install%20brochure.pdf
- ↑ https://www.certainteed.com/resources/CTS%20Step-by-Step%20Install%20brochure.pdf
- ↑ https://www.youtube.com/watch?v=Nq4y9iDPl5s&feature=youtu.be&t=51
- ↑ https://www.familyhandyman.com/garden-structures/fences/installing-a-vinyl-fence/view-all/
- ↑ https://www.familyhandyman.com/garden-structures/fences/installing-a-vinyl-fence/view-all/
- ↑ https://www.familyhandyman.com/garden-structures/fences/installing-a-vinyl-fence/view-all/
- ↑ https://www.familyhandyman.com/garden-structures/fences/installing-a-vinyl-fence/view-all/
- ↑ https://www.youtube.com/watch?v=Nq4y9iDPl5s&feature=youtu.be&t=51
- ↑ https://www.familyhandyman.com/garden-structures/fences/installing-a-vinyl-fence/view-all/
- ↑ https://www.thisoldhouse.com/how-to/how-to-install-vinyl-fence
- ↑ https://www.familyhandyman.com/garden-structures/fences/installing-a-vinyl-fence/view-all/
- ↑ https://www.thisoldhouse.com/how-to/how-to-install-vinyl-fence
About This Article