This article was co-authored by wikiHow staff writer, Eric McClure. Eric McClure is an editing fellow at wikiHow where he has been editing, researching, and creating content since 2019. A former educator and poet, his work has appeared in Carcinogenic Poetry, Shot Glass Journal, Prairie Margins, and The Rusty Nail. His digital chapbook, The Internet, was also published in TL;DR Magazine. He was the winner of the Paul Carroll award for outstanding achievement in creative writing in 2014, and he was a featured reader at the Poetry Foundation’s Open Door Reading Series in 2015. Eric holds a BA in English from the University of Illinois at Chicago, and an MEd in secondary education from DePaul University.
This article has been viewed 8,189 times.
Learn more...
Rebuilding an entire deck can be a costly and time-consuming process. Luckily, you can easily replace individual boards in your deck with a few hours of work. To replace a few boards, pry the nails in your old boards out with a hammer and cat’s paw. Then, use nails and screws to install new boards into your old joists. Replace entire boards whenever possible to avoid having to use any power tools to cut into your deck and always wear protective eyewear if you have to work with power tools.
Steps
Measuring and Finding Your Replacement Boards
-
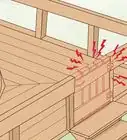
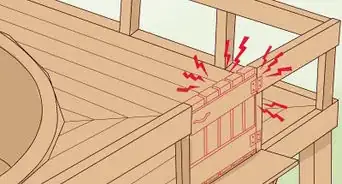
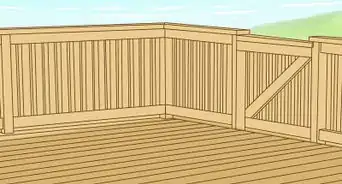
1Inspect your deck to see how many boards need to be replaced. If part of a board is damaged or needs to be repaired, it is easier to replace the entire board to ensure that the wood is evenly secured against the joists underneath. Walk around your deck and note the number of boards that need to be replaced on a sheet of paper.
- You could choose to replace part of a board, but it would require you to saw through a board while it’s installed on your deck. This is highly dangerous for the structural integrity of your deck if you end up cutting a joist.
-
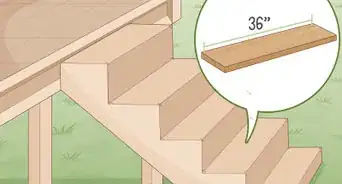
2Use a measuring tape to determine the length of your boards. Measure the entire length of any individual boards that you’re replacing by hooking a measuring tape on one end and pulling it out all the way to the end of the board. Measure each individual board that you plan on replacing, since the length of each board may be different.
- Write these measurements down on a sheet of paper to make them easy to refer to when you go to order your replacement boards.
Advertisement -
3Note the width and depth of a board by using your measuring tape. Hook your measuring tape on the bottom of a board and slide it all the way to the top to note the depth. Measure the width of a board by looking at the distance from one edge of the board to the opposite side. This will determine the size of lumber that you need to get. Write your measurements down.[1]
- The width and depth of each board should be identical.
- Do not include the space between boards in your measurement. You typically leave at least 1⁄8 in (0.32 cm) of space between boards to give the wood space to expand a little when it gets wet.
-
4Select a wood that is the same species and color to try to match your deck. It is hard to match the look of weathered wood, but you can try to match the color by getting the same species and type of wood as the rest of your deck. If you built the deck yourself, you should know what species of wood you used. Otherwise, contact the contractor that built it to find out.[2]
- You can always use a wood stain to try to darken or lighten your wood, but it’s still better to get as close as you can naturally.
- You can snap off a piece of your broken board to take to the store when you go to look at replacement boards. The clerk may be able to help you identify the type of wood that your deck is made out of.
- If you’re replacing individual boards for your deck, be prepared to have a little bit of a difference in the color between new and replaced boards. It is near-impossible to perfectly match the color if the deck has been exposed to the weather for more than a few weeks.
-
5Order your replacement lumber and pick it up or get it delivered. Order your replacement boards from a lumber mill or constriction supply store. Depending on the size of your order, you may want to pick them up yourself to save some money. Otherwise, get them delivered to your house.
- Before you start to remove boards, check the replacements to ensure that they are cut accurately based on your specifications.[3]
Tip: You can save some money by getting a larger length of lumber and cutting it yourself if you’d like. Use a circular saw and saw horses to trim down an oversized board. Use a speed square as a straight edge to keep your cuts at a 90-degree angle.


Removing Damaged Boards and Prepping the Joists
-
1Pry out the nails in your old boards with a cat’s paw and hammer. You can use the claw of your hammer to pry out any nails that are sticking out by inserting the nail in between the spokes of the claw and bracing the hammer’s head against the wood to rip it out. For embedded nails, you’ll need a cat’s paw. Place the teeth of a cat’s paw in between a nail and the wood at a 45-degree angle with your nondominant hand. Hit the backside of the paw with your hammer to dig the paw’s teeth into the wood. Pull the cat’s paw away from the nail to rip it out.[4]
- You may need to strike a cat’s paw 2-3 times to dig the teeth deep enough into the wood.
- If you’re have trouble getting enough clearance under the head of a nail, use a wood shim and heavy pliers to create a platform under the head before pulling it up a little.
- A cat’s paw looks like a small crowbar, and it is designed to rip out hard-to-reach nails.
-
2Lift the damaged boards out of the deck and discard them. If there is any space in between the boards, slowly lift them out by hand. If there isn’t any space, pry them up slowly with your cat’s paw or a crowbar by sticking it between 2 boards and lifting it slowly. If the board is stuck to your joist, drive the claw of your hammer into a board near the end and lift it out by raising the hammer.[5]
- A joist refers to the horizontal pieces of wood that support your deck boards underneath.
- If a board snaps while you’re removing it, don’t worry. You can remove it in sections. Put on thick gloves to protect your hand from splinters though.
- Remove every damaged board before replacing any single section.
-
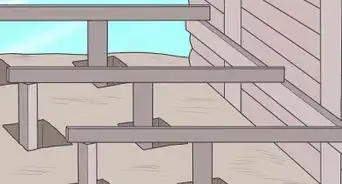
3Remove any debris from your joists and inspect them for damage. With your old boards up, you need to inspect your exposed joists to ensure that the replacements will rest flat. Look for the thin pieces of wood in the open spaces where your boards used to be to find your joists. Pry out any nails that remain with the claw of your hammer and remove any chunks of debris or board-wood by driving a chisel between the top of the joist and the unwanted object before prying it off.[6]
- Check each joist before replacing your boards. Joists can be damaged by the removal process and you may need to install tin flashing to reinforce them.
-
4Replace any joist that looks rotted or unstable. If any of your joists are really weathered or appear unstable, you can replace the entire joist. Use a wrench to unscrew any flange bolts and a jigsaw to cut the section of rotting joist out. Use a jigsaw or circular saw to cut a replacement beam and install it in the missing slot by using corner brackets and nails to attach it to your frame.[7]
- Replacing a floor joist can be a big job, and you could permanently destroy your deck if you don’t do it correctly. Hire a professional carpenter to do this for you if you are unsure about the process.
-
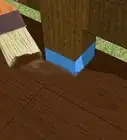
5Put tin flashing over any of your damaged joists. If you accidentally damaged any of your joists or they are worn down where they meet the board, you can reinforce the joists by putting a sheet of tin flashing in the center. Apply pressure to both sides at the same time by using both of your hands to bend the flashing around the edges of your joist.[8]
- Put on some thick construction gloves to do this.
- Tin flashing comes in paper-like sheets if you want a more flexible option.
Tip: Tin flashing is designed to insulate 2 pieces of wood that are touching to prevent friction. They look like thin metal sheets and are usually folded quite easily to fit a shape.
-
6Drive a nail through the sides of your flashing to affix it to a joist. Use a nail gun or hammer to drive a 1–2 in (2.5–5.1 cm) nail through the side of your flashing. This will keep it in place while you’re installing your new boards. Install a nail on each side in different locations to ensure that the nails don’t hit one another.[9]
- Tin flashing will also keep your wood dry when it rains.


Installing Your Replacement Boards
-
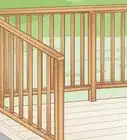
1Insert your replacement boards in the locations where they’re cut to fit. Lay each of your boards into the slot they belong so that you don’t accidentally install a board in an improper location. Look at your boards before moving on to see if there are any imperfections or odd marks in the wood grain that you want to hide. If you don’t like the look of a board, try flipping it over and fitting it in the opposite side.[10]
- Unless you gave unique cutting instructions, the front face and the backside of each board should be exactly the same.
- You may have to rearrange several boards after trying to fit them in the first time. Installing multiple boards can be kind of like fitting puzzle pieces together!
-
2Mark the location of each joist on your replacement boards with a carpentry pencil. If there is no room in between the preexisting boards and the new ones, use a carpentry pencil to mark the location of each joist underneath a board. If you can see in between the boards, you can rely on the space in between to make sure that you’re inserting nails or screws into the proper locations.[11]
-
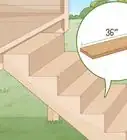
3Place 2 nails or screws at each location where a board meets a joist. Select nails or screws that are long enough to reach 1.25 in (3.2 cm) into the joist. Place the screws or nails equidistant to one another, leaving at least 1.5 inches (3.8 cm) between them. There must be at least 2 screws for every connection between a joist and a board.[12]
- For example, if your deck boards are 2 inches (5.1 cm) thick, your wood screws or nails must be at least 3.25 inches (8.3 cm) long.
- Try to place your nails or screws so that there is an equal amount of space between each nail or screw and the ends of your boards.
-
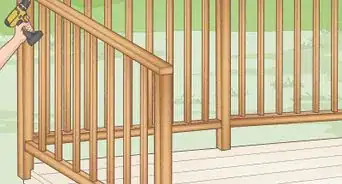
4Drill or hammer your screws or nails into place. You can use a hammer and nails or a drill and wood screws. If you’re drilling screws in, use a boring drill head to place a pilot hole for each screws. Then, hold each screw in place with your nondominant hand and use the lowest setting on your drill to insert your screws. If you’re hammering nails in, steady each nail in your nondominant hand and hit the head of your hammer to slowly push it into the wood before removing your nondominant hand.[13]
Tip: If you’re using a hammer and nails, hit the sharp point of a nail once or twice before driving it through the wood. This will flatten it a little to make it dig into the joist more securely.
-
5Repeat this process on each joist for each board that you’re replacing. Use 2 screws for every joist on each board that you’re installing. If you skip a joist, your wood could warp around it over time, causing your deck to become uneven.
-
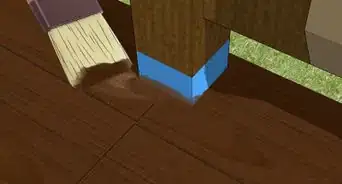
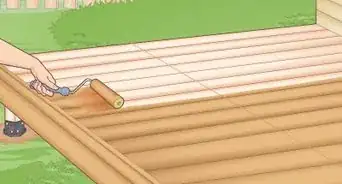
6Waterproof your boards by staining and sealing them if you’d like. If your boards aren’t pre-treated or pre-sealed, you can use a deck stain and sealant to waterproof your new boards. Use the same color that you used on the rest of your deck, or get an oil-based or resurfacing stain and sealant that looks similar to your preexisting boards. Pour your stain and sealant into a paint tray and apply it with a natural brush. Use back-and-forth strokes to work in the direction of the grain until you cover all of your boards.[14]
- There are clear, water-based stains that won’t change the color of your wood if you got an accurate match with your new boards.
- Wear a dust mask and gloves while doing this. The fumes from some deck stains can be quite pungent, and the gloves will keep your hands clean as you apply the stain.
- A sealant protects your wood from water while a stain protects your wood from UV rays. You can get a combination sealant and stain that does both, or you can apply them separately.
- You can stain your entire deck if you want to make the stain match across each of your boards.


Things You’ll Need
- Drill
- Protective eyewear
- Gloves
- Cat’s paw
- Hammer
- Replacement joists
- Nails or Screws
- Carriage bolts
- Speed square
- Jigsaw or circular saw (optional)
- Chisel
- Drill
- Carpentry pencil
- Flashing (optional)
- Water repellant wood stain
- Brush


References
- ↑ https://extremehowto.com/radical-re-deck/
- ↑ https://www.thisoldhouse.com/how-to/how-to-replace-broken-front-porch-board
- ↑ https://home.costhelper.com/deck-repair.html
- ↑ https://www.thisoldhouse.com/how-to/how-to-replace-broken-front-porch-board
- ↑ https://www.familyhandyman.com/decks/replacing-deck-boards/
- ↑ https://www.familyhandyman.com/decks/replacing-deck-boards/
- ↑ https://www.familyhandyman.com/decks/replacing-deck-boards/
- ↑ https://www.familyhandyman.com/decks/replacing-deck-boards/
- ↑ https://extremehowto.com/radical-re-deck/
- ↑ https://www.familyhandyman.com/decks/replacing-deck-boards/
- ↑ https://www.familyhandyman.com/decks/replacing-deck-boards/
- ↑ https://www.familyhandyman.com/decks/replacing-deck-boards/
- ↑ https://www.familyhandyman.com/decks/replacing-deck-boards/
- ↑ https://www.ewg.org/healthyhomeguide/wood-stains-and-finishes/
About This Article