This article was co-authored by James Schuelke and by wikiHow staff writer, Eric McClure. James Schuelke, along with his twin brother David, is the co-owner of the Twin Home Experts, a licensed plumbing, leak detection, and mold inspection company based in Los Angeles, California. James has over 32 years of home service and business plumbing experience and has expanded the Twin Home Experts to Phoenix, Arizona and the Pacific Northwest.
There are 10 references cited in this article, which can be found at the bottom of the page.
This article has been viewed 284,353 times.
When you pull up on that rod sticking up behind your faucet, the drain stopper is supposed to plug the sink. But if that stopper snaps, gets stuck, or that rod just dangles there? Your first instinct may be to call a plumber, but you can save your hard-earned money by doing this one yourself. So far as home repairs go, replacing a sink stopper is pretty low on the difficulty curve, and most DIYers can handle without much fuss. Read on to learn how to replace your sink stopper.
Things You Should Know
- Undo the clamps connecting the rod that sticks down from the handle and disassemble your drain pipe.
- Purchase a sink stopper replacement kit that matches your pipe width and sink opening.
- Unscrew the drain pipe, add new plumber’s putty, and replace the drain pipe and extension rod. You’ll connect the stopper to the rod last.
- Use trial and error to find the right height and stick with it. Don’t get frustrated trying to get your new stopper to open and close.
Steps
Removing the Old Stopper
-
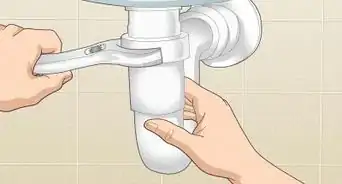
1Undo the clamp that connects the pivot rod and extension bar. Beneath the sink, you'll find a vertical metal bar with a series of holes in it (called the extension bar). It’s connected to a rod that enters the sink's drainpipe (called the pivot rod). Pinch the V-shaped spring clamp that holds them together to disconnect them. Keep the clamp and all other pieces you disconnect for future reference.[1]
- If the spring clamp broke, congratulations! You just saved yourself a ton of time and effort. Just replace the spring clamp and the stopper should work just fine. Spring clamps look like this. Find one for your faucet brand.
-
2Unscrew the pivot nut and pull it out along with the pivot rod. The pivot nut is threaded onto a short stub on the drainpipe. It’s where the pivot rod connects to the drain. Turn the nut counterclockwise by hand (or use a wrench if necessary) to remove it. Pull it straight off along with the inserted pivot rod.[2]
- Depending on how much stuff you have under the sink, you may want to clear everything out and set it aside to make room to work.
Advertisement -
3Undo the screw that connects the extension bar and lift rod. The vertical extension bar is connected to the lift rod you pull up behind the sink via a clevis (a U-shaped joint). Undo the screw to free up the lift rod, then pull it out of the sink.[3]
- If there’s nothing wrong with your lift rod, leave it in place. You can probably reuse it.
- A sink stopper replacement kit will come with a new extension bar and lift rod if there is something wrong with the lift rod.
-
4Lift out the drain stopper in the middle of your sink. The stopper is no longer connected to anything, so pull it up out of the sink by hand. Use your fingernails or a flathead screwdriver to pry it up out of the drain.[4]
- You may be able to reuse the drain stopper, but it’s probably going to be extremely dirty. Soak it in a bowl of vinegar for 30 minutes and then rinse it off if you want to reuse it. Scrub it with an old toothbrush if necessary.[5]
-
5Take your pieces to the hardware store and find replacements. Take everything you've disconnected to a home improvement store. If you have details on the brand and model, all the better. Buy a replacement kit that’ll fit the opening in your sink. If you can't find a kit that fits your pipe or you'd rather replace the whole mechanism, disconnect the drain pipe (the next section) and bring that with you to, too.[6]
- If you're only replacing the stopper mechanism components, skip down to the third section.
- You don’t have to take the drain out so long as it appears to be in good working order and your replacement kit matches the opening of the sink. However, you may want to replace the whole thing if it’s especially old or you can’t find a kit that fits the sink’s collar.


Disconnecting the Drain
-
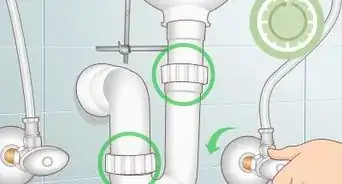
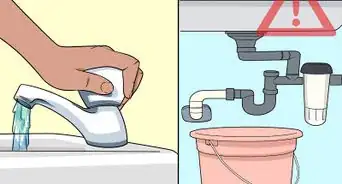
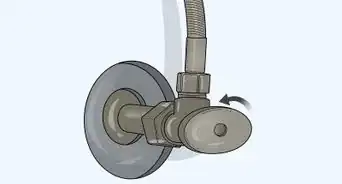
1Undo the connection between the P-trap and the drain pipe. Stick a bucket under the lowest part of the sink and lay some towels down. Shut the water off by turning the valves on the supply lines counterclockwise. Then, turn the nut connecting the drain pipe that leads up into the sink and the P-trap (the U-shaped pipe). Loosen the nut completely and pull the pipes apart.
- You should be able to gently slide the pipes apart without damaging anything, but don’t be too aggressive.
- If you’re worried about breaking something, undo the other end of the trap where it connects to the pipe leading into the wall.
-
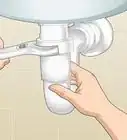
2Unthread the sink stopper's drain pipe from the underside of the drain. Now that the bottom of the drain pipe is free from the P-trap, loosen the nut that connects it to the threaded bottom of the sink drain. Loosen the nut by hand, or use a wrench if you can’t get the nut loose.[7]
-
3Loosen the locknut that holds the drain in place. Most sink drains have a compression nut between the drain's lip on the topside of the sink and a locknut on the underside. The locknut will be snug up against the underside of the sink. Use a large wrench or channel locks to loosen and remove it.[8]
- If the whole sink drain spins when you try to turn the locknut, hold the drain pipe with one hand while twisting with the other.
- Some sink drain locknuts have screws that need to be removed first. Remove the screws and then pull off the housing to access the compression fitting.
-
4Push up on the sink drain and pull it out of the sink basin. Your drain is now free, but there’s plumber’s putty sticking the sink to the opening. Just push and jiggle the drain pipe free to get it off of the putty. If it still won't budge, a few taps from below with a rubber mallet should do the trick.[9]
- Clear away the old putty residue in the sink bowl with a plastic putty knife and a wet rag.
-
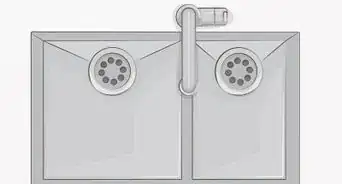
5Take everything to the hardware store to find a replacement kit. You don't have to replace the old sink stopper assembly with the exact same model so long as the diameter of the sink opening matches the stopper and pipe. The drain pipe must also match the diameter of the P-trap.[10]
- If your other pipes are PVC, get a PVC drain pipe kit. If the pipes are metal, go with a metal kit. Don’t mix and match.
- Unless your setup is on the older side, the sink opening is probably 1.25 inches (3.2 cm) in diameter and the pipes will be 1.5 inches (3.8 cm).


Installing the New Drain
-
1Roll up some fresh plumber’s putty and put it around the basin opening. Take a small handful of plumber's putty from its container and work it around in your hands until it feels like soft clay. Then, roll it into a “snake” about the thickness of a pencil, and form a ring by pressing the ends together. Press this ring onto the rim of the opening in your sink basin.[11]
- Make sure you've removed any old putty from the sink with wet rags and a plastic putty knife first.
-
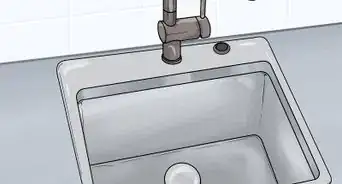
2Push the new sink drain pipe into the opening and onto the putty. Press firmly enough that plumber's putty squeezes out around the top lip of the drain. Clear this excess putty away with your fingers and a wet rag.[12]
- Use as much pressure as necessary until the rim around the sink opening is flush with the basin around it.
- Don’t be shy about pushing and pulling down on the pipe! It can take a fair bit of pressure. You won’t break anything.
-
3Stack any included gaskets on top of the locknut or bell housing. Follow your kit’s instructions here. To keep the sink watertight, install the required gaskets and nuts that firmly keep your drainpipe in place. Tighten everything firmly by hand unless instructed otherwise.[13]
-
4Tighten the locknut or bell housing nut to secure the drain in place. Use a large wrench or channel locks to tighten a traditional locknut. Make the connection snug, but don't try to over-tighten it or you may crack the porcelain sink basin. If you have a locknut with screws, just hand-tighten the locknut and use a screwdriver to secure the screws and make the compression connection snug.[14]
- If you have a bell washer strainer, slide the bell housing over the sink drain and wrench-tighten the nut that fits onto the exposed sink drain threads at the bottom.
-
5Smear pipe joint compound onto the threads at the bottom of the pipe. Most sink stopper drain pipes only have a few rings of threads to attach them to the sink drain, which makes them prone to leaks. To prevent leaks, smear pipe joint compound around the bottom several threads of the sink drain.[15]
- You can also wrap Teflon tape around the threads, but pipe joint compound provides superior leak protection.
- If your sink drain kit has a metal tailpipe, the exposed threads may be on the P-trap instead of the sink drain. If so, smear the pipe joint compound on the exposed P-trap threads instead.
-
6Screw on the drain pipe with the cap opening pointing back. Hand-tighten the connection between the drain pipe and the sink drain until they're snug. Make sure the pipe stub (opening for the stopper) that will accept the pivot rod is pointing straight back to the wall. Get that connection as tight as possible while achieving the proper alignment.[16]
- If you need help picturing this, drop the lift handle down through the opening in the faucet fixture. If necessary, you can also temporarily attach the extension bar with the screw that connects them at the clevis.
-
7Connect the P-trap to the drain pipe to complete the connection. If your new sink stopper drain is the same length as the old one, the existing P-trap should reattach without much trouble. Gently align the pipes and slide them in together. Then, tighten the compression nut by hand.
- If the pipe is too long, use a hacksaw or pipe cutter to trim off some of the pipe.


Assembling the New Stopper
-
1Align and place the drain stopper into the sink's drain opening. The drain stopper will have a notch in the bottom with a hole behind it. Line up the stopper so that the notch is facing directly toward the opening for the lift handle, which is usually directly behind the faucet spigot. Maintain this alignment as you insert the stopper into the drain opening.[17]
-
2Insert the plastic washer on the horizontal stub on the drain pipe. Your kit will come with a small plastic ring that is slightly wider in diameter on one side than the other. Place the narrower side into the opening first. This washer will help hold the ball on the pivot rod in place and provide a watertight seal.[18]
-
3Put the pivot rod into the stub inside the drain stopper. Insert the rod at a slightly downward angle. If your drain stopper is lined up properly, you should be able to feed the rod through the hole without much fuss. You'll know you've succeeded if the drain stopper bobs up and down in the sink. Pull up on the stopper to verify the attachment — if you can't pull it out of the drain opening, then it's attached.[19]
-
4Feed the pivot nut over the pivot rod and tighten it. Tighten the nut by hand onto the threads on the end of the drain pipe’s horizontal stub. If you overtighten the nut, the pivot rod may not be able to move up and down freely; test the rod's movement, and loosen the nut slightly if necessary.[20]
-
5Install and connect the lift handle and extension bar. Drop the lift handle into the opening in the faucet fixture or connect the lift bar to the lift handle with a clevis and a screw. You'll end up with a single vertical shaft, the bottom of which should line up with the horizontal pivot rod. Make sure the series of holes in the extension bar are facing the pivot rod.[21]
- Once the rod is connected, lifting the stopper behind the faucet will pull down on the stopper.
-
6Connect the pivot rod to the extension bar with the spring clamp. Angle the pivot rod downward until the drain stopper pops up to its highest position in the sink basin. Feed the pivot rod through the corresponding hole in the extension bar. Use the V-shaped spring clamp that comes with the kit to hold the pivot rod and extension bar together.[22]
- Don’t tighten the clamp as hard as you can; just apply enough pressure to hold the rod and bar in place. This is the hardest part of the process—getting the rod and bar to the right height where the stopper will open and close correctly.
-
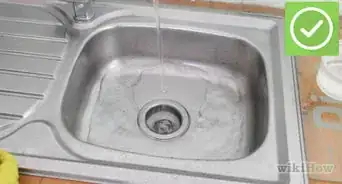
7Test the stopper, make adjustments as needed, and check for leaks. Lift up on the lift handle and see if the drain stopper plugs the sink drain completely. Move the pivot rod up or down on the openings of the extension bar until it looks and feels right. Then, run water in the sink to ensure you’ve got a good seal.[23]
- Don’t get frustrated. It can be annoying trying to line the rod up at the right height, but you will eventually get it right.
- Once you’ve got the rod configured right, tighten the clamp completely to close the connection.
-
8Tighten everything fully and enjoy your new sink stopper. Check for leaks around the pivot nut and any other pipe connections you've made. Once everything looks good, give all of the washers and nuts one more full rotation to tighten everything all the way.[24]EXPERT TIPJames Schuelke, along with his twin brother David, is the co-owner of the Twin Home Experts, a licensed plumbing, leak detection, and mold inspection company based in Los Angeles, California. James has over 32 years of home service and business plumbing experience and has expanded the Twin Home Experts to Phoenix, Arizona and the Pacific Northwest.Professional Plumber
 James Schuelke
Professional PlumberYou can make use this same mechanism later if you need to adjust your sink stopper: Look under the sink for a U-shaped clip with a bar that goes inside of the tailpiece. Use one hand to hold the stopper at the height you want it. Once it's adjusted, use the other hand to set the clip, then screw the tailpiece nut back on to the pop-up assembly.


Things You'll Need
- Sink stopper replacement kit
- Sink drain kit (optional)
- Pipe joint compound
- Plumber's putty
- Adjustable wrench or channel locks


References
- ↑ https://www.handymanhowto.com/how-to-replace-a-pop-up-sink-drain-part-1/
- ↑ https://www.handymanhowto.com/how-to-replace-a-pop-up-sink-drain-part-1/
- ↑ https://www.tsbrass.com/files/drawings/098/098-018118-45.pdf
- ↑ https://www.thisoldhouse.com/how-to/how-to-fix-bath-sink-stopper
- ↑ https://www.tubshroom.com/blogs/tips/how-to-remove-drain-stopper
- ↑ https://www.epa.gov/watersense/fix-leak-week
- ↑ https://www.faucetdepot.com/pdfs/AS0235270.pdf
- ↑ https://www.thisoldhouse.com/how-to/how-to-fix-bath-sink-stopper
- ↑ https://www.us.kohler.com/onlinecatalog/pdf/115999_2.pdf
- ↑ https://www.epa.gov/watersense/fix-leak-week
- ↑ https://piperepair.co.uk/2020/07/20/the-difference-between-plumbers-putty-and-epoxy-putty/
- ↑ https://www.faucetdepot.com/pdfs/AS0235270.pdf
- ↑ https://www.familyhandyman.com/plumbing/how-to-replace-a-kitchen-sink-basket-strainer/view-all/
- ↑ https://www.faucetdepot.com/pdfs/AS0235270.pdf
- ↑ https://www.handymanhowto.com/how-to-replace-a-pop-up-sink-drain-part-1/
- ↑ https://www.faucetdepot.com/pdfs/AS0235270.pdf
- ↑ https://www.us.kohler.com/onlinecatalog/pdf/115999_2.pdf
- ↑ https://www.handymanhowto.com/how-to-replace-a-pop-up-sink-drain-part-1/
- ↑ https://www.us.kohler.com/onlinecatalog/pdf/115999_2.pdf
- ↑ https://www.hometips.com/repair-fix/sink-popup-stopper.html
- ↑ https://www.faucetdepot.com/pdfs/AS0235270.pdf
- ↑ https://www.faucetdepot.com/pdfs/AS0235270.pdf
- ↑ https://www.handymanhowto.com/how-to-replace-a-pop-up-sink-drain-part-1/
- ↑ https://www.hometips.com/repair-fix/sink-popup-stopper.html
About This Article
To replace a sink stopper, first, follow the vertical bar of the stopper beneath your sink. Then, undo the clamp that connects the bar to the angled rod that enters the drainpipe by pinching and separating it. After that, unscrew the nut holding the angled rod and pull it off. Undo the screw holding the extension bar and lift out the drain stopper. To install the new stopper, push the new sink drain into the opening and tighten the nut to secure it in place. Then, go beneath the sink to reconnect the angled pivot rod to the extension bar, and tighten all of the nuts. Test the stopper and check beneath the sink to make sure there aren’t any leaks. For tips about how to undo the tailpipe, keep reading!