This article was co-authored by wikiHow staff writer, Christopher M. Osborne, PhD. Christopher Osborne has been a wikiHow Content Creator since 2015. He is also a historian who holds a PhD from The University of Notre Dame and has taught at universities in and around Pittsburgh, PA. His scholarly publications and presentations focus on his research interests in early American history, but Chris also enjoys the challenges and rewards of writing wikiHow articles on a wide range of subjects.
Learn more...
Fiddle leaf fig trees make beautiful houseplants, but they’re also finicky about changes to their situation. So it’s important to cause minimal disruption when the time comes to move the plant to a new pot. To help out, we’re here with all the info you need about when to repot, how to choose and prep the new pot, and what steps to take to unpot and then repot your fiddle leaf fig.
Things You Should Know
- Repot the plant when you first buy it, and also when it shows signs—like slowed growth rate or exposed roots—of being rootbound.
- Choose a new pot that’s only 1–2 in (2.5–5.1 cm) larger than the old one.
- Carefully pull the plant from the old pot, remove any loose soil and bad roots, and nestle it into a bed of fresh potting mix for indoor plants.
Steps
Prep Work
-
1Repot the plant when you take it home and when it looks crowded or root-bound. It’s always a good idea to transfer a plant out of its thin plastic pot when you buy it, but after that you should repot a fiddle leaf fig only when there’s a good reason. For instance, if the plant has been in the same pot for 3-4 years, repot it to refresh the soil. More likely, though, plan to repot it every 1-2 years when it shows signs (like the following) of outgrowing its current pot:[1]
- Roots are growing out of the drainage holes in the bottom of the pot.
- Roots are growing up through the surface of the soil.
- The plant has grown tall enough that it’s in danger of tipping over easily.
- The soil, even when moist, pulls away from the interior of the pot (this indicates that the roots are pushing against the pot and compacting the soil).
- The plant’s growth rate becomes sluggish or stops during its typical growth season (usually spring and summer).
-
2Do the repotting in spring or summer, if possible. Finicky fiddle leaf figs handle repotting best during their active growth season, so try to plan ahead and do the task during the late spring or early summer. However, if the plant has become severely root-bound and is clearly struggling, repot it ASAP no matter the season.[2]
- If roots are coming up from the surface or out of the drainage hole and the leaves are yellowing or falling off to an unusual degree, go ahead and repot the plant right away.
Advertisement -
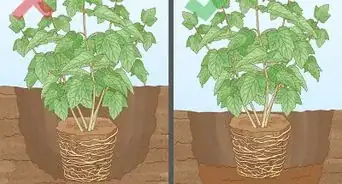
3Choose a new pot that’s no more than 2 in (5.1 cm) larger. You might be tempted to get a much bigger pot so you can repot less often, but fiddle leaf figs like to be cozy (and don’t like big changes). So it’s better to move up to a new plant pot that’s just a little bit bigger in diameter—1 in (2.5 cm) is ideal, but 2 in (5.1 cm) is fine as well.[3]
- For instance, if the current pot has an 8 in (20 cm) diameter at the top, pick a new one that has a 9–10 in (23–25 cm) diameter. The new pot should be no more than 2 in (5.1 cm) taller as well.
- Follow this 1–2 in (2.5–5.1 cm) rule when repotting plants of any type—it’s a great rule of thumb if you want to have a green thumb!
-
4Disinfect the new pot, especially if it’s been used before. Clean out any soil residue in the pot with soap and water, then plug up the drainage holes (or put it in a larger bucket) and fill it with a solution of 1 part bleach to 9 parts water. Leave the solution in the pot for at least 10 minutes, then rinse it out thoroughly.[4]
- If it’s a ceramic pot, keep it soaking in a bucket of clean water until you’re ready to use it. That way, the ceramic won’t suck up all the moisture the first time you water the repotted plant.
- Sterilizing the pot kills any disease-causing organisms that might have been left behind by the previous plant. But it’s not a bad idea to sterilize brand-new pots as well.


Unpotting
-
1Detach the soil from the pot with a garden knife. Grab the fiddle leaf fig near the soil line and give it a wiggle. If it’s solidly in place and there’s no gap between the soil and the inner surface of the pot, run the blade of a garden knife around the perimeter to help break the soil free. If the roots have compressed the soil away from the inner surface of the pot, skip this step.[5]
- A garden knife is a very handy tool, but you can use any kind of flat, narrow blade if you don’t have one.
-
2Lift the fig tree straight up and out of the pot. Grasp the plant firmly just above the soil line with one hand, and push down on the rim of the pot with the other hand. Bring the whole plant, including the root ball and any attached soil, up and out of the pot and lay it on its side.[6]
- If the plant is too large to lift up and out, lay the potted plant on its side and slide it out.
- This is messy work, so either do the job outside or lay down some drop cloths or plastic sheeting.
-
3Brush any excess soil off of the plant’s root ball. Use a paintbrush, a soft scrub brush, or just your hands (with gardening gloves on) to remove any loose soil around the root ball. Don’t try to remove every last bit of soil, but do get rid of the loose stuff so you can get a good look at the root ball.[7]
- You’ll be replacing this old soil with fresh soil when you repot the fiddle leaf fig.
-
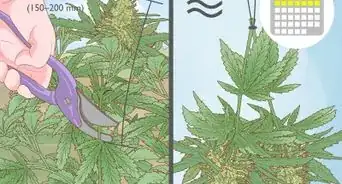
4Prune and loosen up the root ball. Even a healthy plant will have some unhealthy roots, and now’s the time to prune them. Use clean, sanitized pruning shears to snip off any roots that are dark brown or black and mushy, as well as any that are dried out and brittle. Leave behind all the healthy roots, which are white or light brown in color and pliable (“bendy”).[8]
- When you’re done pruning off any bad roots, lightly loosen up and spread out the remaining healthy roots.
- Sanitize pruning shears by wiping them down with isopropyl (rubbing) alcohol or by soaking them in a 1:10 bleach-to-water solution (just like with the new pot).


Repotting
-
1Pack 1–2 in (2.5–5.1 cm) of soil in the new pot. Choose a well-draining, organic matter-rich potting mix that’s designed specifically for indoor plants. Add about 1.5 in (3.8 cm) to the bottom of the pot and pack it down lightly to about 1 in (2.5 cm). If the new pot is 2 in (5.1 cm) taller than the old pot rather than 1 in (2.5 cm), add another 1 in (2.5 cm) of lightly compacted soil.[9]
- Add a single layer of newspaper or paper towel first if you’re concerned about soil falling out of the drainage hole(s). Don’t add a layer of rocks, broken pottery, etc.—just stick with the potting soil.
-
2Position the plant in the pot so it’s centered and upright. Set the fiddle leaf fig on top of the bottom layer of soil, right in the middle of the pot. If it’s a really tall plant, have a friend hold it steady and upright while you move on to the next step. Otherwise, use one hand to steady the plant and the other to do the next step.[10]
-
3Add soil around the sides up to the same level as before. Slowly fill in the void between the root ball and the inner surface of the pot by putting in small scoops or handfuls of the potting mix. Very lightly pack it as you work—just enough to fill in any air pockets against the roots. Keep adding soil up the sides until it reaches the same level on the plant as before (in the old pot).[11]
- Ideally, there should be around 2 in (5.1 cm) of space between the top of the soil and the rim of the new pot.
-
4Water the fig tree and resume its normal routine. Now that the fiddle leaf fig is repotted, water it just as you normally do—a good rule of thumb is to give it 8 fl oz (240 ml) of water per 2 ft (61 cm) of plant height. From here on, treat it just as you did before—put it back in the same place and resume your prior watering and care schedule. The leaves may yellow for a few days due to stress, but your plant should bounce back fairly quickly.[12]
- If you think your “normal routine” may not be the best for your fiddle leaf fig, wikiHow has you covered! We’ll help you water it properly, give it the care it needs, and even revive it if it’s having a tough time.


References
- ↑ https://houseplantauthority.com/when-repot-fiddle-leaf-fig/
- ↑ https://houseplantauthority.com/when-repot-fiddle-leaf-fig/
- ↑ https://extension.uga.edu/publications/detail.html?number=B1318&title=Growing%20Indoor%20Plants%20with%20Success#Pruning
- ↑ https://hortnews.extension.iastate.edu/1994/3-16-1994/clean.html
- ↑ https://gardenerspath.com/plants/houseplants/grow-fiddle-leaf-fig/#Pruning-and-Maintenance
- ↑ https://gardenerspath.com/plants/houseplants/grow-fiddle-leaf-fig/#Pruning-and-Maintenance
- ↑ https://gardenerspath.com/plants/houseplants/grow-fiddle-leaf-fig/#Pruning-and-Maintenance
- ↑ https://extension.uga.edu/publications/detail.html?number=B1318&title=Growing%20Indoor%20Plants%20with%20Success#Pruning
- ↑ https://gardenerspath.com/plants/houseplants/grow-fiddle-leaf-fig/#Pruning-and-Maintenance
- ↑ https://extension.uga.edu/publications/detail.html?number=B1318&title=Growing%20Indoor%20Plants%20with%20Success#Pruning
- ↑ https://extension.uga.edu/publications/detail.html?number=B1318&title=Growing%20Indoor%20Plants%20with%20Success#Pruning
- ↑ https://houseplantauthority.com/when-repot-fiddle-leaf-fig/
About This Article