This article was written by Gino Colucci and by wikiHow staff writer, Eric McClure. Gino Colucci is a Home Improvement Specialist and the Owner of Crackerjacks Handyman Services (not a licensed contractor) in Chandler, Arizona. Crackerjacks Handyman Services offers an effective cost-saving solution for commercial and residential repair and maintenance needs, specializing in smaller projects. Crackerjacks Handyman Services carries liability insurance and all technicians go through a background check.
There are 10 references cited in this article, which can be found at the bottom of the page.
This article has been viewed 13,605 times.
Whether you just moved into a home with a Ring doorbell or you’re hooking up a new doorbell and something got messed up during the installation process, you may want to reset your Ring doorbell. Luckily, this is usually a breeze, and you should be able to reset the doorbell back to factory settings in less than a minute or two. While the overall process is basically identical across every model, there are a few unique things to take into account from model to model, so refer to your instruction manual first if you can!
This article is based on an interview with our home improvement specialist, Gino Colucci, owner of Crackerjacks Handyman Services. Check out the full interview here.
Steps
Resetting the Original Ring Models
-
1Remove the screws at the bottom of the doorbell. Ring doorbells come with a special screwdriver. Use this screwdriver to remove the 1-3 screws that rest at the bottom of your doorbell and set them aside.[1]
- You can use a T6 torx-head screwdriver if you don’t have the original screwdriver that came with the doorbell.[2]
- These instructions apply to the original Ring, as well as a variety of the other older models. If you don’t have your manual, you can pull up an image of the different models and compare them to yours, or just remove the screws to see whether there’s a removable faceplate or not. If there is no faceplate, use the steps in this section.
-
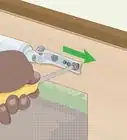
2Lift the doorbell up off of the bracket and flip it over. Gently and carefully slide the doorbell up off of the bracket that’s holding it in place. Flip it over to the back so that you’re looking at the side that was resting against the building.[3]
- Your doorbell may be hard-wired into your building. If it is, you don’t need to unplug anything. Just gently pull the doorbell out a bit and let it hang.
Advertisement -
3Hold down the orange button down for at least 10 seconds. Above the QR code and labels on the back of the doorbell, there should be a bright orange button. This is the reset button. Press and hold it down for 10-20 seconds until the LED on the front of the doorbell starts flashing.[4]
- On some models, this button will be black with an orange dot.
-
4Wait for the light on the front to stop flashing and connect your phone. The flashing LED on the front indicates that your doorbell is resetting, and it may take a few minutes for the process to complete. Once the LED stops blinking, scan the QR code on the back with the Ring app and complete the setup process.[5]
- If this is your first time hooking up the phone, you can’t hook the doorbell up without the Ring app. Download it if you haven’t already and scan the QR code in the app.
-
5Place the doorbell back into the brackets and screw it back in. You put the doorbell back on the bracket the same way you took it off. Just slide it on top of the bracket and push it down gently. Then, replace the screws on the bottom of the doorbell using the same screwdriver you used to remove them in the first place.[6]


Resetting the Ring 2, 3, and Pro
-
1Slide the faceplate off by removing the screws at the bottom. Grab the screwdriver that came with your Ring doorbell. Use it to unscrew the 1-3 screws at the bottom of the doorbell. Hold on to these screws. The faceplate covering your doorbell is now unlocked. Gently pry it off of the doorbell by hand.[7]
- You can use a T6 torx-head screwdriver if you don’t have the screwdriver that came with your Ring doorbell.[8]
- These instructions apply to the newer Ring models. If you don’t know what model you have, you can look online at what the different models look like to see which one you have, or just remove the screws. If a faceplate slides off, use the steps in this section.
-
2Look for a small black button on the front of the doorbell. The location of this button differs on the Ring 2, Ring 3, and Ring Pro, but it will always be on the front of the doorbell near the camera.[9] On most models, there will be an orange dot on the button, and it may be labeled “Setup.”[10]
- The only exception here is the wired version of the 2021 Ring and Ring Pro. On this version, the button will be on the side of the doorbell.[11]
-
3Hold this button down for 10-20 seconds and release it. Once you find the reset button, press it firmly and hold it down. After 10 seconds or so, the LED on the front of the doorbell will start flashing. Once this happens, release the button and wait.[12]
- As soon as the light starts flashing, your doorbell has successfully been reset to factory settings.
-
4Connect your phone to the doorbell to finish setting up. With the LED flashing, your doorbell is in setup mode. Pull up the Ring app and proceed with the setup process to connect your phone to the doorbell.[13]
- Some of the newer Ring doorbells will play a “setup mode” notification to let you know it has reset and it’s ready to connect.
- You must use the Ring app to connect your phone to the doorbell.
-
5Put the faceplate back on and reinstall the screws at the bottom. Pop your faceplate back into place. Just push it over the doorbell gently until it clicks into place. Then, take the screws that came with your doorbell and reinstall them at the bottom to keep the faceplate from falling off.[14]
- You must use the same screwdriver that you used to remove the screws originally.


Refreshing the Connection to Your Phone
-
1Get as close to the doorbell as possible to check the connection. If you’re connected via WiFi, get as close to the doorbell as you can to inspect the connection. That way, if it was simply a lost connection due to the WiFi signal dropping out, your phone and doorbell will reconnect automatically as you get closer to it.[15]
- Before you start messing with your doorbell, confirm that your WiFi is working. If the internet is out, just reset the router. Your phone should reestablish a connection.
-
2Open the Ring app and check your device’s connection. Go into the Ring app and tap the three lines on the top left of the home screen. Then, tap “Devices” and select your doorbell. Tap the “Device Health” tile to pull up the info on your device.[16]
- If it just says that you have a low or weak signal, the problem is the location of your router or the layout of your home. You may need to get a WiFi booster or relocate your router to get it closer to your doorbell.
-
3Tap “Reconnect to WiFi” to reset your phone and doorbell connection. If there is no signal at all or it’s low and you want to reset it to see if that helps, select the “Reconnect to WiFi” option in the “Device Health” menu. This will drop and reestablish the connection between your phone, doorbell, and router.[17]
- If you have multiple WiFi networks, you can try swapping the doorbell to a different network to see if that improves the connection.


References
- ↑ Gino Colucci. Home Improvement Specialist. Expert Interview. 14 January 2021.
- ↑ Gino Colucci. Home Improvement Specialist. Expert Interview. 14 January 2021.
- ↑ Gino Colucci. Home Improvement Specialist. Expert Interview. 14 January 2021.
- ↑ https://support.ring.com/hc/en-au/articles/4405018926740-How-to-completely-reset-your-Ring-Video-Doorbell
- ↑ https://support.ring.com/hc/en-au/articles/4405018926740-How-to-completely-reset-your-Ring-Video-Doorbell
- ↑ https://youtu.be/FNKjIcHHRw4?t=535
- ↑ Gino Colucci. Home Improvement Specialist. Expert Interview. 14 January 2021.
- ↑ Gino Colucci. Home Improvement Specialist. Expert Interview. 14 January 2021.
- ↑ https://www.digitaltrends.com/home/how-to-reset-ring-doorbell/
- ↑ https://support.ring.com/hc/en-au/articles/4405018926740-How-to-completely-reset-your-Ring-Video-Doorbell
- ↑ https://youtu.be/QHOp08cOndo?t=91
- ↑ https://www.digitaltrends.com/home/how-to-reset-ring-doorbell/
- ↑ https://youtu.be/QHOp08cOndo?t=147
- ↑ https://support.ring.com/hc/en-au/articles/360041190411-How-to-physically-install-your-Ring-Video-Doorbell-2020-release-without-an-existing-doorbell
- ↑ https://support.ring.com/hc/en-us/articles/115001499906-Ring-App-is-Having-Trouble-Connecting-to-the-Ring-Device-and-Showing-Video
- ↑ https://support.ring.com/hc/en-us/articles/115001499906-Ring-App-is-Having-Trouble-Connecting-to-the-Ring-Device-and-Showing-Video
- ↑ https://support.ring.com/hc/en-us/articles/360034825092-How-to-Reconnect-Your-Ring-Doorbell-or-Security-Camera-to-Wifi-or-Change-Your-Wifi-Network
- ↑ https://support.ring.com/hc/en-us/articles/360038010351-I-Would-Like-to-Take-Over-Change-Ownership-of-Ring-Devices
- ↑ https://support.ring.com/hc/en-us/articles/360034825092-How-to-Reconnect-Your-Ring-Doorbell-or-Security-Camera-to-Wifi-or-Change-Your-Wifi-Network
About This Article