This article was co-authored by David Pew. David Pew is a Professional Tailor and the Owner of Sew Generously based in Seattle, Washington. With over a decade of experience, David specializes in bespoke tailoring and alterations. He uses his experiences, skills, and eye for detail to produce the highest quality of products.
There are 13 references cited in this article, which can be found at the bottom of the page.
This article has been viewed 83,106 times.
Pockets add function and style to a pair of pants, but they can be a little tricky to sew. You can easily add pockets to a pair of pants that you are sewing from scratch or to a pair of pants that have no pockets. If possible, use a pattern to help you create the pocket. Then, position the pocket pieces and sew them into the side seams of your pants to attach them.
Steps
Cutting Fabric for the Pockets
-
1Cut out the paper pattern pieces for your pockets. If you are following a pattern that includes pockets, locate the pocket pieces and cut them out. If you are not using a pattern, then draw and cut your own paper pattern piece to ensure that all of your pocket pieces will be the same size.[1]
- You can make your pants pockets any size you like, but a 10 by 5 in (25 by 13 cm) rectangle is a good size. If you want to use a pattern, but don’t have one, there are some free pocket patterns available online.[2]
- If you prefer a curved edge on the bottom of the pockets, then cut out a rectangle and then cut around the corners on 1 side to round them out.
-
2Pin the paper pattern piece onto your fabric. Smooth out the fabric that you want to use for the pockets and lay your paper pattern piece on top of it. Pin the pattern in place so that all of its edges are over the fabric. Insert a pin about every 2–3 in (5.1–7.6 cm) along the edges of the pocket piece.[3]
- Make sure that the pins go all the way through the pattern and fabric.
- You can use any woven cotton fabric for your pockets. For dress pants, a common choice is silesia.[4]
Advertisement -
3Cut along the edges of the paper pattern. Use a sharp pair of fabric scissors to cut out the fabric. Follow the edges of the pattern that you pinned onto the fabric.[5]
- Repeat this 1 time to make a second matching piece for the pocket. You will need 2 pieces for each pocket, so create a total of 4 pieces if you want to add 1 pocket on each side of your pants.
- If you notice any notches on the paper pattern pieces, make sure to cut around these when you cut out the fabric. These will be useful for lining up your pocket pieces.
-
4Transfer any marks on the paper pattern piece to the fabric pieces. After you have cut out the fabric piece for your pockets, use a piece of chalk or a fabric marker to transfer any marks that are on the pattern onto the fabric pieces in the same locations.[6]
- For example, there may be 2 dots on the paper pattern piece to indicate where you will need to leave the pocket opening. Mark these on the same spots of your fabric pieces.
- If you created your own pattern, then you will not need to worry about adding marks to the fabric pieces.
Expert AnswerQWhat is the best fabric for pockets?
David Pew is a Professional Tailor and the Owner of Sew Generously based in Seattle, Washington. With over a decade of experience, David specializes in bespoke tailoring and alterations. He uses his experiences, skills, and eye for detail to produce the highest quality of products.Professional Tailor EXPERT ADVICEAnswer from David Pew:
Use any woven cotton—it can be boring, or it can be fun. If you're making dress pants, silesia is a commonly-used fabric for the pockets.
Positioning the Pockets
-
1Lay 1 pocket piece onto the edge of your pants and line up the marks. Position the pants fabric so that the right (print or outer) side is facing up and then lay 1 pocket piece right-side down on top of the pants. Line up any marks on the pocket piece with the marks on the pants. Position the pocket piece so that the edge of the pocket aligns with the edge of the pants fabric.[7]
- If you are adding pockets to pants that are already finished, then you will need to open up the side seam of your pants to attach the pockets. Use a seam ripper to cut away the stitches in the side seam from the top of the waistband down to the bottom of the pocket.[8]
- If the pattern has notches on it, make sure to line these up with any notches in your pants.[9]
- Make sure you pin the pocket so it isn't going to show from the outside.[10]
-
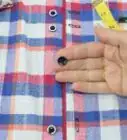
2Insert pins along the edges of the pockets and pants. Pin the pocket piece into place along the edge of the pants. Insert 1 pin every 2 to 3 in (5.1 to 7.6 cm) starting at the top edge of the pocket.[11]
- Do not pin the front and back of the pants or pocket piece together at this time. Only pin 1 pocket piece to 1 pants piece.
-
3Sew a straight stitch along the pinned edge of the pants and pocket. Set your sewing machine to the straight stitch setting and begin sewing a straight stitch near the top of the pocket piece. Sew the straight stitch about 0.5 in (1.3 cm) from the raw edges of the pocket and pants. Keep sewing until you reach the bottom of the pocket.[12]
- Make sure to remove the pins as you sew. Do not sew over them or you may damage your sewing machine.
-
4Repeat this for each of the pocket pieces. After you sew the first pocket piece into place along the edge of the pants, do the same thing for the second piece. Position the pocket on the other side of the pants, such as the front if you sewed the back piece first. Sew this piece in the same fashion. Then, repeat the whole process again to sew a front and back piece onto the opposite side of the pants.[13]
- For example, if you are sewing 1 pocket into each side of your pants, then sew 1 piece onto the front and 1 piece onto the back piece on each side of the pants for a total of 4 pocket pieces.
-
5Iron along the seam to press it flat. After you finish sewing the pocket to the edge of the pants, lay the pants and pocket piece so that the seam you created is facing up. Then, iron over the seam to flatten it out. This will help to improve the appearance of the pants once they are finished.[14]
- For delicate fabrics, use the lowest possible setting on your iron. You may also want to lay a t-shirt or thin towel over the fabric before you sew.
Sewing the Pocket Pieces Together
-
1Lay the pants and pocket pieces right (outer) sides together. After you have attached the pockets to the front and back sides of the pants, lay the front and back pant pieces on top of each other. Position the pieces so that the right (print or outer) sides of the pockets and pants are facing each other. As you do this, make sure that the edges of the front and back pieces are lined up.[15]
- Ensure that the edges of the pants are lined up going from the waistband to the bottom of the pant legs.
- Line up any notches in the pocket pieces or pants at this time as well.[16]
-
2Pin above and below the 2 dots from the paper pattern. These are the dots that indicate the pocket opening. Pin along the edges of the pocket and pants above and below these dots, but do not place any pins in this area. The space should be about 5 in (13 cm) wide.[17]
- You may also place 2 pins in an X shape through each of these dots to remind yourself not to sew across this section of the pocket.
- If you are not working from a pattern, measure 1 in (2.5 cm) from the top of the pocket and then measure a 5 in (13 cm) wide line along the seam where the pants and pocket meet. Mark the space with pins at each end.[18]
-
3Sew a straight stitch along the pinned edges of the pants. Begin sewing at the top edge of the pants and sew a straight stitch down to your first dot or pin X mark. Keep the stitch about 0.5 in (1.3 cm) from the raw edges of the pants.[19]
- Sew slowly to ensure a straight line of stitches.
- Be careful not to sew across the pins or you may damage your sewing machine. Remove the pins as you sew.
-
4Backstitch when you get to the X mark. Once you reach the dot or X mark, take your foot off of the pedal to stop the machine. Then, locate the reverse lever on the side of your sewing machine and press down on it. Continue to hold down the lever as you apply gentle pressure to the pedal again. Sew back by 1 in (2.5 cm) to secure the end of your stitches. Then, release the lever and sew forward to the X mark again and stop the machine.[20]
- Make sure to go extra slow when your backstitch to avoid going too far back.
-
5Reposition the needle below the second X and sew forward. Cut the thread and lift the needle out of the fabric. Raise the presser foot to free the fabric from the machine. Then, reposition the pocket and pants so that the second X or dot is under the needle. Remove any pins in this area, then lower the needle and presser foot over this spot. Sew forward by 1 in (2.5 cm).[21]
- Make sure to apply gentle pressure at the beginning of this stitch to ensure that you don’t sew too far down yet.
-
6Backstitch again and then sew to the bottom edge of the pant leg. After you backstitch, sew from the second X mark down to the bottom edge of the pant leg. Continue to keep the stitch about 0.5 in (1.3 cm) from the raw edges all the way down the pants.[22]
- Repeat this process for the other side of your pants if you are adding 2 pockets.
-
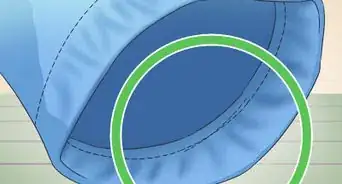
7Topstitch along the opening of the pocket. After you finish securing the side seams, turn your pants so that the right sides are facing out and the pocket material is tucked into the inside of the pants. Then, sew a straight stitch along the edge of the pocket about 0.25 in (0.64 cm) from the edge.[23]
- Repeat the stitch on both sides of each pocket.
- The topstitch will make the pockets lay flatter and look neater.
-
8Sew around the outside of the pocket with the right sides together. Turn the pants inside out again and line up the edges of the pockets so that their right sides are facing each other. Then, sew a straight stitch 0.5 in (1.3 cm) from the edges of the pocket material starting at the side seam of the pants.[24]
- Do not sew across the pocket opening or you will not be able to use the pocket.
- Repeat this for each of the pockets.
- After you finish sewing around the edges of the pocket, turn your pants right side out.
Expert Q&A
Did you know you can get expert answers for this article?
Unlock expert answers by supporting wikiHow
-
QuestionCan you add pockets to pants?
 David PewDavid Pew is a Professional Tailor and the Owner of Sew Generously based in Seattle, Washington. With over a decade of experience, David specializes in bespoke tailoring and alterations. He uses his experiences, skills, and eye for detail to produce the highest quality of products.
Professional TailorYes, you can add pockets to finished pants. First, open the seam with a seam ripper. Then, use the directions for sewing pants pockets to add the new pocket.
Support wikiHow by unlocking this expert answer.
Things You’ll Need
- Pants pattern with pocket pattern pieces
- Fabric
- Pins
- Chalk or fabric marker
- Sewing machine
- Thread
- Scissors


References
- ↑ https://www.youtube.com/watch?v=aN7A00EP_7I&feature=youtu.be&t=55
- ↑ http://www.sewstylish.com/2017/02/10/download-free-pocket-pattern/
- ↑ https://www.youtube.com/watch?v=aN7A00EP_7I&feature=youtu.be&t=55
- ↑ David Pew. Professional Tailor. Expert Interview. 5 January 2021.
- ↑ https://www.youtube.com/watch?v=aN7A00EP_7I&feature=youtu.be&t=55
- ↑ https://www.youtube.com/watch?v=aN7A00EP_7I&feature=youtu.be&t=72
- ↑ https://www.youtube.com/watch?v=aN7A00EP_7I&feature=youtu.be&t=85
- ↑ David Pew. Professional Tailor. Expert Interview. 5 January 2021.
- ↑ http://www.sewstylish.com/2017/02/10/download-free-pocket-pattern/
- ↑ David Pew. Professional Tailor. Expert Interview. 5 January 2021.
- ↑ https://www.youtube.com/watch?v=aN7A00EP_7I&feature=youtu.be&t=155
- ↑ https://www.youtube.com/watch?v=aN7A00EP_7I&feature=youtu.be&t=227
- ↑ https://www.youtube.com/watch?v=aN7A00EP_7I&feature=youtu.be&t=227
- ↑ https://www.youtube.com/watch?v=aN7A00EP_7I&feature=youtu.be&t=255
- ↑ https://www.youtube.com/watch?v=aN7A00EP_7I&feature=youtu.be&t=290
- ↑ http://www.sewstylish.com/2017/02/10/download-free-pocket-pattern/
- ↑ https://www.youtube.com/watch?v=aN7A00EP_7I&feature=youtu.be&t=319
- ↑ https://www.youtube.com/watch?v=aN7A00EP_7I&feature=youtu.be&t=85
- ↑ https://www.youtube.com/watch?v=aN7A00EP_7I&feature=youtu.be&t=422
- ↑ https://www.youtube.com/watch?v=aN7A00EP_7I&feature=youtu.be&t=422
- ↑ https://www.youtube.com/watch?v=aN7A00EP_7I&feature=youtu.be&t=422
- ↑ https://www.youtube.com/watch?v=aN7A00EP_7I&feature=youtu.be&t=422
- ↑ https://www.youtube.com/watch?v=aN7A00EP_7I&feature=youtu.be&t=660
- ↑ https://www.youtube.com/watch?v=aN7A00EP_7I&feature=youtu.be&t=1040
About This Article