This article was co-authored by Seleh Rahman. Seleh Rahman is a Tailor, Furrier, and the Owner of Seleh de Federal Hill in Baltimore, Maryland. With over 45 years of experience, Seleh specializes in fur, alterations, and fashion illustration. Seleh studied Fashion Design and Tailoring at Bay College of Maryland. He holds certifications in fur, design, and tailoring.
There are 14 references cited in this article, which can be found at the bottom of the page.
This article has been viewed 49,399 times.
Suspenders that connect to your pants with buttons are fashionable and functional. Most pants do not come with suspender buttons already sewn in. However, you can sew suspender buttons into your pants with a needle and thread. Add some suspender buttons to your pants and start getting more use out of your suspenders!
Steps
Marking the Placement
-
1Check the type of suspenders. Some suspenders have 2 connecting straps with buttonholes in the back and 2 straps with a buttonhole (1 per strap) in front. However, some suspenders are more elaborate than this and the back connects with 4 buttons while each of the front straps connects with 2 buttons. Check your suspenders to see how many buttons you will need to sew onto your pants to connect the suspenders.[1]
-
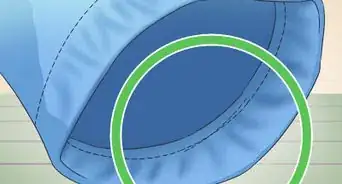
2Measure 1 inch (2.5 cm) from the center of the back of the pants. The back strap of your suspenders will need to connect with buttons near the center of the back of the pants. Find the center seam and measure 1 inch (2.5 cm) from the center on one side. Mark the point with a piece of chalk. Measure and mark the other side as well.[2]
- You can place the buttons on the inside or on the outside of your pants. Placing the buttons on the inside is usually better for a formal look, such as a pair of dress pants. Placing the buttons on the outside is more informal, such as for a pair of blue jeans.[3]
Advertisement -
3Mark the placement of the front buttons. Place the buttons that attach to the suspenders in the front of your pants so they are centered on each side of the front of your pants. The buttons will go in the areas that are just above the front of your hipbone.
- To get a good fit, you may want to put on your pants and after you have connected the back buttons. With the back of the suspenders connected by the back buttons, sling the suspenders over your shoulders and find where you want to connect them in front. Mark these areas with chalk to indicate where to sew the buttons onto.[4]
- You'll have 2 buttons on the left side, right side, and back of your pants.[5]
-
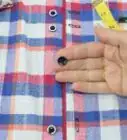
4Choose some plain, flat, round buttons. It is best to use simple buttons to hold suspenders in place, so avoid anything too ornate. Look for buttons that will match your pants and fit through the suspender buttonholes.
- The buttons should be about the same size as or slightly larger than the buttonholes.


Sewing the Buttons by Hand
-
1Thread a needle with about 24 inches (61 cm) of thread. Use a heavyweight thread that matches your pants, especially if you will be sewing the buttons onto the outside of the waistband. Insert the end of a 24 inches (61 cm) strand of thread through the eye of the needle.[6] Then, pull the end of the thread until it is even with the other end. Tie a knot to secure the ends of the thread.[7]
- You will need to rethread the needle with a new 24 inches (61 cm) strand of thread each time you start sewing on a new button.
-
2Insert the needle through the fabric. Push the needle in through the fabric where you marked the pants with chalk. Then pull the thread through the fabric until it is taut.
- If you want to keep the buttons hidden inside of the pants, then sew through the top layer of fabric on the waistband. Do not insert the needle all the way through to the other side. Just try to catch the fibers on the top layer of the fabric.
- If you want to place the buttons on the outside of the pants, then you can sew all the way through.[8]
-
3Slide the needle through 1 of the buttonholes. After you have inserted the needle through the fabric, insert the needle through 1 of the buttonholes. Pull the thread all the way through the buttonhole and slide the button down the thread so that it is right up against the fabric.[9]
-
4Bring the needle back down and through another button hole. Next, insert the needle down through the buttonhole opposite the one you just threaded. Pull the thread all the way through the buttonhole until it is taut and the button is right up against the fabric.[10]
-
5Catch the fibers of the pants with the needle. You do not need to insert the needle all the way through the fabric. You can just catch the fibers with the tip of the needle and then pull the thread through until it is taut. This is especially important if you want the thread to be hidden on the inside of the pants.
- If you are sewing the button onto the outside of the pants, then you may catch the fibers or sew all the way through the fabric.[11]
-
6Repeat the sequence for a secure stitch. After stitching through 2 of the buttonholes 1 time, repeat the stitch to ensure that the button will hold and the stitch will not come loose. [12]
- Depending on the type of buttons, you may only have 2 button holes to sew through. Repeat the process for those holes 1 time.
- If your buttons have 4 holes, then you will need to sew through each of these holes twice.[13]


Securing the Thread
-
1Wrap the thread around the base of the button 2 times. When you have finished stitching the button into place, take the tail of the thread still attached to the needle and loop it around the base of the button 2 times.[14]
-
2Hold the thread and insert the needle through twice to make a knot. After the second loop hold onto the middle of the thread, and bring the needle around the base of the button to create a loop. Insert the needle into the loop and bring it out the other side.
- Repeat this 2 times to create a knot around the base of the button. Then, pull on the thread to tighten the knot.[15]
-
3Insert the needle through the pant fabric under the button. Next, insert the needle through a few fibers on the surface of the fabric under the button. Then, pull the thread until it is taut. This will help to secure the knot you just made.[16]
- This is optional. If you think the knot is secure enough, then don't worry about sewing under the button.
-
4Snip the excess thread. Cut the excess thread extending from the stitch you just made. This will ensure that there are no threads hanging from the button.[17]
- After you finish the first button, you can work on the next one. Keep repeating the process until all of your buttons have been attached.


Expert Q&A
-
QuestionHow many suspender buttonholes do you need for your pants?
 Seleh RahmanSeleh Rahman is a Tailor, Furrier, and the Owner of Seleh de Federal Hill in Baltimore, Maryland. With over 45 years of experience, Seleh specializes in fur, alterations, and fashion illustration. Seleh studied Fashion Design and Tailoring at Bay College of Maryland. He holds certifications in fur, design, and tailoring.
Professional Tailor & FurrierYou'll have 2 on the left side of your pants, 2 on the right side, and 2 on the back. -
QuestionThe buttons are two inches apart from each other, correct?
 T. ChinsenTop AnswererThe suspender used in the article has a loop with 2 button loops at the end of the strap. You may not need to follow the steps shown if your suspender has only a single loop. In that case, position the button in the center for correct alignment.
Things You’ll Need
- 2 suspender buttons
- Ruler
- Chalk or fabric marker
- Thread
- Needle
- Scissors


References
- ↑ https://bespokeunit.com/suits/braces/retrofit-trousers-with-buttons/
- ↑ https://www.youtube.com/watch?v=DqMAzYXOqPg&feature=youtu.be&t=49s
- ↑ https://bespokeunit.com/suits/braces/retrofit-trousers-with-buttons/
- ↑ https://bespokeunit.com/suits/braces/retrofit-trousers-with-buttons/
- ↑ Seleh Rahman. Professional Tailor & Furrier. Expert Interview. 25 June 2021.
- ↑ https://www.artofmanliness.com/2012/06/28/sewing-on-a-button/
- ↑ https://www.youtube.com/watch?v=DqMAzYXOqPg&feature=youtu.be&t=1m5s
- ↑ https://www.youtube.com/watch?v=DqMAzYXOqPg&feature=youtu.be&t=1m34s
- ↑ https://www.youtube.com/watch?v=DqMAzYXOqPg&feature=youtu.be&t=1m44s
- ↑ https://www.youtube.com/watch?v=DqMAzYXOqPg&feature=youtu.be&t=1m55s
- ↑ https://www.youtube.com/watch?v=DqMAzYXOqPg&feature=youtu.be&t=1m57s
- ↑ https://www.youtube.com/watch?v=DqMAzYXOqPg&feature=youtu.be&t=2m10s
- ↑ https://bespokeunit.com/suits/braces/retrofit-trousers-with-buttons/
- ↑ https://www.youtube.com/watch?v=DqMAzYXOqPg&feature=youtu.be&t=3m14s
- ↑ https://www.youtube.com/watch?v=DqMAzYXOqPg&feature=youtu.be&t=3m24s
- ↑ https://www.youtube.com/watch?v=DqMAzYXOqPg&feature=youtu.be&t=3m47s
- ↑ https://www.youtube.com/watch?v=DqMAzYXOqPg&feature=youtu.be&t=3m57s
About This Article