wikiHow is a “wiki,” similar to Wikipedia, which means that many of our articles are co-written by multiple authors. To create this article, 14 people, some anonymous, worked to edit and improve it over time.
wikiHow marks an article as reader-approved once it receives enough positive feedback. In this case, 89% of readers who voted found the article helpful, earning it our reader-approved status.
This article has been viewed 67,203 times.
Learn more...
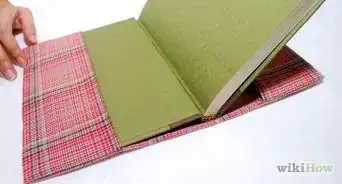
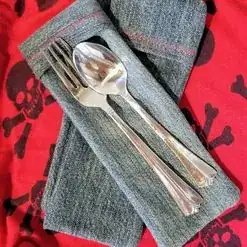
One easy way to reduce waste in your lunchbox is to carry a real fork, knife, and spoon. This sturdy, reusable pouch takes only minutes to make, and it keeps your cutlery clean and separate from other items in your lunch. The sandwich-bag style closure holds it shut until lunchtime with no fasteners.
Steps
-
1Start with any appropriate scrap of sturdy material. This material is cut from the leg of an old pair of jeans that has already been used for various other projects. You could also use part of an old dishtowel, fabric napkin, or other leftover fabric. Make sure the fabric is sturdy, washable, and clean.
-
2Make a simple, rectangular pattern. The pattern used here is a business sized mailing envelope 4 1/4 x 9 1/2 inches long (10.5 x 24cm). You can adjust the size for your cutlery, but remember to leave a seam allowance.
- Make the smaller rectangle at least an inch (2.5cm) longer than the longest item you wish to carry.
Advertisement -
3Cut two pieces of the fabric. Place the long direction of the pattern with the grain of the fabric. Make one piece the size of the pattern and the other a bit longer. If the fabric already had a hem on one end, allow an extra inch (2.5cm) on the hemmed piece. If the fabric does not have an existing hem, allow an extra two inches (5cm).
-
4Hem one end of each rectangle of fabric. Fold the fabric over and sew a straight hem. If the fabric already has a hem, skip this step.
-
5Place the fabric right sides together and align the ends without the hems. One hem should extend an inch (2.5cm) or more past the other hem.
-
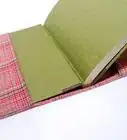
6Lift the shorter piece and fold the longer piece over as shown.
-
7Set the shorter piece back down on top. The hem of the longer piece should extend down past the hem of the shorter piece, and the folds should lie as shown. For ease of sewing, the hems should not be right on top of each other. You can trim the opposite ends (the ends without the hem) at this point if you need to adjust a bit.
-
8Stitch around the three sides that are not folded. This is a seam allowance of about 1/2 inch (12mm). (The dark pen line is to show the location of the stitching in the photo. It is not necessary to draw the line.)
-
9Cut corner reliefs so that the fabric will not bunch up when you turn it right side out.
-
10Turn the large end right side out. You can use the closed tip of a pair of scissors or the eraser end of a pencil to push the corners all the way out.
-
11Turn the small end right side out.
-
12Try out your pouch with the items you'd like to carry.


Community Q&A
-
QuestionWould stretchy fabric work for this project?
 SylghoulsTop AnswererStronger/thicker fabric is better suited to this project because it will hold the utensils in more sturdily, but it's possible to make this with almost any kind of fabric.
Warnings
- This pouch can act as a breeding ground for dangerous food-borne bacteria (similar to reusable grocery bags). Wash it regularly. If the material is white, it can be bleached.⧼thumbs_response⧽
- Use scissors, sewing machines, and needles with appropriate caution.⧼thumbs_response⧽
- Please confirm your local school district policy before sending your child to school with a knife. Usually very dull "butter knives" are fine. However, some schools have an extremely strict policy on the matter.⧼thumbs_response⧽
Things You'll Need
- Scrap denim or fabric
- Pattern paper and markers
- Scissors
- Sewing pins
- Sewing machine
- Thread