This article was co-authored by wikiHow Staff. Our trained team of editors and researchers validate articles for accuracy and comprehensiveness. wikiHow's Content Management Team carefully monitors the work from our editorial staff to ensure that each article is backed by trusted research and meets our high quality standards.
There are 21 references cited in this article, which can be found at the bottom of the page.
This article has been viewed 19,167 times.
Learn more...
Having a neat, well-tailored neckline can make a huge difference in how your finished garment looks, so it’s important to take your time and do it right. The process you follow will depend on the type of neckline you’re trying to add. Some of the most common necklines include a curved (also known as a rounded or scoop) neckline, a stretchy neckline, and a V-neckline. Choose the option that best suits your project and sew your neckline!
Steps
Curved Neckline
-
1Cut out the neckline facing according to your pattern’s instructions. Consult the pattern and follow its instructions for how to cut out the neckline facing piece. This piece lines up with the edges of the neckline, so it is important to choose the right size and cut along the lines on the pattern. Use a sharp pair of fabric scissors to cut the fabric along the pattern's lines.[1]
- Go slowly to avoid creating any jagged edges.
-
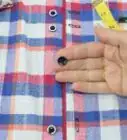
2Pin the facing to the edges of the neckline with the right sides together. Then, turn it so that the right (print or outer) side of the fabric is facing down towards the right side of the neckline. Pin the raw edges of the neckline and the neckline facing together so that they are even. Insert 1 pin perpendicular to the seam about every 2 to 3 in (5.1 to 7.6 cm) going all the way around the edge.[2]
- Inserting the pins perpendicular to the edges of the fabric will help to make it easier to remove them as you sew.
Advertisement -
3Backstitch to secure the beginning of the stitch. Place the edge of the fabric under your sewing machine and lower the presser foot to keep it in place. Then, sew a straight stitch forward by about 1 in (2.5 cm) and then press the reverse lever on the side of the machine to sew back to the beginning again.[3]
- Release the lever and continue to sew forward after you backstitch to the beginning.
-
4Sew a straight stitch along the edges of the neckline and facing. Follow the curve of the neckline while keeping the stitch about 1⁄2 in (1.3 cm) away from the raw edges of the fabric. Do not stretch the fabric as you sew it. Allow it to lay flat while gently guiding it through the presser foot.[4]
- Make sure to remove the pins as you sew along the edges of the neckline. Do not sew over them or you may damage your sewing machine.
-
5Trim off 1⁄4 in (0.64 cm) of fabric along the seam with pinking shears. Once you finish the stitch, cut the thread and remove the garment from the sewing machine. Then, place the garment on a flat surface so that the seam is facing out. Use a pair of pinking shears to cut off about 1⁄4 in (0.64 cm) of fabric from the seam going all the way around the edges.[5]
- Trimming off the excess fabric helps to reduce the bulk around the neckline, which will allow the fabric to lay flat after you turn it right side out.
Warning: Be careful not to cut through any of the stitches as you trim off the excess fabric.
-
6Snip through the remaining fabric perpendicular to the seam. Next, take a regular pair of fabric scissors and cut small notches in the fabric going towards the seam. These notches will reduce the amount of fabric along the seam even more and help the neckline to lay flat. Each cut should be about 1⁄8 in (0.32 cm) long and perpendicular to the seam. Be very careful not to cut through any of the stitches as you do this![6]
-
7Turn the fabric right-side out and press it with an iron. After you finish cutting the notches in the fabric, flip the neckline facing to the inside of the garment and flatten it out with your hands. Then, use an iron to press the neckline seam so it lays flat. Use the lowest setting on your iron to press the fabric. Move the iron along the seam slowly to press it.[7]
- If your fabric is delicate, you may also want to lay a t-shirt or towel over it. This will create a barrier between the iron and fabric.
- If you notice any puckering or gathering in the fabric along the neckline, spritz it with water and iron it again.[8]


Stretchy Neckline
-
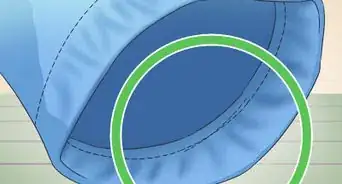
1Mark quarter points on the neckline and neckband. Fold the neckline so that the shoulder seams are matching up. Then, insert pins on either end of the fold and at the shoulder seams. Insert 4 pins at equidistant points around the neckline to indicate the quarter points. These points are the middle of the front and back of the neckline. Fold the neckband in the same way and insert pins to indicate the center of the front, back, and sides.[9]
-
2Match up the neckline and neckband using the quarter points. Use the pins you placed in the neckline and neckband as reference points. Match up the front of the neckband to the front of the neckline, the sides with the sides, and the back with the back. As you do this, lay the neckband over the neckline so that the right sides of the neckband are facing the right sides of the shirt and the raw edges are lining up.[10]
-
3Pin the neckband to the neckline with the right sides facing each other. Insert a pin through each of the quarter points in the neckline and neckband. Go through both layers of fabric to secure the neckband to the neckline.[11]
- Remove the other pins as you pin each of the quarter points of the neckband and neckline together.
-
4Sew a stretch stitch along the edges of the neckline and neckband. Place the neckband and neckline under the presser foot of your sewing machine at one of the quarter points and set your sewing machine to the stretch stitch. Then, lower the presser foot and begin sewing around the edges of the neckband and neckline. Position the stitch about 1⁄2 in (1.3 cm) from the raw edges and hold the neckband taut as you sew.[12]
- Don’t stretch the neckband beyond the length of the neckline. Stretch it just enough so that it is even with the length of the neckline.
Tip: Remove the pins as you sew. Do not sew across them or you may damage your sewing machine.
-
5Sew a second stretch stitch along the edges of the seam. Remove the garment from the sewing machine and cut the excess thread after you finish sewing the straight stitch. Then, flip the neckband so that the seam is facing into the shirt. Turn the shirt inside out, and sew a second straight stitch along the raw edges of the neckband to hold it down. This will help to reduce irritation from the neckband’s edge.[13]
- Remove the garment from your sewing machine and cut the excess thread when you’re done.


V-Neckline
-
1Sew a stay stitch about 5⁄8 in (1.6 cm) from the edges of the neckline. A stay stitch is a straight stitch that helps to prevent a garment’s neckline from losing its shape, which is a common problem with V-necks. Set your sewing machine to the straight stitch setting and sew a straight stitch about 5⁄8 in (1.6 cm) from the raw edges of the neckline.[14]
- Cut the excess thread when you finish sewing the straight stitch.
-
2Draw a line 5⁄8 in (1.6 cm) from the edges of the neckline facing. Use a ruler to measure 5⁄8 in (1.6 cm) raw edges of the neckline on the wrong (back or inner) side of the neckline facing. Mark this position in a few places. Then, turn the ruler so that 1 edge is along these dots. Hold a fabric marker or pen against the edge of the ruler and draw a line to connect the dots.[15]
- This line will serve as a guide for sewing your V-neckline, so ensure that it is the same distance from the raw edges going all the way around the neckline facing.
-
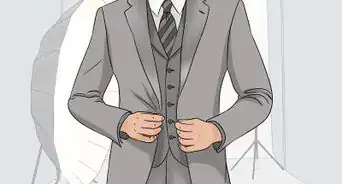
3Pin the facing to the neckline with the right sides facing each other. Next, take the neckline facing piece and lay it on top of the neckline of your garment. Position the 2 pieces so that the right (print or outer) sides are together and the raw edges are lining up. Then, insert 1 pin through both layers of fabric every 2 to 3 in (5.1 to 7.6 cm) going all the way around the neckline.[16]
Tip: Position the pins so they are perpendicular to the raw edges of the neckline. This will make it easier to remove them later on.
-
4Sew a straight stitch along the line on the neckline facing. Set your sewing machine to the straight stitch setting. Then, lower the presser foot over the line on the neckline facing and begin sewing a straight stitch using the line as your guide. Hold the fabric gently and avoid pulling or stretching it as you sew.[17]
- When you reach a pin, pull it out before you sew across it. Do not sew over the pins or you may damage your sewing machine!
- After you finish sewing, stop the machine, lift the presser foot and needle, and cut the excess thread.
-
5Trim 1⁄4 in (0.64 cm) of fabric off along the seam. Use a sharp pair of fabric scissors to cut along the edges of the seam. Aim to remove about 1⁄4 in (0.64 cm) of fabric going all the way around the neckline’s seam.[18] This will help to reduce the bulk when you turn the neckline [19]
- Be careful not to cut through any of the stitches as you trim the excess fabric.
-
6Cut notches in the fabric every 2 in (5.1 cm) along the seam. After you remove the excess fabric, use the scissors to cut a notch perpendicular to the seam. Cut out a triangle shaped notch every 2 in (5.1 cm). Create the triangle shape by cutting into the fabric 2 times at 45 degree angles to the edge of the fabric.[20]
- Don’t cut too close to the seam or you may damage it.
- These notches will help to reduce the amount of fabric along the seam and make it easier for the neckline to lay flat.
-
7Press the seams to make them lay flat. After you finish cutting out the notches, place the neckline on a flat surface with the seams facing up. Then, use an iron to press the seams down so they lay flat against the neckline and neckline facing. Use the lowest setting on your iron to press the seams.[21]
- If your fabric is delicate, place a towel or t-shirt over it before ironing it. This will help to protect the fabric.
- If you notice any puckering or gathering along the neckline, spritz the neckline with water and iron it again.[22]
-
8Sew a straight stitch along the edges of the seam. Next, sew the excess seam fabric in place long the seam to keep it laying flat. Sew a straight stitch right along the raw edge of the fabric to tack it down. Go all the way around the outside of the neckline.[23]
- Cut the thread and remove the garment from the sewing machine after you finish sewing down the seam. Then, repeat for the other edge of the excess fabric.
- These additional seams will also help to reinforce the neckline and prevent it from becoming misshapen.
-
9Turn the neckline facing over and tuck it inside of the garment. Once the seams are tacked down, turn the neckline facing so that it is inside of the garment and arrange the fabric along the neckline. Use your hands to manipulate it as needed and make it lay flat.[24]
- If needed, you can also insert a few pins to keep the neckline positioned how you want it to be.
-
10Sew a topstitch along the edge of the neckline. To complete the V-neckline, place the edge of the seam under your sewing machine and sew a topstitch right along the edges of the neckline. Position the stitch about 1⁄8 in (0.32 cm) from the edges of the neckline. Go slowly to get a neat, even stitch along the neckline since this stitch will be visible.[25]
- After you finish sewing along the edges of the neckline, cut the excess thread and remove the garment from the sewing machine. Your V-neckline is finished!


Things You’ll Need
Curved Neckline
- Neckline facing
- Pins
- Sewing machine
- Thread
- Pinking shears
- Scissors
- Iron
Stretchy Neckline
- Stretchy neckline facing
- Pins
- Sewing machine
- Thread
V-neckline
- Ruler
- Fabric marker or pen
- Neckline facing
- Pins
- Sewing machine
- Thread
- Scissors
- Iron


References
- ↑ https://www.youtube.com/watch?v=F5stylknUoQ&feature=youtu.be&t=36
- ↑ https://www.youtube.com/watch?v=F5stylknUoQ&feature=youtu.be&t=36
- ↑ https://www.youtube.com/watch?v=F5stylknUoQ&feature=youtu.be&t=76
- ↑ https://www.youtube.com/watch?v=F5stylknUoQ&feature=youtu.be&t=100
- ↑ https://www.youtube.com/watch?v=F5stylknUoQ&feature=youtu.be&t=180
- ↑ https://www.youtube.com/watch?v=F5stylknUoQ&feature=youtu.be&t=381
- ↑ https://www.youtube.com/watch?v=F5stylknUoQ&feature=youtu.be&t=531
- ↑ http://www.eg.bucknell.edu/~acg/Documents/SewingTrimOnANeckline.pdf
- ↑ https://www.youtube.com/watch?v=ABaG-f47NQQ&feature=youtu.be&t=75
- ↑ https://www.youtube.com/watch?v=ABaG-f47NQQ&feature=youtu.be&t=120
- ↑ https://www.youtube.com/watch?v=ABaG-f47NQQ&feature=youtu.be&t=120
- ↑ https://www.youtube.com/watch?v=ABaG-f47NQQ&feature=youtu.be&t=197
- ↑ https://www.youtube.com/watch?v=ABaG-f47NQQ&feature=youtu.be&t=250
- ↑ https://www.youtube.com/watch?v=4R54KCmQMps&feature=youtu.be&t=23
- ↑ https://www.youtube.com/watch?v=4R54KCmQMps&feature=youtu.be&t=48
- ↑ https://www.youtube.com/watch?v=4R54KCmQMps&feature=youtu.be&t=135
- ↑ https://www.youtube.com/watch?v=4R54KCmQMps&feature=youtu.be&t=166
- ↑ https://sewguide.com/how-to-sew-a-vneck/
- ↑ https://www.youtube.com/watch?v=4R54KCmQMps&feature=youtu.be&t=215
- ↑ https://www.youtube.com/watch?v=4R54KCmQMps&feature=youtu.be&t=215
- ↑ https://www.youtube.com/watch?v=4R54KCmQMps&feature=youtu.be&t=272
- ↑ http://www.eg.bucknell.edu/~acg/Documents/SewingTrimOnANeckline.pdf
- ↑ https://www.youtube.com/watch?v=4R54KCmQMps&feature=youtu.be&t=310
- ↑ https://www.youtube.com/watch?v=4R54KCmQMps&feature=youtu.be&t=325
- ↑ https://www.youtube.com/watch?v=4R54KCmQMps&feature=youtu.be&t=340
About This Article