This article was co-authored by David Pew and by wikiHow staff writer, Amy Bobinger. David Pew is a Professional Tailor and the Owner of Sew Generously based in Seattle, Washington. With over a decade of experience, David specializes in bespoke tailoring and alterations. He uses his experiences, skills, and eye for detail to produce the highest quality of products.
This article has been viewed 32,922 times.
Pockets make every garment better. They're cute and super functional, giving you a place to keep your credit cards or keys and somewhere to put your hands when you're standing up. Even better, they're easy to sew, whether you're making a garment or adding pockets to an existing piece! If you want your pocket to be hidden, sew it into the inseams of your clothing. If you'd like a decorative pocket, such as one in a contrasting color on the front of a shirt or a dress, try sewing a patch pocket, instead!
Steps
Inseam Pocket
-
1Trace and cut out 2 pairs of a pocket pattern. Lay the pocket pattern on the fabric and trace it twice. Then, flip it over and trace it 2 more times, so you have 2 front and 2 back pieces. Make sure you don't end up with 4 of the same piece, especially if your fabric obviously has a right side and a wrong side. Then, cut the pieces out with sharp sewing scissors.[1]
- If you're sewing from a pattern, it may have a pocket pattern included. If it doesn't, you can buy one wherever you buy sewing supplies, or from a pattern shop online.
- You can also draw your own pocket pattern on paper if you're experienced with pattern drafting. Draw a straight line for the mouth of the pocket, making sure it's wide enough to fit your hand. Angle the sides of the pocket down at about 45°, and finish the bottom of the pocket with a curved or straight line. You can also trace around an existing pocket on a pair of pants or a skirt that you already have.
-
2Finish the edges of the pockets and garment. Use a serger, a zig-zag stitch on your sewing machine, or pinking shears to finish all 4 pocket pieces, along with the front and back pieces of the garment. This will clean up any raw seams that would look messy on the finished garment.[2]
- If finishing the pieces makes them wrinkled, you may want to press them.[3]
- You can add the pockets at any point before you sew the sides of the garment together. If you're adding a pocket to a finished garment, use a seam ripper to undo just enough of the side seem to fit the mouth of the pocket.
Advertisement -
3Pin the pocket pieces on the garment pieces. Lay one of the front garment pieces flat in front of you, with the decorative side (also called the right side) facing up. Then, lay one of the pocket pieces so the straight edges are lined up with the garment piece, with the right side facing down, and pin the pocket in place. Repeat for the other sides.[4]
- Compare the garment pieces to make sure the pockets are lined up perfectly.
- For pants and skirts, the top of the pocket should be about 4.5 in (11 cm) below the waistband. On jackets, make sure you place the pockets high enough that they won't be visible beneath the hem, and for dresses, place the openings just above the widest part of the hips.
-
4Sew the straight edge of each pocket with a 1⁄2 in (1.3 cm) seam allowance. Using a straight stitch, sew along the line where each pocket piece is pinned to the garment, just along the straight edge. When you're finished, you should have 4 pieces of a garment, each with 1 side of a pocket attached.[5]
- By leaving a small seam allowance, the outside fabric will fold slightly into the pocket when it's turned in, so the pocket material won't be as obvious.
- If you're adding a pocket to an existing garment, make sure not to sew the pocket edge to both sides of the garment, or it won't open.
Tip: You can use a 3⁄8 in (0.95 cm) seam allowance if you'd prefer the fold to be slightly smaller.
-
5Fold each pocket piece open and press along the seam. Once you've sewed your seam allowances, spread the pocket fabric open over the seam, so you can see the right side while you're looking at the right side of the garment. Then, use your iron to press the pocket flat all the way along the seam.[6]
- This will help the pocket appear hidden inside the finished garment.
-
6Pin together the front and back pieces with right sides facing each other. Match up the 4 garment pieces so you have the front and the back of the left side together, and the front and back of the right side together. Pin all along the inseam, including around the edges of the pocket.[7]
- At this point, the fabric should look like it's inside-out.
- If you're working with an existing garment, just turn it inside-out.
-
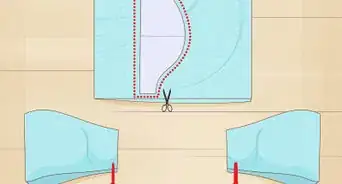
7Sew around each inseam and pocket with a 1⁄2 in (1.3 cm) seam allowance. Start at the top, outside edge of one of the pieces, and use a straight stitch to sew down along the inseam. When you get to the pocket, lift the presser foot but leave the needle down, and rotate the material. Continue sewing around the pocket, and rotate the fabric again in the same way when you get to the other side, then finish sewing down the rest of the inseam.[8]
- Repeat for the other side of the garment as well. If you have any sewing left to do to finish constructing the garment, do it now.
-
8Turn the pieces of the garment right side out and press the pockets. When you're finished sewing the pockets into place, they'll still be sticking straight out. To get them to lie in the garment naturally, turn each piece right side out. Use your iron to press each pocket again, then enjoy your new garment!


Patch Pocket
-
1Draw a square pocket shape onto the fabric and cut it out. Think about the size you want your patch pocket to be, and draw it onto a piece of fabric with tailor's chalk. Add 1 1⁄2 in (3.8 cm) to the top of the pocket for a hem, and 1⁄2 in (1.3 cm) to the bottom and sides for a hem as well.[9]
- Unless the pocket is purely decorative, make sure it's big enough to fit your hand into!
- If you're putting a patch pocket on a garment you're making from scratch, it's easiest to attach the pocket before you sew the sides of the garment together.
Tip: If you want your pocket to be a shape other than square, cut out a template from cardboard. Trace the template onto the fabric, then add the seam allowance and cut it out. Fold the seams over the cardboard template to help you when you start to sew.
-
2Use interfacing if you want to reinforce the fabric where the pocket will go.[10] The easiest way to reinforce the pocket is to place a piece of interfacing inside the garment, just on the other side of where the pocket will be placed. Cut a piece of interfacing that's a little larger than the pocket, then pin it to the back of the garment. When you stitch the patch pocket into place, the interfacing will be attached to the garment as well.[11]
- This makes it harder to tear the pocket off of the finished garment.
-
3Turn the top edge down 1⁄2 in (1.3 cm), then 1 in (2.5 cm), and stitch it. By folding the top edge down over the wrong side of the fabric twice, the pocket will be sturdier, and the finished edge will look nicer.[12] Use a straight stitch to secure the seam into place.[13]
- The seam will look nicer if you sew it from the right side of the fabric, rather than sewing it from the wong side.
-
4Fold the sides and bottom in by 1⁄2 in (1.3 cm) and press the pocket. Once the top seam is stitched into place, fold in the rest of the pocket all the way around. Then, use your iron to press the seams flat. Iron the rest of the pocket, as well.[14]
- Ironing the pocket will make it look neater, but it will also make sure you're able to sew it flat against the garment, which wrinkles might prevent.
-
5Pin the pocket to the garment, then edge stitch it into place. After you've pressed the side and bottom seams into place, use pins to attach the pocket to your garment. Then, use an edge stitch about 1⁄8 in (0.32 cm) from the fold to sew the pocket in place.[15]
- If you line up the pressure foot with the folded edge of the pocket, the seam should be about 1⁄8 in (0.32 cm).
- If you don't have a sewing machine, you can sew the pocket in place by hand.
- Remember not to sew the top of the pocket! Also, if you're adding the pocket to an existing garment, take care not to sew the front and back sides of the garment together by accident.
-
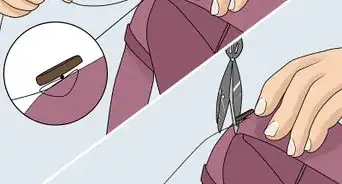
6Backstitch at the top corners of the pocket to secure them. To reinforce the corners of the pocket, sew all the way to the edge of the fabric, then switch the sewing machine to a backstitch and go back over the last 1⁄2 in (1.3 cm) or so. Then, sew forward one more time to complete the stitch.[16]
- The pocket will be most likely to unravel at the top corners first, so backstitching will help make the pocket stronger.
- If you're sewing by hand, just add a few extra stitches going back down the last 1⁄2 in (1.3 cm) of the seam, then up again.


Expert Q&A
-
QuestionHow do you make your pockets stronger?
 David PewDavid Pew is a Professional Tailor and the Owner of Sew Generously based in Seattle, Washington. With over a decade of experience, David specializes in bespoke tailoring and alterations. He uses his experiences, skills, and eye for detail to produce the highest quality of products.
Professional TailorFold the "wrong" edge of the fabric over twice before you sew your stitch. This will make your pocket sturdier and your finished edge will look nicer.
Things You'll Need
Inseam Pocket
- Pocket pattern
- Fabric
- Sewing scissors
- Serger or pinking shears
- Fabric pins
- Iron
- Sewing machine
Patch Pocket
- Tailor's chalk
- Fabric
- Sewing scissors
- Measuring tape
- Sewing machine
- Iron
-Step-24-Version-5.webp)


References
- ↑ https://100actsofsewing.com/tutorials/inseam-pockets/
- ↑ https://100actsofsewing.com/tutorials/inseam-pockets/
- ↑ http://sewaholic.net/sewing-inseam-pockets/
- ↑ http://sewaholic.net/sewing-inseam-pockets/
- ↑ https://100actsofsewing.com/tutorials/inseam-pockets/
- ↑ https://100actsofsewing.com/tutorials/inseam-pockets/
- ↑ https://100actsofsewing.com/tutorials/inseam-pockets/
- ↑ https://100actsofsewing.com/tutorials/inseam-pockets/
- ↑ https://sewguide.com/stitch-patch-pocket/
- ↑ David Pew. Professional Tailor. Expert Interview. 5 January 2021.
- ↑ https://sewguide.com/stitch-patch-pocket/
- ↑ David Pew. Professional Tailor. Expert Interview. 5 January 2021.
- ↑ https://sewguide.com/stitch-patch-pocket/
- ↑ https://sewguide.com/stitch-patch-pocket/
- ↑ https://sewguide.com/stitch-patch-pocket/
- ↑ http://www.simplysewingmag.com/how-to-sew/sew-patch-pocket/
About This Article