wikiHow is a “wiki,” similar to Wikipedia, which means that many of our articles are co-written by multiple authors. To create this article, 9 people, some anonymous, worked to edit and improve it over time.
This article has been viewed 161,302 times.
Learn more...
Organizing images on your computer can provide a challenge in itself. In addition, you might need to reduce the file size or display size of a picture in order to send it in an email or free up space on your hard disk. Luckily, there are several ways to do this using popular image editing software. By following a few easy steps, you can quickly learn how to shrink a picture.
Steps
Shrink a Picture in Adobe Photoshop
-
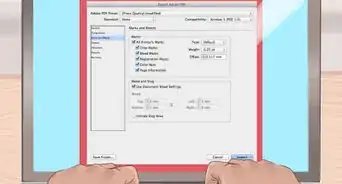
1Open your image in Adobe Photoshop. This is one of the most popular programs for editing images, and also one of the most powerful. Resizing a picture can be done in a few simple steps.
-
2Click on "Image" from the toolbar, and then click on "Image Size" from the menu that appears.[1]Advertisement
-
3Choose the measurement you want to use to resize your image. In the menu that appears, you will see 2 boxes that read "Width" and "Height." Next to these boxes are drop-down menus that let you pick the units you are specifying; you can resize a picture by pixels, inches (or centimeters), or percentage. If you don't have a specific size in mind, choose the percentage option.
-
4Specify the desired size of your image. After choosing the percentage, type in a number less than 100 in the "Width" and "Height" boxes to shrink the picture. For example, typing "50" will make your image 50 percent as big as it was before. Usually, 75% is a good number to reduce the file size without compromising the quality. Click the "OK" button.[2]
-
5Save the image. Click on "File" from the toolbar and then click "Save."


Shrink a Picture in Google's Picasa
-
1Open your image in Picasa. Picasa is an image editing program produced by Google, and it is available as a free download. If you don't have any image editing software installed on your computer, consider downloading Picasa. Resizing an image can be done in a few steps.
-
2Click on "File" from the toolbar, and then click on "Export Picture to Folder" from the menu that appears.
-
3Select the folder where you want to save the new, resized picture. Click on the "Browse" button on the Export menu and select the folder where you want the image to be saved.
-
4Click on the radio button that reads "Resize to." Move the slider to the right of this button to indicate the desired size of your image. Click "OK" and the image will be saved.


Shrink a Picture in Microsoft Office 2003
-
1Navigate to the image's location on your hard drive. Right-click on the image's icon, and select "Open with" from the context menu that appears. Select "Microsoft Office Picture Manager" from the available options. When the program launches, click the "Edit Pictures" button.[3]
-
2Locate the "Change Picture Size" heading at the bottom of the program's window. Click on the "Resize" option located under this heading.[4]
-
3Choose the image's desired size in the menu that appears. Specify the new width and height of the image in pixels, and then click "OK" to resize the picture. If you don't like the results, you can always use the Undo feature.
-
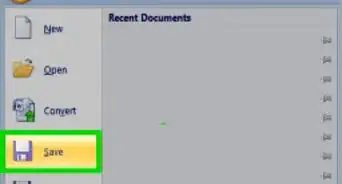
4Save the image. Click on "File" from the toolbar, and click "Save" from the menu that appears.[5]


Shrink a Picture in MS Paint


Community Q&A
-
QuestionI need to know how to shrink a picture for an email app. How do I do this?
 AppleBottmCommunity AnswerYou could right click and select the picture of the two L shaped things overlapping and shrink and grow it to your wish.
 -
QuestionHow do I make a photo smaller to print on transfer paper?
 CJ89483Community AnswerTo make a photo smaller for transfer paper, resize it using image-editing software or an online tool, maintaining the aspect ratio and saving in a compatible format. Test print before the final printing.
Warnings
- Experts usually caution against making files if you might need to edit them later, since having the maximum amount of information available to work with is usually better.⧼thumbs_response⧽
Things You'll Need
- Computer
- Image editing software


References
- ↑ https://helpx.adobe.com/photoshop/how-to/image-resizing-basics.html
- ↑ https://helpx.adobe.com/photoshop/how-to/image-resizing-basics.html
- ↑ https://www.ccad.edu/sites/default/files/legacy/page/resizing-images-picturemngr.pdf
- ↑ https://www.ccad.edu/sites/default/files/legacy/page/resizing-images-picturemngr.pdf
- ↑ https://www.ccad.edu/sites/default/files/legacy/page/resizing-images-picturemngr.pdf
- ↑ https://students.case.edu/operations/marketing/editor/resizing.html
- ↑ https://students.case.edu/operations/marketing/editor/resizing.html
- http://www.pcmag.com/article2/0,2817,1778244,00.asp
- http://www.adobe.com/designcenter/photoshop/articles/lrvid4289_ps.html
About This Article
Shrinking your pictures is a great way to save on storage space on your computer. The easiest way to do this is to first open your picture in Adobe Reader. Select “Image” from the toolbar, then go to image size. You can then select the size of picture you want. If you don’t have Adobe Reader, open Picasa, which is a free photo editing software you can download from Google. Go to “Export picture to folder,” then click the radio button that says “Resize to.” For tips on how to shrink a picture in Microsoft Office 2003, keep reading!