wikiHow is a “wiki,” similar to Wikipedia, which means that many of our articles are co-written by multiple authors. To create this article, 18 people, some anonymous, worked to edit and improve it over time.
There are 9 references cited in this article, which can be found at the bottom of the page.
wikiHow marks an article as reader-approved once it receives enough positive feedback. In this case, 91% of readers who voted found the article helpful, earning it our reader-approved status.
This article has been viewed 108,413 times.
Learn more...
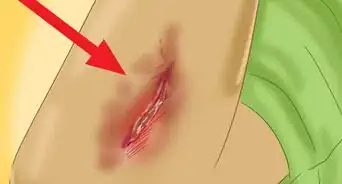
Suturing is a term used to describe the closing of a wound, artery, or part of an organ using a specific needle and thread. The main reasons for placing a suture are to stop bleeding and inhibit infections from making further damage. Although not discussed in this page, some suturing techniques are done for beauty reasons or for preventing a scar from forming. The first step of performing any suture is to make sure that it is fixed and will not open up with any movement of the patient, hence requiring the instrumental tie. Then, one can go ahead and continue with a certain suture technique, such as simple interrupted, simple running, running locking, and vertical and horizontal mattress sutures.
Steps
Preparing
-
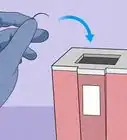
1Gather the necessary equipment:[1]
- To practice the suturing techniques, you will need a suture pad. It can easily be obtained online (from Amazon, for example).
- Tissue forceps: opens up wound and allows clear vision of the needle's puncture site
- Scissors: To cut excess thread.
- Needle holder: To prevent the spread of germs, the needle must always be held by the needle holder rather than being held with your hands.
- Needle with thread: The choice of the needle size and thread type depend on the reason for performing a suture and the nature of the wound. The needle with thread used in the following steps is 2-0 silk.
-
2Hold the tools correctly:
- For right-handed people, hold the needle holder with your right ring finger and thumb. For more control and stability, place your index and middle fingers on the long side of the needle holder.[2]
- Left-handed people can follow the same steps (including those below) but should replace the tools used with the left hand with those used by the right hand, and vice versa.
- The tissue forceps are to be held by the left hand with the thumb and index fingers, just like holding a pen.
Advertisement -
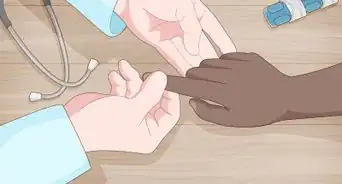
3With the needle holder, take out the needle from its package.
- Make sure to pull all the thread out.
-
4Hold the needle by its flat side using the needle holder. Hold it approximately 2/3 of the way up from the needle's tip, which should be pointing upwards.[3] Press down with your thumb and ring finger until you hear a click from the needle holder.


Instrumental Tie
-
1Using the tissue forceps, expose the skin towards the end of the right side of the wound. This allows for better visualization and avoids hitting muscle.
- This step should always be done before puncturing the skin, which is introduced in the next step.
- Remember to always avoid pushing down on the skin with the tissue forceps.
-
2Puncture the right side of the skin (take a bite). Aim for about half a cm down from the end of the wound with a 90 degrees angle between the skin and the needle, twisting your hand clockwise for about half a circle.[4]
- The needle goes through the skin from outside to inside.
- Also, make sure that you the needle exits on the inner side of the skin; it should go down to a depth of about 0.5cm.
- To release the needle holder's "click" to pull the needle out, pull the needle holder with your ring finger to the right and push with your thumb to the left.
-
3Parallel to the first bite, puncture the left side of the skin the same way as you did in the last step. However, in this step, the needle goes from inside to outside.
-
4Hold the needle with the needle holder (without the need to hear a click) and pull so that all the thread, except for about 3–5 centimeter (1–2 in), is on the left side of the wound.
-
5After releasing the needle from the needle holder, use your left hand to hold the thread near the wound and wrap it approximately a cm or two from the tip around the closed needle holder.[5]
- Make sure to wrap the thread three times outward (clockwise) while keeping the thread in close proximity to the wound.
- Note: The direction in which you wrap the thread does not matter as long as it alternates between consecutive steps.
-
6Slightly open the needle holder with the thread wrapped around it, grab the 3–5 centimeter (1.2–2.0 in) of thread on the right side with the needle holder.
-
7Using your left hand, pull the long thread to allow the wrapped thread to pass out of the needle holder and get tied around the loose 3–5 centimeter (1.2–2.0 in) of thread on the right.
- Be careful to NOT pull too much on the skin, causing one side to be pushed on top of the other.
- Only pull as much as you need in order to bring together and seal the two sides of the wound.
-
8Next, do steps 5 to 7 again with a couple of alterations:
- Note: these three steps (5 to 7) will be done a total of 3 times, with a small difference in them each time.
- First, do steps 5 to 7, wrapping the thread inwards (counterclockwise) twice around the needle holder.
- Then, do steps 5 to 7 a third time, wrapping the thread only once outwards (clockwise) on the needle holder.


Simple Running Suture
-
1Again, start with the instrumental tie at the beginning of the wound in order to fix the thread in place but do not cut the excess thread.
-
2Continue to puncture the right and left sides of the wound, respectively, bringing them together. MAKE SURE that every loop you make is on the upper side of the suture pad (away from you).
- This is going to be one long suture running along the entire wound with an instrumental tie at the beginning and end of the suture.[6]
- This suture is as if you are continuing to make whirls in a clockwise direction.
- Use the last loop of the running suture to perform an instrumental tie since there is no loose end to grab with the needle holder.
-
3This is what the end result should look like, more or less.


Running Locking Suture
-
1Like before, start this altered version of the simple running suture with an instrumental tie at the beginning of the wound and then puncture the skin about a cm from the instrumental tie on the right and left side of the wound, respectively.[7]
-
2Before pulling the thread completely to seal the wound, it's very important to MAKE SURE that the loop is on the lower side of the suture pad (towards you).[8]
-
3Continue performing steps 1 and 2 multiple times along the extent of the wound and end the suture with an instrumental tie to prevent any loosening up to take place.
- Note: You will notice that a line will form on the left side of the suture, which provides extra firming, allowing the suture to remain in place.
-
4This is what the end result should look like, more or less.


Vertical Mattress (or "far-far-near-near") Suture
-
1Start with a puncture of the skin on the right side of the wound, but make sure to do so approximately double the distance that you used for the previous sutures, so approximately 2 centimeter (0.79 in) out from the wound site.[9]
-
2Travel under the skin to the left side of the wound and bring out the needle at the same distance, so approximately 2 centimeter (0.79 in) out from the wound site.
-
3Turn the needle around 180 degrees with the help of the tissue forceps and hold it with the needle holder.
- This will make the next step easier.
- DO NOT use your hands to adjust and turn the needle around.
-
4The next puncture site inwards will be on the same side of the wound (left) and halfway between the puncture site made in step 2 and the wound.
-
5Finally, take a bite outwards on the right side of the wound, halfway between the initial puncture site and the wound.[10]
- The 4 puncture sites are represented by the 4 red dots.
-
6Of course, you will need to pull the thread out, bring the two sides of the skin together, and finish with an instrumental tie to secure the suture.[11]
- If you place your suture pad with the wounds lined horizontally, then you will see that the puncture sites line up vertically, hence this suture's name. In addition, a bigger needle is usually used to perform this type of suture.


Horizontal Mattress Suture
-
1Start at the beginning of the wound and take a bite inwards approximately 1 centimeter (0.39 in) from the wound site.[12]
- Leave approximately a 3 centimeter (1.2 in) of the thread loose.
-
2Next, take an outward bite parallel to the previous one, but on the opposite side of the wound.
-
3Moving alongside the same side of the wound (left), take an inwards bite about 2 centimeter (0.8 in) from the previous bite.
- A "line" will form between the second and third bites.[13]
-
4The last bite for this suture is across from the third suture, taken outwards about 2 centimeter (0.8 in) from the first bite.
- The puncture sites are represented by the 4 red dots.
-
5To end this suture, perform an instrumental tie and cut excess thread.
- With the suture pad placed horizontally in front of you, it will seem that you are moving horizontally along the wound, hence this suture's name.


References
- ↑ https://meds.queensu.ca/central/assets/modules/basic_suturing/the_suture_tray.html
- ↑ https://wcvm.usask.ca/vsac205/Lab1/needle-holders.php#SkillstoMaster
- ↑ https://wcvm.usask.ca/vsac205/Lab1/needle-holders.php#SkillstoMaster
- ↑ https://emedicine.medscape.com/article/1836438-overview#a6
- ↑ https://www.artofmanliness.com/articles/how-to-suture-a-wound/
- ↑ https://accessemergencymedicine.mhmedical.com/content.aspx?bookid=2076§ionid=156455385
- ↑ http://gynecology.sbmu.ac.ir/uploads/4_6026216038322930178.pdf
- ↑ http://gynecology.sbmu.ac.ir/uploads/4_6026216038322930178.pdf
- ↑ https://www.aafp.org/afp/2002/1215/p2231.html
- ↑ https://www.medicalvideos.com/video/2042/smead-jones-sutures-far-far-near-near
- ↑ https://www.medicalvideos.com/video/2042/smead-jones-sutures-far-far-near-near
- ↑ https://www.aafp.org/afp/2002/1215/p2231.html
- ↑ https://www.aafp.org/afp/2002/1215/p2231.html
- https://www.youtube.com/watch?v=TFwFMav_cpE
About This Article
If you need to suture a wound, use tissue forceps to expose the skin near the end of the right side of the wound, puncture the skin with the needle and thread, and twist your hand clockwise in a half circle. Next, puncture the left side of the skin directly across the wound, pull the needle so that all but 3-5 cm of the thread is on the left side, and secure the thread with an instrumental tie. Then, continue puncturing the right and left sides to close the wound. Finally, tie off the last loop and cut the excess thread. For tips on using different techniques, read on!


Medical Disclaimer
The content of this article is not intended to be a substitute for professional medical advice, examination, diagnosis, or treatment. You should always contact your doctor or other qualified healthcare professional before starting, changing, or stopping any kind of health treatment.
Read More...