This article was co-authored by wikiHow Staff. Our trained team of editors and researchers validate articles for accuracy and comprehensiveness. wikiHow's Content Management Team carefully monitors the work from our editorial staff to ensure that each article is backed by trusted research and meets our high quality standards.
This article has been viewed 56,779 times.
Learn more...
The constrictor knot is simple, versatile, and especially useful for holding things in place. This knot has the ability to tighten itself around an object without becoming loose. There are several variations of how to tie a constrictor knot - the standard method involves wrapping rope around an object and crossing the two rope ends in a manner that cinches the knot closed. A direct variation on this method is the double constrictor knot, which loops around the object an additional time to secure the object even more tightly. A constrictor knot can also be tied by adapting a clove hitch, another simple knot. Finally, this multipurpose knot can be tied in the bight (a loose loop, curve, or semi-circle in the rope) without using the rope ends.[1]
Steps
Tying a Standard Constrictor Knot
-
1Cross the rope ends. Pull a rope around the back of the object you will be tying a knot around. Pull each end of the rope towards the centre. Cross the right-hand end of the rope over the left-hand end.[2]
-
2Loop the rope around once more. Hold the end of the rope that is crossed underneath taut. With your other hand, pull the end of the rope that is crossed overhand behind the object. Pull it around to the other side to meet the opposite rope end.[3]
- Alternate this method by attempting a double constrictor knot: instead of looping the rope around once more at this step, do it twice.
Advertisement -
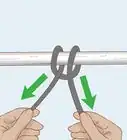
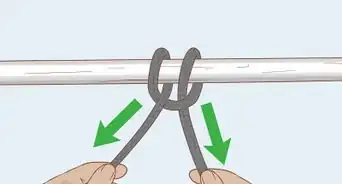
3Secure the knot. Pull the overhand side of the rope under the opposite rope end, between the object and the rope. Thread it under the "X" formed by the crossed rope in the middle. Pull it though to the other side. Pull both ends to tighten.[4]


Using the Hands Only Method
-
1Hold the rope. Hold the rope in your left hand (or right hand, if you are left-handed), draped over your four fingers. Brace the rope between your thumb and index finger. Your other three fingers should be curled in loosely to hold the rope.[5]
-
2Create a loop. Grab the rope further down, or near the end, with your right hand, bracing it between your index finger and thumb. Bring your hand around to touch thumbs, creating a loop. Release the rope from the right hand, leaving it secured between the left thumb and index finger. The three other fingers on your left hand should still be holding the rope, through the middle of the loop.[6]
-
3Make an 8 shape. Move the right thumb and index finger downwards to pick up another part of the rope, within the loop. Twist the rope forward, creating the shape of an 8. Bring the side of the 8 shape held by the right hand over onto the other side, looping over the end of the rope.[7]
-
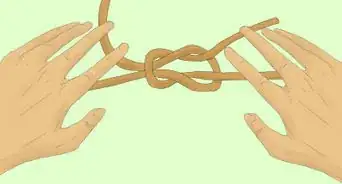
4Close and tighten the knot. Loop the right hand over the left thumb, closing the constrictor knot. Pull the end of the rope that is till being held by the last two fingers of your right hand. Tighten the knot.[8]


Making an Adapted Clove Hitch
-
1Tie a clove hitch knot. Start this method of tying a constrictor knot by tying a clove hitch. Make two loops in a rope; the left loop should be twisted above the rest of the rope, and the right loop should be twisted below. Place the right loop over the left loop, then insert a pole or stick through the loops. Pull the ends of the rope to tighten your clove knot.
-
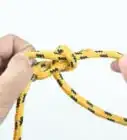
2Tuck in the working end. Pick up the working end of the rope (i.e. the end of the rope of the right-hand side, if you are right-handed). Pull the rope over and into the top loop of the knot. Pull the rope back through to the right.[9]
-
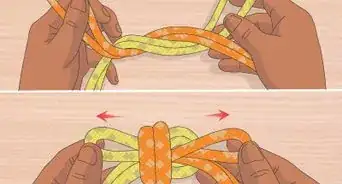
3Tighten the knot. Grab each end of the rope and brace them with your index fingers and thumbs. Pull the rope tightly on both sides. Your clove hitch knot is now a constrictor knot.[10]


Tying a Constrictor Knot Without Using Rope Ends
-
1Make wide loop in the rope. Grab a bight in the rope. Pinch it together at the bottom, approximately 10 inches down.Twist the rope where your fingers meet to make a loop.[11]
-
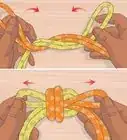
2Twist and fold. Twist the lower side of the loop down over the top of the knot. The middle should be twisted, forming two loops.Hold them together firmly.[12]
-
3Cinch the knot. Slide the object though the loops, or slide the loops over an object. Pull tightly on both ends. Secure the knot.[13]
-
4Finished.


References
- ↑ http://www.motherearthnews.com/homesteading-and-livestock/useful-knots-zmaz79mjzraw
- ↑ http://www.netknots.com/rope_knots/constrictor-knot
- ↑ http://www.netknots.com/rope_knots/constrictor-knot
- ↑ http://www.netknots.com/rope_knots/constrictor-knot
- ↑ http://www.asiteaboutnothing.net/cr_constrictor.html
- ↑ http://www.asiteaboutnothing.net/cr_constrictor.html
- ↑ http://www.asiteaboutnothing.net/cr_constrictor.html
- ↑ http://www.asiteaboutnothing.net/cr_constrictor.html
- ↑ http://members.iconn.net/~gedney/Docs/Useful%20Knots%20for%20Campers.pdf
- ↑ http://members.iconn.net/~gedney/Docs/Useful%20Knots%20for%20Campers.pdf
- ↑ http://www.animatedknots.com/constrictorfold/index.php?LogoImage=LogoGrog.png&Website=www.animatedknots.com#ScrollPoint
- ↑ http://www.animatedknots.com/constrictorfold/index.php?LogoImage=LogoGrog.png&Website=www.animatedknots.com#ScrollPoint
- ↑ http://www.animatedknots.com/constrictorfold/index.php?LogoImage=LogoGrog.png&Website=www.animatedknots.com#ScrollPoint
About This Article