X
wikiHow is a “wiki,” similar to Wikipedia, which means that many of our articles are co-written by multiple authors. To create this article, 11 people, some anonymous, worked to edit and improve it over time.
This article has been viewed 95,040 times.
Learn more...
Remember that old SideWinder Precision Pro joystick you used to use? Yeah the one with the buttons...And the 8 Axis with the twist features...And probably with the dust on it because they canceled support for it back in Windows XP/Vista-ish if you were lucky?
- This will require some soldering skills, or you could just twist the wires together then electric tape them. Soldering will help hold the build together though, and if you have other ways of securing the wires, please do share.
Steps
-
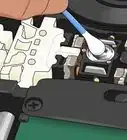
1Cut the Gameport end off of the joystick about 3 inches (7.6 cm) from the end. Do the same with the spare USB 2.0 cord. Strip the rubber shields off both wires to reveal the true wires underneath the rubber and foil shields. (Sorry forgot a picture for this step.)
-
2Strip the casing off the wires from pin 1,14,10, and 4 on the joystick cord. Do the same with all wires from the USB.Advertisement
-
3Twist the corresponding cords together.
- USB Red with Pin 1 wire from joystick.
- USB White with Pin 14 wire from joystick.
- USB Green with Pin 10 wire from joystick.
- USB Black with Pin 4 wire from joystick.
-
4Now the reason for Pin "14, 10, etc." wire from joystick, instead of color code is because I don't know if the wire coding is the same for all of them. If it is then they should correspond as so,
-
5Pin 1 red, Pin 14 yellow, Pin 10 Green, Pin 4 black, Pin 2 purple, Pin 7 dark blue. If not, just go by the pins.
-
6(OPTIONAL) Solder all the separate connections.
-
7Tape all 4 connections up separately so that no wires are touching each other.
-
8Strip wires on the joystick Pins 2 and 7. Twist these two together making a connection. (CRITICAL STEP DO NOT SKIP.)
-
9(OPTIONAL) Solder the previous connection you just made.
-
10Tape the connection so it touches no other wires.
-
11Put together the two foil wire shields, tape them together.
-
12Plugin the USB end and test the joystick to see if it worked (Control panel>Devices and printers>SideWinder Precision Pro USB) Controller properties. Check buttons and so on.
-
13The three wires from the SideWinder joystick are spares and are no longer needed. Tape them up so they don't touch any wires.
-
14Tape everything up to make a decent looking cord.
-Microsoft-Sidewinder-Precision-Pro-Into-a-USB-Joystick-Step-1.jpg)
-Microsoft-Sidewinder-Precision-Pro-Into-a-USB-Joystick-Step-2.jpg)
-Microsoft-Sidewinder-Precision-Pro-Into-a-USB-Joystick-Step-3.jpg)
-Microsoft-Sidewinder-Precision-Pro-Into-a-USB-Joystick-Step-4.jpg)
-Microsoft-Sidewinder-Precision-Pro-Into-a-USB-Joystick-Step-5.jpg)
-Microsoft-Sidewinder-Precision-Pro-Into-a-USB-Joystick-Step-6.jpg)
-Microsoft-Sidewinder-Precision-Pro-Into-a-USB-Joystick-Step-7.jpg)
-Microsoft-Sidewinder-Precision-Pro-Into-a-USB-Joystick-Step-8.jpg)
-Microsoft-Sidewinder-Precision-Pro-Into-a-USB-Joystick-Step-9.jpg)
-Microsoft-Sidewinder-Precision-Pro-Into-a-USB-Joystick-Step-10.jpg)
-Microsoft-Sidewinder-Precision-Pro-Into-a-USB-Joystick-Step-11.jpg)
-Microsoft-Sidewinder-Precision-Pro-Into-a-USB-Joystick-Step-12.jpg)
-Microsoft-Sidewinder-Precision-Pro-Into-a-USB-Joystick-Step-13.jpg)
-Microsoft-Sidewinder-Precision-Pro-Into-a-USB-Joystick-Step-14.jpg)
Advertisement
Community Q&A
-
QuestionWill this work with anything that plugs into the game port?
 Community AnswerNo. This particular model of joystick had USB built in, but you needed an adapter to access it. If you have a pure gameport-only joystick, you'll need an active adapter with a chip to do the gameport->usb re-encoding.
 -
QuestionHow do you tell which wire belongs to which pin?
 Community AnswerPin one will be denoted by a mark or a tiny one on the plastic female pin acceptor. Just count clockwise away from it.
Advertisement
Warnings
- This was a quick throw together, don't be amazed if I made errors, or seem very un-detailed.⧼thumbs_response⧽
- I am not responsible for any damages or harm you might do to yourself computer, joystick, anything.⧼thumbs_response⧽
- You could ruin your equipment easily if you don't know what you're doing.⧼thumbs_response⧽
Advertisement
Things You'll Need
- The SideWinder Precision Pro joystick, specifically the model (Product ID) 85791. (This hasn't been tested on any other gameport joysticks).
- A spare USB 2.0 cord that you are willing to part with and not use as a USB cord anymore. (It will become the USB end to your joystick.)
- Something to cut with, I used my work box cutter, scissors will suffice.
- Electrical tape.
- (OPTIONAL) Soldering iron, and solder.
- (OPTIONAL) Caramel candies, or stuff to munch on. And an annoying cat.

About This Article
Advertisement