This article was co-authored by wikiHow staff writer, Travis Boylls. Travis Boylls is a Technology Writer and Editor for wikiHow. Travis has experience writing technology-related articles, providing software customer service, and in graphic design. He specializes in Windows, macOS, Android, iOS, and Linux platforms. He studied graphic design at Pikes Peak Community College.
This article has been viewed 190,641 times.
Learn more...
Many laptops have a switch that can disable your wireless adapter. This is great for planes, but it can cause problems when you're trying to get online. If your wireless adapter won't turn on, even after pressing the switch, there are several things you can try to fix it. This wikiHow teaches you how to restore your Wi-Fi compatibility on your Windows computer.
Steps
Turning on Wi-Fi
-
1Use your keyboard to enable your wireless adapter. Many computers have a key or switch that can be used to toggle the wireless adapter on or off. The key will have a logo of an antenna with radio waves coming out of each side, or it may have an image of an airplane to signify Airplane Mode. Tap this key to toggle your wireless adapter on and off. You may need to press the "Fn" key in conjunction with the Wi-Fi key.
-
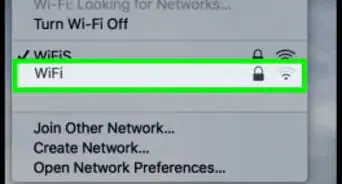
2Turn on Wi-Fi via the Wi-Fi icon. If your keyboard doesn't have a Wi-Fi key, you can look for the Wi-Fi icon in the taskbar. If there is no wireless connection, it will be an icon that resembles a globe. If it has a Wi-Fi connection, it will have an icon that resembles radio waves transmitting upwards at an angle. Use the following steps to turn on Wi-Fi via the Wi-Fi icon:
- Click the Wi-Fi icon in the taskbar. If you don't see it next to the clock in the lower-left corner, click the icon that resembles an arrowhead pointing up to show more icons.
- Click the Wi-Fi icon.
- Click the Wi-Fi button at the bottom of the Wi-Fi menu if it's not highlighted.
- Click a Wi-Fi network connection.
- Enter the wireless password if needed.
- Click Connect below the Wi-Fi connection.
Advertisement -
3Turn on Wi-Fi via the Windows Settings menu. If you can't find the Wi-Fi option in the Taskbar, use the following steps to turn on Wi-Fi in the Windows Settings menu:[1]
- Click the Windows Start button in the taskbar.
- Click the Settings/Gear icon.
- Click the toggle switch below "Wi-Fi."


Running the Troubleshooter on Windows
-
1Check if any other devices can connect to your wireless network. This checks to make sure it is your computer that's the problem and not your modem, router, or wireless connection. If your computer can't connect to your wireless network, but your smartphone and other devices can, the problem is with your computer. If no devices can connect to your wireless network, the problem is with your wireless connection.
-
2Restart your modem or router. If no devices are able to connect to the internet, unplug your modem or router for about 20 seconds. Then plug it back in and allow a few minutes for it to boot up. Attempt to connect to the internet again. If all of your devices are still unable to connect to Wi-Fi, contact your internet service provider for assistance.
-
3
-
4Type Troubleshoot. This displays the Troubleshoot Settings option in the Windows Start menu.
-
5Click Troubleshoot Settings. It's the first option in the Windows Start menu. This opens the Troubleshoot Settings.
-
6Click Additional Troubleshooters. It's at the bottom of the Troubleshoot settings menu.
-
7Click Internet Connection. It's next to an icon that resembles an antenna broadcasting radio waves.
-
8Click Run the Troubleshooter. This launches the troubleshooter.
-
9Click Troubleshoot my connection to the internet. This will run the troubleshooter. If there are any problems detected, the troubleshooter will tell what issues were found and give suggestions on how to fix them.


Reinstalling Your Driver
-
1Open the Device Manager. This tool lists all of the components installed on your computer. Hardware on your computer is controlled by software called "drivers". Reinstalling your wireless adapter's driver is the quickest way to troubleshoot it when it won't turn on. Windows will handle the heavy lifting automatically. Use the following steps to open Device Manager:
- Click the Windows Start menu.
- Type Device Manager.
- Click Device Manager in the Start menu.
-
2
-
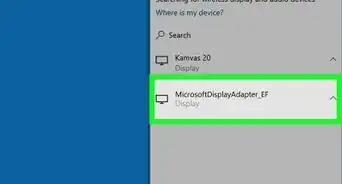
3Right-click the wireless adapter and click Uninstall Device. This displays a pop-up menu. The option to uninstall the driver is in the pop-up menu.
-
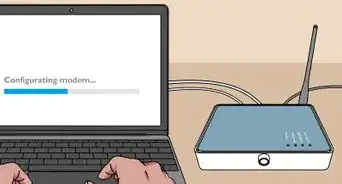
4Connect your computer to your modem or router via Ethernet. You'll need a network connection in order for Windows to automatically install the correct driver. Use an Ethernet cable and attach your laptop to one of your router's LAN ports.
-
5Restart your computer. Once you're connected to your router via Ethernet, reboot your computer.
-
6Log into Windows and allow it to install the wireless adapter driver. Windows should detect your driver-less adapter automatically once you log in. It will prompt you to let it find and install the proper driver. If you're connected to your router via Ethernet, Windows will be able to check online for the latest version of the driver. Windows will download and install them automatically.
-
7Attempt to connect to a wireless network. After the driver installation (which may take several minutes), your network adapter should turn back on. If your adapter has an indicator light, you should notice it change from orange to blue.[2]
- Click the Network icon in the system tray and select your wireless network. You'll need to enter the password if the network is secured.


Performing a System Restore
-
1Know when to do a system restore. If your internet connection was working a few days ago but isn't anymore, you may be able to fix the problem by performing a system restore. This will roll back your computer's settings to the date that you select. Any changes made to the system since the date will be undone. This means that programs that you've installed since the selected date will be removed, and settings will be reverted. A system restore will not affect your personal files.[3]
-
2
-
3Type Create a restore point. This displays the option to create and manage system restore points on your computer.
-
4Click Create a restore point. This opens the Protection tab in the System Properties menu.
-
5Click System Restore. It's the first button below "System Restore" header on the right.
-
6Click the radio option next to "Recommended restore" and click Next. This selects the restore point Windows created last time there were changes to your system.
- Alternatively, if you have created a restore point, you can select "Choose a different restore point" to see a list of all the restore points. Click the restore point you made and click Next.
- Click Scan for affected apps to see if what apps will be removed by reverting back to this restore point. Your documents and data will remain unaffected.
-
7Click Finish. This confirms that you want to revert your system back to the restore point and begins the restore process. Your computer may restart several times during this process.[4]


Community Q&A
-
QuestionI can't see my wireless icon. Even if I search, I don't find it. What must I do?
 Josiegivesadvice1Community AnswerTurn your router off for five seconds, then restart your phone. Or, check your settings -- you may have turned an option controlling it off.
 -
QuestionThe WiFi is off on my iPad and iPhone. What can I do?
 Community AnswerThe most likely scenario is that airplane mode is on. You can easily disable it in "General" in your settings.


-Step-8-Version-2.webp)
-Step-30.webp)

References
- ↑ https://www.businessinsider.com/how-to-turn-wifi-on-windows-10
- ↑ https://www.drivereasy.com/knowledge/how-to-reinstall-wi-fi-driver-on-windows-10-easily/
- ↑ http://support.hp.com/us-en/product/HP-Pavilion-dm4-Entertainment-Notebook-PC-series/4346357/model/5051458/document/c02543015#N55
- ↑ https://www.windowscentral.com/how-use-system-restore-windows-10
About This Article

1. Try turning Wi-Fi on using the keyboard key, Taskbar icon, or by clicking the toggle switch under "Network & Internet" in the Windows Settings menu.
2. Open the Windows Start menu and type "Troubleshoot."
3. Open Troubleshoot Settings and click Aditional Troubleshooters.
4. Click Internet Connection and click Run the troubleshooter.
5. Follow any instructions to correct any detected problems.
6. Click the Windows Start menu and type "Device Manager."
7. Open Device Manager and expand "Network adapters".
8. Right-click your wireless adapter and click Uninstall Driver.
9. Connect your computer the internet via an Ethernet cable.
10. Restart your computer.