This article was co-authored by wikiHow staff writer, Megaera Lorenz, PhD. Megaera Lorenz is an Egyptologist and Writer with over 20 years of experience in public education. In 2017, she graduated with her PhD in Egyptology from The University of Chicago, where she served for several years as a content advisor and program facilitator for the Oriental Institute Museum’s Public Education office. She has also developed and taught Egyptology courses at The University of Chicago and Loyola University Chicago.
There are 13 references cited in this article, which can be found at the bottom of the page.
This article has been viewed 24,160 times.
Learn more...
When you’re painting with an airbrush, stencils are a great tool for helping you achieve clean, consistent results. You can either purchase premade stencils or make your own. To create solid shapes, a negative stencil is your best bet. You can also make negative shapes on your canvas with templates, also known as positive stencils. Once you get comfortable with both types, try combining them to make a more complex image!
Steps
Using Negative Stencils
-
1Mount your painting surface securely. You’ll be able to use your stencil most effectively if you’re painting on a stable, flat surface. Mount the surface you’d like to paint on an easel or pin it up on a wall.[1]
- The flatter your work surface, the more neatly you will be able to fill in the stencil.
- If you’re painting on fabric, make sure to pull it tight so there are no sags or wrinkles. Take care not to stretch it so much that you warp your design, though.
-
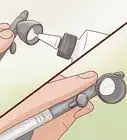
2Adhere the stencil to the surface you want to airbrush. Depending on the size and complexity of the design, you may be able to simply hold the stencil in place with your hand. However, you can free up both your hands and keep the stencil stable by using some spray-on stencil adhesive. Lightly spray the back of the stencil with the adhesive and let it sit for 2-3 minutes before sticking the stencil onto your painting surface.[2]
- You can also tape your stencil in place with a little masking tape.
Tip: If you make your own negative stencil, keep the cut-out shape. You can use it as a template and incorporate both negative and positive versions of the same shape into your designs!
Advertisement -
3Use masking tape to cover any areas you don’t want painted. As you use your airbrush, some paint may end up outside the borders of the stencil. To prevent this, put some masking tape around the outside edges of the stencil. That way, any stray paint will end up on the tape rather than on your work surface.[3]
- If you’re painting on thin paper, be cautious about using masking tape. It may rip the paper when you pull it off. Masking tape should be safe to use on thicker papers or cardstock, however.
-
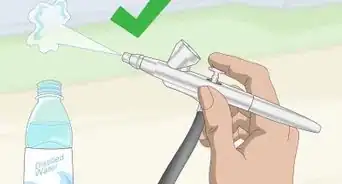
4Sweep the airbrush back and forth over the stencil to fill in the design. Pass the airbrush over the stencil in an up-and-down or side-to-side motion.[4] Take care not to hold the brush too close to the stencil or linger in one spot for too long, or paint may be forced under the edges of the stencil. You can also keep your design neat by holding the airbrush at a 90° angle relative to the stencil.
- You may need to hold the airbrush at least 2–3 inches (5.1–7.6 cm) away from the surface you are painting to get broad enough coverage and make sure you do not overload the stencil.
-
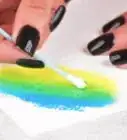
5Use multiple colors and values to create a more complex design. As you fill in the stencil, don’t be afraid to get creative! If you wish, you can make separate passes with different colors of paint, or do some freehand shading within the stencil design.[5]
- For example, you might begin with one paint color at the top and then make the transition to another color at the bottom to create a gradient or ombre effect.
- Make several passes with the airbrush if you want darker paint, or just a few passes if you want a lighter effect.
-
6Pull the stencil off carefully when you’re done. Once you’ve painted the surface, remove any masking tape and gently pull away the stencil. Take care not to rip the stencil if it’s made of paper or another delicate material.[6]
- Try to lift the stencil straight off without dragging it from side to side to avoid smudges.
- If there’s any underpaint (i.e., areas where the paint seeped in under the edges of the stencil), you may be able to correct it with a little paint that matches the color of the background.
- Make sure the ink on the stencil is dry before you use it again.


Airbrushing with a Template
-
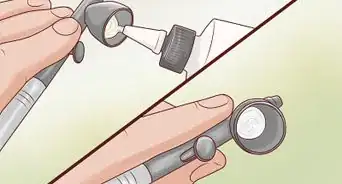
1Use a spray adhesive to fix the template in place. A template (otherwise known as a positive stencil) is much like a negative stencil, except that it’s a solid shape that masks out an area of your work surface.[7] Decide where you want the template to be, then spray down the back with a little stencil adhesive. Let it bond for 1-2 minutes, then attach the template to your work surface.
- If you feel comfortable doing so, you can simply hold the template in place with your hand and move it around as you work to create multiple images on the same surface.[8]
Tip: If you like, you can overlap several templates to create a more complex design.
-
2Spray lightly around the border of the template to create an outline. When you use a template, you will be creating an outline of the shape with a negative (paint free) silhouette inside. Use your airbrush to lightly follow the border of the template, creating a “halo” effect.[9]
- Some templates have interior details, meaning that they act like a cross between a template and a negative stencil. If this is the case, make sure to pass your airbrush over the whole template to fill in any open spaces in the design.
- To create a fine, dark outline, hold the airbrush close to your work surface and follow the border of the template closely. For a more diffuse outline, hold your airbrush farther away and use broader strokes.
-
3Remove the template from the surface carefully when you’re done. After you’re satisfied with the outline you’ve created around the template, carefully lift or peel the template off your work surface. Be careful not to rip the template or your work surface.
- Try not to slide the template around as you remove it, or you may end up with smudges.
-
4Add interior shading and details if you like. Your template will leave a blank, negative image behind on your work surface. If you wish, you can fill in the blank space with freehand details or shadows.[10]
- For example, if you’ve used a skull template, you can now add some shading and fill in details like the outlines of the teeth or the natural sutures in the bone.


Making Multilayer Designs
-
1Choose a combination of stencils and templates. If you want to create a more complex design, you can combine multiple types of stencils together into a single image. For example, you might create a design using a combination of:[11]
- An overlay. This is a type of stencil that covers your entire work surface to create a detailed background. A piece of lace fabric or a large doily will work for this purpose.
- A template.
- One or more negative stencils.
-
2Fix your template to the work surface. If you’re making a design where a template image will be the main focus, put the template in place first. Carefully adhere it to your work surface with some adhesive stencil spray.[12]
- For this kind of design, you will need to take some care in planning out where you want all the elements to be relative to each other.
-
3Put your overlay in place over the template. Once you’ve created an outline for your template, add your overlay stencil.[13] You may wish to tape or pin it to the edges of your work surface.
- The overlay will create an interesting background for the negative template image.
Did you know? Some complex stencil designs involve using 2 or more overlays that work together to create a single image. For example, if you’re making a tree design, you might have one overlay for the branch elements, another for the leaves, and a third one for flowers.[14]
-
4Use your airbrush to fill in the area around the template. With your overlay and template in place, sweep your airbrush across the work surface with a back-and-forth motion. Fill in as much of the surface as you like, but focus on the borders of your template.[15]
- The larger the area you cover with your paint, the more of the overlay design will be visible in your final piece.
-
5Remove the overlay and make a second pass around the template. Once you’ve filled in the background of your design, take the overlay off of your work surface. Take your airbrush and carefully follow the edges of the template to create a stronger border for the focal point of your design.[16]
- If your template has negative interior details, this is a good time to fill them in. You may wish to do so in a different color from the background paint.
-
6Use a negative stencil to add more decorations. Now that the outline of your main design is established, you can have some fun adding more details. Take a negative stencil and fill in a few shapes around the design.[17]
- For example, you might take a star stencil and scatter a few stars around your image.
- To create contrast, use a different color from the paint that you used to fill in your background design.
-
7Remove your template from the work surface. Once you’re satisfied with your design, carefully peel off the template. Make sure not to rip the template or your work surface.
- If you like, you can now add shading or freehand details to the negative space left behind by your template.[18]


Things You’ll Need
Using Negative Stencils
- Painting surface (such as a piece of cardstock or fabric)
- Negative stencil
- Adhesive stencil spray
- Masking tape
- Airbrush
- Paints
Airbrushing with a Template
- Painting surface (such as a piece of cardstock or fabric)
- Template (positive stencil)
- Adhesive stencil spray
- Airbrush
- Paints
Making Multilayer Designs
- Painting surface (such as a piece of cardstock or fabric)
- Overlay stencil
- Template (positive stencil)
- Negative stencils
- Adhesive stencil spray
- Airbrush
- Paints
References
- ↑ http://www.airbrushguru.com/how-to-make-stencil.html
- ↑ http://www.airbrushguru.com/how-to-make-stencil.html
- ↑ https://youtu.be/BzclYyjoSuw?t=72
- ↑ https://youtu.be/BzclYyjoSuw?t=93
- ↑ http://www.airbrushguru.com/how-to-make-stencil.html
- ↑ http://www.airbrushguru.com/how-to-make-stencil.html
- ↑ https://youtu.be/Nct26u1GAWg?t=85
- ↑ https://youtu.be/K3S5k0qsoss?t=31
- ↑ https://youtu.be/K3S5k0qsoss?t=31
- ↑ http://www.airbrushguru.com/how-to-airbrush-5-point-star.html
- ↑ https://youtu.be/Nct26u1GAWg?t=180
- ↑ https://youtu.be/Nct26u1GAWg?t=180
- ↑ https://youtu.be/Nct26u1GAWg?t=209
- ↑ https://youtu.be/_3Fvw37ebiQ
- ↑ https://youtu.be/Nct26u1GAWg?t=240
- ↑ https://youtu.be/Nct26u1GAWg?t=281
- ↑ https://youtu.be/Nct26u1GAWg?t=306
- ↑ https://youtu.be/Nct26u1GAWg?t=395
About This Article