This article was co-authored by Kieren Dutcher. Kieren Dutcher is a Professional Artist and a Teaching Artist at the NIAD Art Center in Richmond, California, and other venues around the Bay Area. With 30 years of experience, she specializes in colorful illustrations inspired by folk art, nature, and color. Kieren earned her Master of Education in Art Education from San Francisco State University and her BFA from the California College of the Arts. Her work has been published by St. Martin's Press, Uppercase Magazine, Highlights Magazine, in hospitals, and on TV. Her picture book Chinese and English Nursery Rhymes: Share and Sing in Two Languages (2010) won best book of the year from the Chinese American Library Association.
This article has been viewed 89,562 times.
A kneaded eraser is a staple of any artist’s toolbox. It can be used to remove a number of drawing materials, including charcoal, graphite, chalk, and pastel. As the name suggests, kneaded erasers can be stretched and molded into different shapes depending on the area you are working on. Start by breaking in your new kneaded eraser, then practice various techniques for erasing to get the most out of this artistic tool.
Steps
Breaking in the Eraser
-
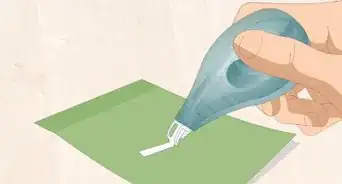
1Unwrap a new kneaded eraser on a clean surface. Pull off the plastic wrapper so you’re left with a flat rectangle of eraser. Make sure you’re working on a clean surface because the eraser will pick up hair, dirt, or anything else it comes in contact with.[1]
- You can purchase a new kneaded eraser online or at your local art supply store.
-
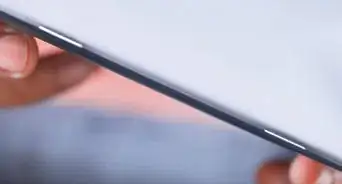
2Stretch the eraser apart with your hands, then knead it back together. Grab the eraser at opposite ends and pull it apart until it breaks. Then, squish the pieces back together. Repeat this process several times until the eraser is fully kneaded together in a soft and malleable ball.[2]
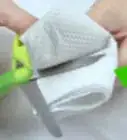
- Cut the eraser in half or quarters if it is too stiff to knead at first.
- This process is often compared to playing around with putty.
Advertisement -
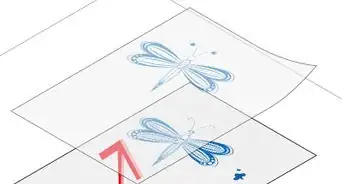
3Fold graphite shavings into the eraser to soften immediately. The eraser will pick up graphite naturally if you use it for erasing. To speed up the process, you can use a sandpaper pencil sharpener to create graphite shavings and work them into the eraser by pulling and stretching.[3]
- The eraser will become a slightly darker shade of grey once the graphite has been fully worked in.

Practicing Different Techniques for Erasing
-
1Dab the eraser on the page rather than dragging it across. A typical rubber or vinyl eraser must be dragged across the mark to erase it. A kneaded eraser, on the other hand, can simply be pressed on top of the charcoal, graphite, or other drawing material to lift it off the page. Dab the area multiple times to remove additional material.[4]
- Unlike typical erasers, kneaded erasers also erase cleanly without leaving bits of the eraser behind to brush off.
-
2Sculpt the eraser into a point to erase small areas. Using your fingers, shape the kneaded eraser into a sharp point. Dab the area you want to lighten 3 or 4 times with the point of the eraser, then knead the point back into the rest of the eraser to avoid transferring any of the material to a new spot on the page.
- You can also sculpt the eraser into other shapes to suit the area you are erasing, such as a thin straight edge.
-
3Wipe the eraser across a page to remove smudges. Hold the page steady with one hand, and swipe the eraser gently across any smudges to eliminate them. Work from the center of the page outwards to avoid crumpling the paper.
- Kneaded erasers are not great at removing pencil lines, however. Use a rubber or vinyl eraser for that.
-
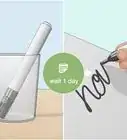
4Use the eraser as a drawing tool for rendering or creating highlights. A kneaded eraser can be used to actually create an image, not just remove unwanted marks. Rendering is the process of laying down darker tones to start, then using your eraser to soften the tones to create an image. Kneaded erasers are also great for lightening small areas to make highlights, like light reflected off an eye.[5]
- Rendering can be used to create entire drawings or for a smaller section of a larger drawing.
-
5Clean your hands with the kneaded eraser. Often some charcoal, graphite, or other drawing material will transfer onto the side of your hand as you draw. Kneaded erasers are a helpful tool in this instance—wipe one across your skin to remove any smudges.
- This can save you time while drawing, since you won’t have to get up as frequently to wash your hands.

Cleaning the Eraser
-
1Fold the eraser so you’re using a different, clean section. Fold the eraser once to reveal another area that isn’t covered in graphite or other drawing materials. This is a quick method, best used when you’ve dirtied just a small section of your eraser and want to keep working without a long interruption.
-
2Stretch the eraser apart several times for a deeper clean. Use this method when you’ve pressed a larger section of the eraser across your drawing and it needs to be thoroughly cleaned. Stretch the eraser apart until it’s close to breaking, then squish the pieces back together again.[6]
- Repeat several times until the surface is rubbery and no longer smooth and covered in drawing material.
- Your kneaded eraser will get darker with use as it absorbs more and more material.
-
3Store in a box or plastic bag away from dust and dirt. Kneaded erasers can easily pick up dirt and dust from the surrounding environment. To lengthen its lifespan, consider storing your eraser in a closed container to protect it from dust and grime.[7]
- A plastic bag or small tupperware are great options. If you have a box to store your art supplies, you can also toss it in there.
-
4Buy a new eraser if it stops self-cleaning. Kneaded erasers can last a long time if treated properly. However, at some point it will become so full of drawing material that it will no longer erase properly or becomes sticky. At this point, you should purchase a new kneaded eraser and break it in.[8]
- A used-up eraser will be stiff and difficult to stretch, almost like a ball of dried-up black gum.


Community Q&A
-
QuestionHow do you keep a kneadable eraser soft?
 LilyCommunity AnswerTo keep your kneaded eraser soft, knead it often and use it. Do not add lotion in it because it can get too sticky and you won’t be able to use it.
 -
QuestionWhat if it is too stiff?LilyCommunity AnswerIf it is too stiff, break it into pieces and knead each piece until it is no longer stiff. If that doesn’t work, rinse it under warm water, then knead it.
-
QuestionWhat happens if you stretch a kneaded eraser farther than you should?LilyCommunity AnswerIf you stretch it too much, it will break apart easily. It will not damage your eraser.

-Step-22.webp)
Expert Interview
Thanks for reading our article! If you'd like to learn more about becoming an artist, check out our in-depth interview with Claire Wentzel.
References
- ↑ https://madhansart.com/how-to-use-kneaded-eraser/
- ↑ https://madhansart.com/how-to-use-kneaded-eraser/
- ↑ https://madhansart.com/how-to-use-kneaded-eraser/
- ↑ https://madhansart.com/how-to-use-kneaded-eraser/
- ↑ https://youtu.be/HkSlXLohrTc?t=54
- ↑ https://youtu.be/HkSlXLohrTc?t=17
- ↑ https://youtu.be/EfAwE5ei8Do?t=85
- ↑ https://youtu.be/PIAKBVfl_YU?t=48
About This Article