This article was co-authored by wikiHow Staff. Our trained team of editors and researchers validate articles for accuracy and comprehensiveness. wikiHow's Content Management Team carefully monitors the work from our editorial staff to ensure that each article is backed by trusted research and meets our high quality standards.
This article has been viewed 19,662 times.
Learn more...
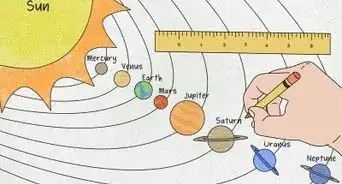
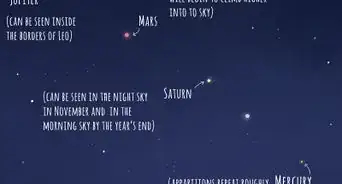
When you need to know what time it is, chances are you look at your phone. But before technology, people used an astrolabe, an ancient astronomical instrument that maps the night sky to determine facts like the hour of the day or when the sun will rise. If you get your hands on an astrolabe, you can not only use it to figure out the time, you can also find where different stars and constellations will be in the sky on a particular date. Happy stargazing!
Steps
Finding Stars and Constellations in the Sky
-
1Move the alidade onto the calendar date to get the zodiac date. Use either the current date or a future date that you want to know the star forecast for. Align the alidade with the date and find the corresponding zodiac date that it points to.[1]
- The dates are found on the back of the astrolabe and are written around the circle.
Understanding the 5 Main Parts of an Astrolabe
Alidade: The rotating bar on the back of the astrolabe that measures altitude and is also used for determining zodiac dates
Mater: The base of the astrolabe that has the time written around the edge in Roman numerals
Latitude plates: Usually a set of 3 plates that contain the latitude lines for 20, 45, and 60 degrees north
Rete: A rotating plate that has a map of the night sky along with the path of the sun through the sky
Rule: The pointer on the front of the astrolabe[2]
-
2Flip the astrolabe over and align the rule with the zodiac date on the rete. This will give you the position of the sun and the stars for that date. Make sure that the rule is perfectly placed on top of the date so you have an accurate reading.[3]
- The ecliptic shows the path of the sun through the sky and is grouped by zodiac signs.
- Note that the sun moves around the ecliptic counter-clockwise.
Advertisement -
3Move the rule and rete together to line up with the time of night. Find the time along the outer edge of the astrolabe when you want to view the stars. Rotate the intersection point of the rule and rete so that it points towards that time.[4]
- For example, if you want to check what will be in the sky at 10:30 p.m., align the rule and rete halfway between “X” and “XI.”
-
4Look at the stars above the horizon line to determine their location. Anything located above the horizon line on the plate of the astrolabe will be visible on the date and time that you chose. The concentric rings tell you how high in the sky each star will be. If a star is at the center of the rings, which is known as the zenith, for instance, it means that the star is directly overhead.[5]
- The farther out from the zenith that the stars are, the lower in the sky they’ll be.
- To know which direction to look in, use the compass markings on the plate. “ESE” means the star or constellation will be located in the east-southeast section of the sky.
- You won’t be able to see any of the stars that are below the horizon line.


Measuring Latitude
-
1Hold the astrolabe at the top and align the alidade with the North Star. Grasp the ring so that the astrolabe hangs down and turn the alidade so that it points directly towards the North Star in the sky. The alidade is the bar that rotates on the back of the astrolabe.[6]
- If your astrolabe doesn’t have a ring, you can identify the top by looking for the “XII.”
- Some alidades are hollow straws. If yours has one like this, line it up by looking through one end of the straw and rotating it until you can see the North Star through the other end.
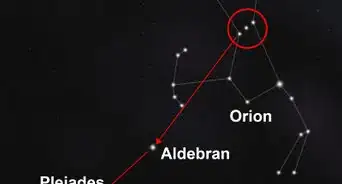
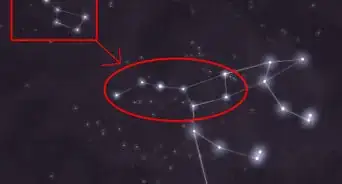
How to Locate the North Star
1. Find the Big Dipper constellation, which looks like a giant soup ladle with a long handle.
2. Look for the 2 stars forming the side of ladle furthest from the handle.
3. Draw an imaginary line from the star at the bottom of the ladle to the other 1 on the corner.
4. Continue drawing the line along the same path, five times longer than the distance between the 2 stars. The next bright star you come across on that line is the North Star.[7]
-
2Look at the measurement on the rim where the alidade is pointing. Once you’ve aligned the alidade, find the number that it intersects on the outer rim of the astrolabe. This is known as the zenith angle, which is measured in degrees and is the angle between the star and an imaginary line that goes straight up from the earth.[8]
- Make sure you have the alidade lined up as accurately as possible. Even the slightest bit to the left or right can throw off your reading.
- It might be easier to have a friend look at the measurement while you hold the alidade in place.
-
3Subtract the zenith angle from 90 to get the latitude. When you calculate 90 minus the zenith angle, you get the elevation angle, which is the angle between the North Star and the horizon. This is also equal to the latitude of where you’re standing.[9]
- For example, if you were standing at the North Pole, the North Star would be directly overhead, making your zenith angle equal 0. Subtract that from 90 and you get 90, which is the latitude of the North Pole.


Calculating the Time
-
1Hold the astrolabe by the ring at the top so it hangs down. Using the astrolabe any other way will distort your readings. The very top of the astrolabe is where the “XII” is marked on the outer rim.[10]
- If there’s no ring on your astrolabe, pinch the top to hold it rightside up.
-
2Adjust the alidade to point at the sun to find the altitude. The alidade is the rotating bar on the back of the astrolabe. Turn it until it’s angled directly towards the sun. Then look at the angle measurement that the alidade is now sitting on top of, along the rim of the astrolabe. That number is the sun’s altitude.[11]
- If the angle reading is 40, for example, it means the sun’s altitude is 40 degrees.
- Never look directly into the sun when doing this. Protect your eyes with sunglasses whenever you’re looking near the sun, too.
- It can help to have a friend hold the astrolabe while you take the reading.
-
3Determine the zodiac date by lining up the alidade with the calendar date. On the back of the astrolabe, you’ll find both the civil calendar dates and the zodiac dates. Place the alidade over the current date to find the corresponding zodiac one.[12]
- A zodiac date looks similar to a calendar date, but uses a sign instead of a month. For instance, the zodiac date of March 13 is Pisces 10.
-
4Align the rule with the correct zodiac date on the front of the astrolabe. The zodiac dates are located on the outside edge of the rete, which is the top plate on the front of the astrolabe. After turning the instrument over, move the rule so that it’s on top of the zodiac date you just found.[13]
- The ring around the rete where the zodiac dates are is also known as the ecliptic circle.
-
5Rotate the rule and rete together, lining them up with the sun’s altitude. You’ll find the altitude measurements on the tympan, which is the base plate of the astrolabe. Line up the intersection point of the rule and rete with the altitude you measured.[14]
- The altitudes are written on the tympan as degrees.
-
6Find the time where the opposite end of the rule is pointing. Once you have the rule and rete aligned properly, look at the opposite end of the rule. It will be resting over the time on the outermost rim of the astrolabe.[15]
- The numbers around the outside edge of the astrolabe are arranged just like a clock from 1 to 12. They’re written in Roman numerals.
- For instance, if the end of the rule is pointing halfway between “VII” and “VIII,” the time is 7:30.


References
- ↑ http://www.mhs.ox.ac.uk/scienceislam_education/docs/A%20brief%20guide%20to%20solving%20problems%20with%20the%20astrolabe.pdf
- ↑ http://astrolabeproject.com/downloads/Astrolabe_the_Missing_Manual.pdf
- ↑ http://www.mhs.ox.ac.uk/scienceislam_education/docs/A%20brief%20guide%20to%20solving%20problems%20with%20the%20astrolabe.pdf
- ↑ http://www.mhs.ox.ac.uk/scienceislam_education/docs/A%20brief%20guide%20to%20solving%20problems%20with%20the%20astrolabe.pdf
- ↑ https://www.joh.cam.ac.uk/library/library_exhibitions/schoolresources/astrolabe/use
- ↑ https://sciencing.com/use-astrolabe-4495712.html
- ↑ https://www.space.com/15567-north-star-polaris.html
- ↑ http://www.atmosedu.com/meteor/Labs/SolarZenith.pdf
- ↑ http://www.atmosedu.com/meteor/Labs/SolarZenith.pdf
- ↑ http://astrolabeproject.com/downloads/Astrolabe_the_Missing_Manual.pdf
- ↑ http://www.mhs.ox.ac.uk/scienceislam_education/docs/A%20brief%20guide%20to%20solving%20problems%20with%20the%20astrolabe.pdf
- ↑ http://astrolabeproject.com/downloads/Astrolabe_the_Missing_Manual.pdf
- ↑ http://astrolabeproject.com/downloads/Astrolabe_the_Missing_Manual.pdf
- ↑ http://astrolabeproject.com/downloads/Astrolabe_the_Missing_Manual.pdf
- ↑ http://astrolabeproject.com/downloads/Astrolabe_the_Missing_Manual.pdf
About This Article