This article was co-authored by wikiHow staff writer, Travis Boylls. Travis Boylls is a Technology Writer and Editor for wikiHow. Travis has experience writing technology-related articles, providing software customer service, and in graphic design. He specializes in Windows, macOS, Android, iOS, and Linux platforms. He studied graphic design at Pikes Peak Community College.
This article has been viewed 17,831 times.
Learn more...
The magic wand tool is a selection tool in Photoshop. It is used to select sections of an image that have a similar color or tone. This wikiHow teaches you how to use the Magic Wand tool in Photoshop.
Steps
-
1Open Photoshop. Photoshop has a blue, square-shaped icon that says "Ps" in the middle. Click the icon to open Photoshop.
-
2Open a Photoshop file. You can open a Photoshop file from the title screen. Click Open and select an image or Photoshop file (.psd) and click Open to open it. You can use the following steps to open an image or Photoshop file at any time:
- Click File in the menu bar at the top.
- Click Open.
- Click a file to select it.
- Click Open.
Advertisement -
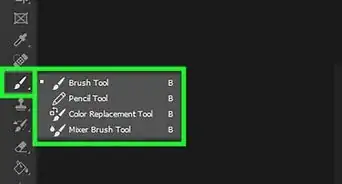
3Click and hold the quick select tool. By default, the toolbar is to the left. The quick select tool resembles a paintbrush painting over a spot. Click and hold the quick select tool to display a submenu.
-
4Click the magic wand tool. It's in the submenu that pops out when you click and hold the quick select tool. It has an icon that resembles a magic wand.
-
5Set the tolerance. The tolerance determines how sensitive the magic wand tool is by setting a range of how many different shades of a tone can be selected. Type a number between 0 and 255 next to "Tolerance" in the Options bar at the top of the screen, below the menu bar. The higher the number, the larger the selection will be.[1]
-
6Turn "Contiguous" off (optional). By default, Contiguous is turned on. This means that the magic wand will only select pixels next to the area you click. If you turn Contiguous off, it will select all pixels in the entire image within the tolerance range. If you want to turn "Contiguous" off, click the checkbox next to "Contiguous" in the Options to uncheck it.
-
7Turn "Anti-alias" off (optional). By default, "Anti-alias" is turned on. This means that Photoshop will blur the edges of your selection to make it appear less jagged. If you want to turn "Anti-alias" off, click the checkbox next to "Anti-alias" in the Options bar to uncheck it.
-
8Turn "Sample All Layers" on (optional). If you are working with multiple layers, you may want to click the checkbox next to "Sample All Layers" in the Options bar at the top. This will allow the magic want to sample all layers when making a selection, and not just the active one.
-
9Click to make a selection. Click any area in your image to make a selection. The magic wand will make a selection based on the pixels nearest to the area you clicked.
- If the magic wand selects too much or too little of your image, press "Ctrl + D" or "Command + D" on Mac to deselect everything. Adjust the tolerance and try again.
-
10Add to or subtract from the selection. To add to or subtract from a selection, click one of the intersection buttons in the upper-left corner then click to make another selection. You can use other selection tools besides the magic wand tool. The buttons resemble two boxes overlapping in different ways. The four options are as follows:
- Click the button that resembles a single box to replace your current selection with a new one.
- Click the box that resembles two squares joined together to add to your current selection. Alternatively, you can press and hold the "Shift" key to add to your current selection.
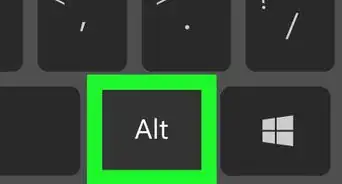
- Click the box that resembles a square cutting into another square to subtract from your current selection. Alternatively, you can press and hold "Alt" or "Option" on Mac and click to subtract from a selection.
- Click the box that resembles two squares overlapping to only keep the pixels nearest the new area you click in your selection. Alternatively, you can press and hold "Shift + Alt" or "Shift + Option" on Mac and click to do an intersecting selection.


-Step-9-Version-2.webp)
About This Article

1. Open an image in Photoshop.
2. Click and hold the Quick Select tool.
3. Click the Magic Wand tool.
4. Type a number between 0 - 255 next to "Tolerance."
5. Click to make a selection.
6. Click one of the intersection buttons in the upper-left corner.
7. Click again to add to or subtract from your selection depending on which intersection button is selected.