This article was co-authored by wikiHow Staff. Our trained team of editors and researchers validate articles for accuracy and comprehensiveness. wikiHow's Content Management Team carefully monitors the work from our editorial staff to ensure that each article is backed by trusted research and meets our high quality standards.
This article has been viewed 269,486 times.
Learn more...
Microsoft Word helps you incorporate images and text together in order to illustrate a document, and you can learn to wrap text around images in order to change the default settings. This wikiHow shows you how to use wrap text in Word to add captions to images.
Steps
Adding an Image
-
1Click on the area where you want your image. Once you do, a flashing vertical line appears right where you want the image placed.
- A mouse is useful for working with images in Word, because you have more control of the size and shape when you can click and drag the image.
-
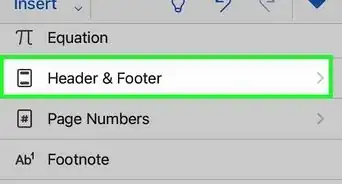
2Click Insert. This appears in the menu at the top of the page and pulls up a menu of different options.Advertisement
-
3Select Pictures.This will allow you to insert any jpg, pdf or other type of image that you have on your computer (or drives) into the document.
-
4Select Photo Browser. This will let you choose from the photo program on your computer.
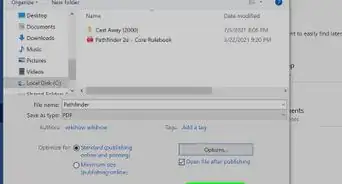
- Choose Picture From File if your image is on your desktop or in another folder.[1]
-
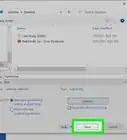
5Select your image. Once you've opened the dialog box for inserting an image, navigate to the folder where your image is saved and click on it once to select it for insertion into the document.
-
6Click Insert. This appears as a button at the bottom of the dialog box. Once done, your image is in the location you selected with your cursor.
-
7View your image. Keep in mind that Word’s default setting is to put the image “in line.” This means it will treat it as if it is a large letter or a tall line of text.
- Text wrapping will allow the text to wrap around the image, go over the image or beside the image.


Wrapping Text
-
1Click on the picture with your cursor. This action will bring up the Picture Formatting menu in the ribbon at the top of Word.
- Clicking outside of the image will take the picture formatting menu away and bring you back to the text formatting menu.[2]
-
2Select Wrap Text. It may be inside the Arrange grouping or in the Advanced Layout tab, Drawing Tools tab or SmartArt Tools tab, depending on the version of Word you are running.
-
3Click the Wrap Text button. This appears in the top-right corner of your image when you click on it and will pull up a drop-down menu listing different text wrapping options.
-
4Select a text wrapping option. Word has different text wrapping options, which you can pick according to your needs:
- Choose Square if your image is square and you want to wrap the text around the square border of your image.
- Choose Top and Bottom if you want the image to stay on its own line, but be between text on the top and bottom.
- Choose Tight to wrap text around a round or irregularly shaped image.
- Choose Through to customize the areas that the text will wrap. This is best if you want the text to be incorporated with your image in some way, or not follow the borders of the image file. This is an advanced setting, because you will pull or drag image points in and out of their original borders.
- Choose Behind Text to use the image as a watermark behind the text.
- Choose In Front of Text to display the image over the text. You may want to change the color, or it can make the text illegible.
-
5Re-position the image. After you have selected your text wrapping option, you can click and drag your image to re-position it on the page. The program will allow you to place it where you want it now, with the text flowing around it.
-
6Experiment with different types of text wrapping. Each image and project requires different types of text wrapping. Browse through options when you add a new image to make sure your wrap text is properly formatted.


Removing Wrap Text
-
1Click on the text box with your wrap text. This will pull up the markers for expanding and/or moving the text box along with making your text editable.
-
2Highlight all but the first letter of your wrap text. It's important to leave the first letter un-highlighted because you'll need to press the Backspace key, which could end up deleting the image you inserted above the wrap text.
-
3Press the ← Backspace key. This will delete the text you highlighted from the text box. Make sure to delete the first letter after the rest of the text, since this will reset your wrap text settings.


Community Q&A
-
QuestionI inserted a picture, chose "text wrapping," and selected "tight." How do I unwrap it?
 Community AnswerSelect the "In Line with Text" option in the same text wrapping menu. This will return the image to the default text wrapping setting -- the same as when you initially added the image.
 -
QuestionHow do I get two images next to each other?
 Community AnswerJust insert one picture right after the other (or put a space in-between if you want). If they don't both fit on the same line, then resize them by clicking one of the corner squares and moving it inward.
 -
QuestionHow do I select which text will wrap around the picture?
 Community AnswerHighlight the paragraph/words you would like to use and then select "Wrap text."
wikiHow Video: How to Wrap Text in Word
Things You'll Need
- Mouse
- Microsoft Word


About This Article

"When you insert an object, such as an image or shape, into your Word document, you can choose how your text wraps around it. First, insert an object. To do this, click the place in your document where you'd like it to appear, click the ""Insert"" tab, and then select the object you want to include. By default, the object will be placed in line with the text, which means it'll probably interrupt the document's text flow. To make text wrap around the object instead, click the object once to select it, and then click the Layout Options icon at its top-right corner—it's the half-circle surrounded by a bunch of lines. Now you'll see several text-wrapping options under ""With Text Wrapping."" Each option has an icon which illustrates how the text will wrap around the object. Click the first icon in this section to wrap the text around the object in a nice clean manner that adds a little space between the object and text. Or, click through the other options to see if they better suit your needs. If you drag the object to another location in the text, the text will continue to wrap around it using your selected text-wrapping setting. Click anywhere outside the object to close your Layout Options and return to editing your document. "