Step-by-step guide to inserting pictures in Word
This article was co-authored by wikiHow staff writer, Kyle Smith. Kyle Smith is a wikiHow Technology Writer, learning and sharing information about the latest technology. He has presented his research at multiple engineering conferences and is the writer and editor of hundreds of online electronics repair guides. Kyle received a BS in Industrial Engineering from Cal Poly, San Luis Obispo.
This article has been viewed 646,218 times.
Learn more...
Whether you're working on a hefty research project or a friendly holiday greeting card, adding images to your Word document can really add value to your project. Whether you want to insert a picture from your computer or find one online, it's easy to add photos in Word. This wikiHow teaches you how to insert an image into a Microsoft Word document using Windows, a Mac, and the free web version of Word.
Things You Should Know
- Use the Insert tab on Windows, Mac, and the web app to add a picture.
- Select Pictures > This Device to use an image on your computer.
- Click the image to resize and reformat it.
Steps
Windows
-
1Click the place in your document where you want to insert the picture. Word's insertion cursor, a vertical blinking bar, will appear at this point. When you insert the image, its bottom-left corner will be at this point.
- This method works for all modern versions of Word beginning with Word 2016. You can also use it as a guide for earlier versions of Windows, although there will be fewer tools and features.
- Changing the background is done through a different method, using the Design tab.
-
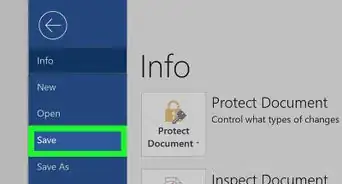
2Click the Insert tab. It's near the top of Word between "Home" and "Draw" (or "Home" and "Design" in some versions).Advertisement
-
3Click the Pictures tool. It's in the "Illustrations" section of the toolbar running along the top of Word. Some location options will appear. If you're using Word 2019 or later, a menu will expand. If you're using Word 2016 or earlier, your file browser will appear.
-
4Select the type of image you want to insert. You can choose an image on your computer, a stock image from Microsoft, or an image from the internet.
- Word 2019 or later:
- Click This Device if the picture is on your computer.
- Click Stock Images to select a free stock image from Microsoft's collection.
- Click Online Pictures to use Bing's image search to find photos on the web.
- If the photo is on your OneDrive, select Online Pictures and click OneDrive at the bottom-left corner.
- Word 2016:
- If the picture is on your computer, simply navigate to it in the file browser.
- If you want to search for a photo online or insert one from Facebook, Flickr, or your OneDrive, close the file browser and click the Online Pictures icon next to the "Pictures" in the toolbar. You can then select an image from Bing image search, Flickr, or Facebook.
- If the picture is on your OneDrive, click Online Pictures instead of Pictures and click Browse next to "OneDrive."
- Word 2019 or later:
-
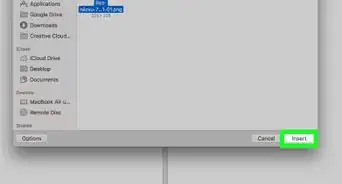
5Select the image you want to insert. When you find the picture, click it once to select it.
- If you're selecting from stock images or online images, you can click multiple pictures to add more than one.
- If you're choosing files from your computer and want to add more than one picture, hold the Ctrl button down as you click each image.
-
6Click Insert. It'll be near the bottom-right corner of the window no matter where you've selected your image(s). You’re done! Continue to the next steps for formatting information, or print the document when you’re ready.
-
7Resize the picture. If you want to change the picture's size, click it once to select it, and then drag any of the corner circles in or out.[1]
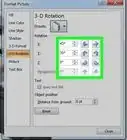
- You can also specify the size if you want. Double-click the picture to open the Picture Format tab at the top, and then set your desired measurements next to "Height" and "Width."
-
8Use the curved arrow at the top of the picture to rotate it. It's above the dot at the top-center part of the picture. To rotate, place the mouse cursor over the curved arrow, and then click and drag the cursor left or right until you're satisfied.
-
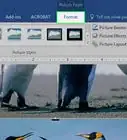
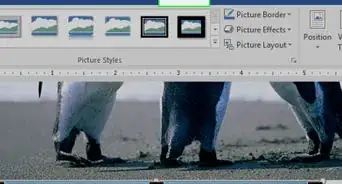
9Double-click the picture to access more editing tools. This opens the "Picture Format" (2019 and later) or "Format" (2016) tab at the top of Word. On this tab, you can:
- In the "Arrange" panel in the top-right area, click Wrap Text to choose how to situate the picture in blocks of text. You can also set alignment preferences here. Wrapping the text is a good way to get your document formatted exactly the way you want.
- To crop the picture, click the Crop tool in the "Size" panel at the top-right corner.
- The "Adjust" panel near the top-left corner has additional tools for background removal, color effects, and corrections.
- To add a border or effect around the picture, select one of the "Picture Styles" at the center of the Format bar, or choose any of the other options in the section to have more control over the style.


Mac
-
1Click the place in your document where you'd like to insert a picture. This places the cursor at that location.
-
2Click the Insert tab. It's at the top of Word between the "Home" and "Design" or "Home" and "Draw" tabs.
-
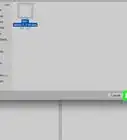
3Click the Pictures icon. It's on the toolbar that runs along the top of Word. Look for an icon of a green mountain with a yellow sun between "Tables" and "Shapes."
-
4Click Photo Browser or Picture from File. If you want to browse images in your Mac's Photos app, use Photo Browser. To select an image file using Finder, choose Picture from File.
-
5Insert the picture into the document. If you're using the Photo Browser option, simply drag the photo into your document. If you're using Picture from File, select the image and click Insert.
-
6Resize the picture. If you want to increase or reduce the picture's size, click the image to select it, and then do one of the following:
- To maintain the picture's proportions so it doesn't stretch or warp, hold down the Shift key as you drag any of the sizing handles (the circles) inward or outward.[2]
- To keep the image's center in place as you resize, hold down the Option key as you drag the handles.
- You can also specify a size. Double-click the Picture to open the Picture Format tab, then enter your desired measurements next to "Height" and "Width."
-
7Drag the curved arrow at the top of the picture to rotate it. It's above the dot at the top-center edge of the picture. Just place the mouse cursor over the curved arrow, and then click and drag it left or right until it's correct.
-
8Double-click the picture to access more editing tools. This opens the "Picture Format" tab at the top of Word, which has a bunch of editing features, including the ability to remove the background and add styles.
- Click Corrections near the top-left corner to correct lighting and color problems.
- Click Artistic Effects to play around with filters, and Transparency to make the picture more see-through.
- To crop the picture, click the Crop tool next to the height and width controls.
- Click Wrap Text to choose how to situate the picture in blocks of text, and use Align and Position to ensure correct placement.
- Click Quick Styles to choose pre-styled borders, shadows, and other options.


Web App
-
1Click the place in your document where you'd like to insert a picture. This places the cursor at that location.
- If it's your first time using Office Online on the web, go to https://www.office.com, sign in with your Microsoft account, and select Word to get started.
-
2Click Insert. This opens the Insert tab.
-
3Click Pictures. This opens a drop down options menu.
-
4Select a picture type. There are four options to choose from:
- This Device - choose a picture on your computer
- OneDrive - choose an image from your OneDrive
- Stock Images - insert a stock image or sticker
- Bing Pictures - search Bing for an image
-
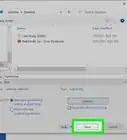
5Select an image. If you choose the This Device option, you’ll be prompted to select an image from your computer. Click it to select it.
-
6Click Open. This is in the bottom right corner of the image selection window. This will confirm your selected image and insert it into the document.
-
7Resize the picture. If you want to change the picture's size, click it once to select it, and then drag any of the corner circles in or out.
- You can also specify the size if you want. Double-click the picture to open the Picture tab at the top, and then set your desired measurements next to "Height" and "Width."
-
8Use the curved arrow at the top of the picture to rotate it. It's above the dot at the top-center part of the picture. To rotate, place the mouse cursor over the curved arrow, and then click and drag the cursor left or right until you're satisfied.
-
9Double-click the picture to access more editing tools. This opens the "Picture" tab at the top of the Word web app. On this tab, you can:
- In the "Arrange" panel in the top-right area, click Wrap Text to choose how to situate the picture in blocks of text. You can also set alignment preferences here.
- To crop the picture, click the Crop tool in the "Image Size" panel at the top-right corner.
- To add a border or effect around the picture, select one of the "Picture Styles" at the center of the bar, or choose any of the other options in the section to have more control over the style.


Community Q&A
-
QuestionHow do I take screenshots?
 Community AnswerOn a Mac, shift command 3 to screenshot the whole screen. If you want to take a screenshot of a certain area on the screen, press shift command 4. On a Windows PC, press control and print screen at the same time, then you can paste the image into Paint or Microsoft Word.
 -
QuestionWhen I insert several photos on an age in a Word document, the photos often won't stay in place. How do I stop the photos from bumping each other around?
 Community AnswerYou can right-click the image, hold the cursor over the "Wrap Text" menu option, and select an option from the list that is NOT "In Line with Text" (usually selected by default), such as "Tight" or "Behind/In Front of Text." Then you should be able to move the image freely around the page.
 -
QuestionHow do I format images in a Word document?Community AnswerTry double-tapping the photo. A photo format menu should come up on the right side.


References
About This Article

1. Click the place you want to insert the image.
2. Click the Insert tab.
3. Click Pictures.
4. Choose a location.
5. Select the image and click Insert.
6. Double-click the picture to open editing and format tools.