This article was co-authored by Shannon O'Brien, MA, EdM. Shannon O'Brien is the Founder and Principal Advisor of Whole U. (a career and life strategy consultancy based in Boston, MA). Through advising, workshops and e-learning Whole U. empowers people to pursue their life's work and live a balanced, purposeful life. Shannon has been ranked as the #1 Career Coach and #1 Life Coach in Boston, MA by Yelp reviewers. She has been featured on Boston.com, Boldfacers, and the UR Business Network. She received a Master's of Technology, Innovation, & Education from Harvard University.
There are 13 references cited in this article, which can be found at the bottom of the page.
This article has been viewed 154,820 times.
Office letters, also known as business letters are a form of written communication used to deliver information which is professional in nature.[1] Because office letters are a reflection of both the author and the organization as a whole, it is important that these letters are formal, courteous and professional in nature.
Steps
Formatting Your Letter
-
1Decide what format you will be using. There are three popular formats to use: block, modified block, and semi-block. Block format means that all elements of the letter are aligned to the left of the page, modified block allows for some elements to be shifted to the right, and semi-block is aligned left but each paragraph is indented.[2]
- Block format is the most formal and widely used format. If you are unsure of what type of format to use, this is the best choice.
- Keep in mind that different organizations utilize different formatting techniques, so be flexible in your formatting if needed.
-
2Choose a font. The standard for font selection is Times New Roman, 12 point. Arial is also considered an acceptable font. The important thing to remember is not only readability of the letter but also who your audience is.
- For example, if you are writing to a conservative organization you should choose the standard Times New Roman. Alternatively, if your organization is more liberal, you have more leeway to choose different fonts.[3]
Advertisement -
3Set your margins. Margins are the areas of white blank space around the edge of the writing area.[4] Most word processors are automatically set to the standard (1-inch margins all around), but you can always double check to make sure you are formatting correctly.
- Check the proportions of the letter by using print preview.
-
4Prepare to type your letter. Business letters should be typed (single-spaced) on a word processor that is set to print to 8 ½" by 11" blank, white paper.


Providing Basic Information
-
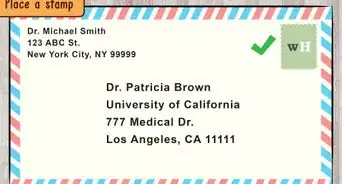
1Create a heading. The heading is the return address (usually 2-3 lines) and it contains information about the organization and where the reader can return any correspondence. It includes organization name (first line), street address (second line), and city and state (third line).
- The heading should be placed two inches from the top of the page.
- It is also acceptable to include additional contact information (phone, email, fax) after the third line of the address.[5]
- Try not to use abbreviations (for example, spell street instead of st.). If abbreviating the state, make sure you use the standard postal service abbreviations and capitalize both letters.
- You do not have to include a heading if your company has a standard letterhead which includes all of the organization's identifying information.
-
2Include a date. When using block style, always skip a line and then include the date under the return address. The standard American formatting for the date is: month, day, and year (including a comma after the day). Do not abbreviate months, and use four digits for the year.[6]
- The standard British formatting for the date is: day, month, year (with no comma).
- If using letterhead instead of a heading, place the date three lines below the last line of the letterhead.
-
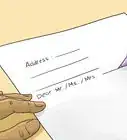
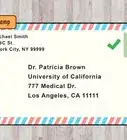
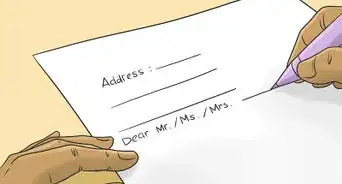
3Include an inside address. The inside address is the recipient's title, full name, and address. This should be included one line below the sender's U.S. postal address or one inch below the date. It is always aligned to the left.[7]
- Always write to a specific individual at an organization. If you don't have a name or title, call or go online to do some research.
- Include the highest title possible (Dr., Professor, etc.). If addressing a woman without a professional title, determine whether she should be addressed as Mrs., Ms. or Miss. When in doubt, use Ms.
- When using international addresses, include the name of the country (in all capital letters) on the last line.


Explaining Why You're Writing
-
1Include a salutation or greeting. Use the same name/title utilized in the inside address. The type of greeting will depend on your relationship with the recipient, but the most common greeting is "Dear," followed by the recipient's name and a colon. The salutation should be placed on the left margin, two lines below the inside address.
- If you don't know the recipient's name, you can also use phrases such as "To whom it may concern" or "Dear Sir or Madam."
- In British English, you do not need a colon after the recipient's name. Instead, leave it blank or use a comma.[8]
-
2Decide if you want to include a subject line. The subject line is a sentence which helps the reader quickly understand the purpose of your letter. It is completely optional. It is usually preceded by the word Subject: or Re: and can be placed either one line below the greeting, or directly after the inside address.[9]
- To make the subject line stand out, you can use bold font, all caps, or underline the text.
-
3Include an introductory body paragraph. This is where you introduce both who you are and your purpose for writing the letter. This should be aligned to the left, two lines below the salutation (or whatever is before the body of the letter).
- If using block or modified block formats, no indentation is necessary. Only indent if using a semi-block format.
-
4Include additional body paragraphs. The additional paragraphs should provide more details, more background information, or clarify any information.[10] This should again be left aligned, single-spaced, and only indented if using semi-block format. Skip a line between each new paragraph.


Concluding Your Letter
-
1Include a closing body paragraph. This is the final paragraph of your letter. It should remind the reader of your main point and provide the reader with a request for a follow up action (if required).[13]
-
2Include a complementary closing. The complementary closing is a brief, polite phrase that brings your letter to an end. It should be one space below the ending of the body of the letter. Standard closings include phrases such as Sincerely, Sincerely yours, or Yours truly.
- The first word of a closing is always capitalized while the second is not.
- Align to the left for block format. For modified block, tab to the center and begin typing (so it justifies right). For semi-block, fully center your closing.[14]
- Other options include: Respectfully, Very truly yours, Regards, and Cordially.[15]
-
3Include a signature and identification. After your closing, hit the enter bar four times to leave space for a signature. After that, type your first name, last name and any credentials. Your title can be included underneath your name.
- When signing your name, use blue or black ink.
- Your signature should begin over the first letter of your typed name.[16]
-
4Provide end notations as needed. End notations are used for any additional information such as initials or enclosures. The information should be placed on the left margin, two spaces below the signature information.
- Initials are included if someone other than the author of the letter types it. The author's initials come first (in capital letters), follow by a colon or forward slash, and the typist's initials in lowercase letters.[17]
- Enclosures are any other items that are being sent with the letter. It is signified by the word "Enclosures" or the abbreviation "Enc." or "Encs." as necessary. If there are multiple enclosures, it is customary to signify this by putting the number of enclosures in parenthesis: Enclosures (3).[18]


Remaining Professional
-
1Write in an appropriate tone. The tone is known as the writer's attitude or feeling towards the writing.[19] It's important to have a professional tone throughout the letter because it reflects both the writer and the organization.
- Be courteous and sincere in your writing by using phrases such as "thank you," or "please feel free to contact me."
- Never use a condescending tone--even if the information is negative. For example, instead of saying, "You did not read the instructions carefully," instead say, "the system may shut down if the instructions are not properly followed."[20]
-
2Use non-discriminatory language. Don't use any type of generalizations or language that others could find offensive. Use non-gender specific titles for generalizations and avoid stereotypical statements.
- For example, use chairperson instead of chairman or say,"the office staff" versus "the girls in the office."[21]
-
3Use appropriate grammar and word choice. Use complete and complex sentences and avoid fragments and run-ons. Always re-read to make sure your sentences are cohesive and well put together.[22]
- Don't use slang terms or lower level words, no matter how popular they are. For example avoid using words such as: stuff, like, or really.
- Avoid overly used words such as: a lot, good, or nice.
- Don't use run-on sentences that seem to have no end and require punctuation but don't use any and put together many ideas into one sentence that should be broken up into a few. (This is an example of a run-on sentence)
- Make sure your sentences. (are complete and not fragments like this one).
-
4Use appropriate writing conventions. This includes punctuation and spelling. When in doubt, utilize your spelling and grammar checker in your word processing system.
- Don't use shorthand such as LOL (laugh out loud) or TTYL (talk to you later).
- Avoid using excessive punctuation marks!!!!!!


Community Q&A
-
QuestionHow do I end an official office letter?
 Tom De BackerTop AnswererThere are a number of standard closing statements: "Kind regards", "Sincerely", "Respectfully", "Yours", "With respect"... you get the idea. Using any of those will be just fine. When people expect a "Respectfully yours" at the end of the letter, they don't have to actually read it; just seeing it there is enough, it saves them time. If you're going to get creative, that takes time to read and understand.


References
- ↑ https://www.englishclub.com/business-english/business-letters-what.htm
- ↑ https://owl.english.purdue.edu/owl/resource/653/01/
- ↑ https://owl.english.purdue.edu/owl/resource/653/01/
- ↑ http://www.webopedia.com/TERM/M/margins.html
- ↑ http://englishplus.com/grammar/00000151.htm
- ↑ http://www.studyenglishtoday.net/business-letter-parts.html
- ↑ https://owl.english.purdue.edu/owl/resource/653/01/
- ↑ https://www.ego4u.com/en/cram-up/writing/business-letter/salutation
- ↑ http://www.studyenglishtoday.net/business-letter-parts.html
- ↑ https://www.ego4u.com/en/business-english/communication/business-letter/body
- ↑ http://www.studyenglishtoday.net/business-letter-parts.html
- ↑ https://owl.english.purdue.edu/owl/resource/653/01/
- ↑ https://www.ego4u.com/en/business-english/communication/business-letter/body
- ↑ https://owl.english.purdue.edu/owl/resource/653/2/
- ↑ https://toughnickel.com/business/Best-Business-Letter-Closings-Letter-Closing-Salutations
- ↑ http://www.studyenglishtoday.net/business-letter-parts.html
- ↑ http://web.mit.edu/course/21/21.guide/letters.htm
- ↑ http://www.writeexpress.com/business-letter-format.html
- ↑ https://owl.english.purdue.edu/owl/resource/652/1/
- ↑ https://owl.english.purdue.edu/owl/resource/652/1/
- ↑ https://owl.english.purdue.edu/owl/resource/652/1/
- ↑ http://www.businesswritingblog.com/business_writing/2006/09/5_tips_to_sound.html
About This Article

To write an office letter, start with a salutation such as “Dear,” followed by the recipient’s name and a colon. If you don’t know their name, use “To Whom It May Concern” or “Dear Sir or Madam.” After the salutation, write an introductory paragraph to introduce yourself and your purpose for writing. Then, follow up with additional paragraphs to provide details and background information. Finish with a concluding paragraph to re-emphasize your main point, and include a complimentary closing such as “Thank you for your consideration.” For more advice, including how to choose your font and set your margins, keep reading.