This article was co-authored by Nicole Bolin. Nicole Bolin is a Crafting Specialist and the CEO of Stencil, a DIY Craft Studio in Phoenix, Arizona. Nicole specializes in interior design and various craft and DIY projects. Nicole holds a Certificate in Interior Design from the New York Institute of Art and Design. She opened Stencil in 2017 to teach others to create DIY projects that fit their home and lifestyle.
There are 7 references cited in this article, which can be found at the bottom of the page.
This article has been viewed 72,377 times.
Glass surfaces look beautiful when they are smudge-free and virtually transparent. But they don't always have to be like that! Writing and drawing on glass is an easy way to add a decorative factor or add a personal touch. All you really have to do is decide on if you want to use temporary or permanent ink, find or create your own design, and then write directly on the glass.
Steps
Choosing a Writing Utensil or Ink
-
1Use a dry erase marker to make temporary marks on glass. Dry erase markers work well on glass surfaces. The markings can be easily wiped off, too, so if you mess up this shouldn’t be a problem!
- Dry erase ink is not necessarily safe to use on glassware that you intend to eat off of. Check the marker's label information for further information.
-
2Write temporarily on glass surfaces using a wet-erase marker. Wet-erase markers differ from dry erase ones in that they are semi-permanent, and cannot be simply wiped away with a dry cloth or whiteboard eraser.
- To erase markings from this type of marker, wipe the surface with a dampened cloth. Wet-erase markers make things easier to wash off if you mess up. You can use either window or glass cleaner, or water, to dampen it.
- Wet-erase ink is not necessarily safe to use on glassware that you intend to eat off of. Check the marker's label information for further information.
Advertisement -
3Write on the glass with a permanent marker. These markers, as the name implies, use a type of ink that is resistant to fading and erasing. If what you write on the glass surface needs to stay there for a long time, a permanent marker is your best bet.
- Let the ink dry for a minute or two after writing in order to give it time to set.
- Many permanent markers, though labeled as non-toxic, are not deemed to be food-safe.[1] Check the label for more information if you plan on using permanent marker ink on glassware for food.
- If you end up having to erase whatever you wrote with a permanent marker, this isn’t causing worry. To remove it, color over the writing with a dry erase or wet-erase marker.[2] Before this dries, wipe the dry-erase or wet-erase marking off. The permanent marker should come off, too!
-
4Mark the glass with an acrylic paint pen for long-lasting designs. Paint pens used for arts and crafts projects are available at craft stores. The result won't necessarily be as permanent as a permanent marker, but paint pens get pretty close.[3] Make sure to get pens with an ink that is safe to use on glass, especially if you plan on using these for glassware that you eat off of. To make your markings permanent, you will have to let the acrylic paint cure for approximately 24 hours by setting the glass aside and not touching the markings until the paint has completely dried and set.[4]
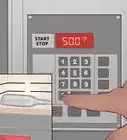
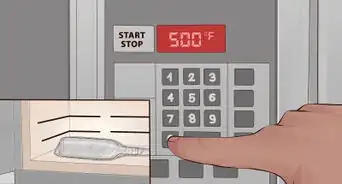
- If you need the paint to set faster, you can put the glass item in an oven to cure, as long as it is oven-safe and heat resistant.[5] Once you finish writing on the glass, put it in a cool oven. Set the oven to 300 °F (149 °C) and let it warm up. Once it has reached 300 °F (149 °C), turn the oven off and let it cool down. The paint should now be set!
- To be safe, double-check the curing time and temperature that's recommended by the paint manufacturer.


Tracing a Stencil
-
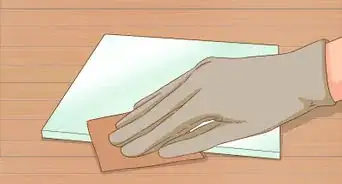
1Prepare the glassware by washing thoroughly with soap and warm water. You need to completely clean the glass surface so that no dirt, dust, or grease gets in the way of the design.[6] Wash with warm, soapy water and rinse completely. Let the glass dry for 15 minutes before you start to write on it.
-
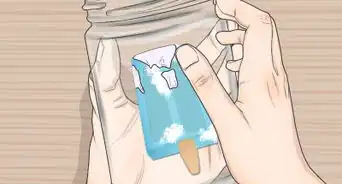
2Find a design or stencil that you like and fits on your glass surface and print it out. Depending on what you are writing on the glass for, this could really be anything you can imagine. Your only parameter would be what you can print out and fit onto the surface of the glassware you will be writing on.[7]
- Customize glassware with your name or monogram.
- Make fun scenes of animals or landscapes on windows in a child's bedroom or on a car.
- Draw on a lightbulb to add colored light to rooms.
- Label jars and containers around the house for decorative storage.
-
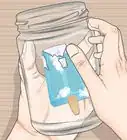
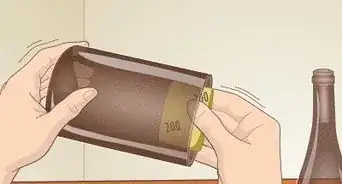
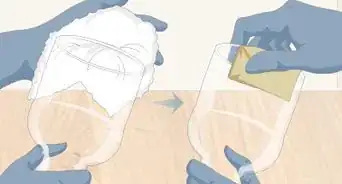
3Tape the stencil to the opposite side of the glass surface that you want the design on. The printout of the stencil has to be on the side that you will not be drawn on so that you can follow the design.[8]
- For example, if you were to be customizing a wine glass, you would tape the stencil to the inside of the glass where the wine would fill, and have the stenciled paper facing towards the outside.
-
4Trace the stencil on the glass surface using the marker of your choice. Follow the lines of the stencil on the side of the glass that doesn't have the stencil taped to it. Make sure to hold the glass very still so that the stencil is clear to follow.[9]
-
5Let the ink or paint dry before using the glassware. The length of time the ink will take to dry depends on what type of writing or drawing tool you used. For non-permanent and permanent markers, this should only take one or two minutes. For paint pens, this can take up to 24 hours to completely dry and seal.


Making Freehand Designs
-
1Prepare the glassware by washing thoroughly with soap and warm water. This will remove any dirt, grease, or dust that could get in the way of the design that you will make.[10] Make sure to let the glass dry completely as excess moisture could cause the ink or paint to smudge.
-
2Use your utensil of choice to make your design on the glass. Write and draw whatever you want! Write notes to yourself on your mirror or the window of your front door. Play games like hangman on windows or glass tables in common areas. Write names on glasses so you never get confused about whose is whose.
-
3Let the ink or paint dry for the necessary amount of time. The length of time the ink will take to dry depends on what type of writing or drawing tool you used. For non-permanent and permanent markers, this should only take one or two minutes. For paint pens, this can take up to 24 hours to completely dry and seal.


Warnings
- Not all inks that can be used on glass are non-toxic or food-safe. Read the pen and marker labels carefully before using them to write on anything you plan on eating off of.⧼thumbs_response⧽
- If you do mess up, permanent marker and acrylic paint can be removed through scrubbing the glass with a rough sponge or steel wool, though this could damage the glass.⧼thumbs_response⧽
- Permanent means permanent! Be very careful when writing or drawing on glass with a permanent marker or paint pen. If you mess up, you might not be able to save the design without scrubbing hard. It's always good to start of with one that can be erased.⧼thumbs_response⧽


References
- ↑ https://www.evilmadscientist.com/2011/evaluating-some-food-safe-markers/
- ↑ https://www.polymersolutions.com/blog/dry-erase-marker-trick/
- ↑ https://youtu.be/iImQMstkU3k?t=11s
- ↑ https://plaidonline.com/articles/how-to-cure-painted-glass-projects
- ↑ https://plaidonline.com/articles/how-to-cure-painted-glass-projects
- ↑ https://plaidonline.com/articles/painting-glassware-101
- ↑ https://www.kenarry.com/hand-painted-wine-glasses-how-to-make/
- ↑ https://www.theartofdoingstuff.com/copying-any-art-onto-glass/
- ↑ https://www.theartofdoingstuff.com/copying-any-art-onto-glass/
About This Article