This article was co-authored by wikiHow staff writer, Jack Lloyd. Jack Lloyd is a Technology Writer and Editor for wikiHow. He has over two years of experience writing and editing technology-related articles. He is technology enthusiast and an English teacher.
The wikiHow Tech Team also followed the article's instructions and verified that they work.
This article has been viewed 1,063,107 times.
Learn more...
This wikiHow teaches you how to create a layer mask, which can be used to conceal or reveal parts of other layers in Adobe Photoshop.
Steps
Masking an Entire Layer
-
1Open or create a Photoshop file. Double-click the Photoshop app icon, which resembles a blue icon with the letters "Ps," then click on File in the menu bar at the top of the screen and perform one of the following actions:
- Click Open... and then double-click a project to open an existing document.
- Click New... to create a new document, then add any images that you want to use.
-
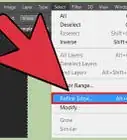
2Make sure that you haven't selected a piece of an image. You can do this by clicking the Select menu item at the top of the window and then clicking Deselect in the drop-down menu.Advertisement
-
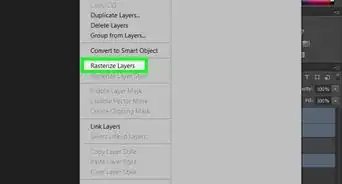
3Select a layer. In the "Layers" section of the Photoshop window, click the layer that you want to mask.
-
4Click the Layer menu item. It's at the top of the window. Doing so prompts a drop-down menu.
- On a Mac, this option is at the top of the screen.
-
5Select Layer Mask. You'll find this option in the drop-down menu. Doing so prompts a pop-out menu to appear.
-
6Click Hide All. It's in the pop-out menu. This will hide the entire selected layer.
-
7Save your project's changes. Click File in the upper-left corner, then click Save in the drop-down menu.
- If you created a new project, doing this will open the "Save As" window in which you'll need to enter a file name, select a location, and click Save again.


Masking or Unmasking Part of a Layer
-
1Open or create a Photoshop file. Double-click the Photoshop app icon, which resembles a blue icon with the letters "Ps," then click on File in the menu bar at the top of the screen and perform one of the following actions:
- Click Open... and then double-click a project to open an existing document.
- Click New... to create a new document, then add any images that you want to use.
-
2Make sure that you haven't selected a piece of an image. You can do this by clicking the Select menu item at the top of the window and then clicking Deselect in the drop-down menu.
-
3Select a layer. In the "Layers" section of the Photoshop window, click the layer that you want to mask.
-
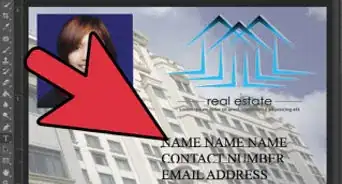
4Select the part that you want to hide or show. Depending on the level of detail that you want to preserve, you'll have to use one of the following tools for this step:
- Marquee Tool - Used to select a large area without worrying about fine edges. Click the dotted-line icon near the top of the "Tool" section, then click and drag your mouse around the area that you want to show or hide.
- Pen Tool - Used to select fine details. Click the fountain pen-shaped icon in the "Tool" section, then click and drag your mouse around the area that you want to show or hide.
-
5Click the Layer menu item. It's at the top of the window. Doing so prompts a drop-down menu.
- On a Mac, this option is at the top of the screen.
-
6Select Layer Mask. You'll find this option in the drop-down menu. Doing so prompts a pop-out menu to appear.
-
7Click either Reveal Selection or Hide Selection. Choosing the Reveal Selection option will cause only the selected area to display while the rest of the layer is masked, while choosing Hide Selection will mask the selected area of the layer while preserving the unselected portion.[1]
-
8Move the mask if needed. If you want to move the mask up to display above a different layer, click and drag the masked layer in the "Layers" section up or down until it's positioned where you want it.
-
9Save your project's changes. Click File in the upper-left corner, then click Save in the drop-down menu.
- If you created a new project, doing this will open the "Save As" window in which you'll need to enter a file name, select a location, and click Save again.


Using Select and Mask
-
1Understand the purpose of Select and Mask. This tool allows you to select a part of an image to serve as the "revealed" part of a layer mask, which is useful when attempting to remove a person from a background (or vice versa).
-
2Open or create a Photoshop file. Double-click the Photoshop app icon, which resembles a blue icon with the letters "Ps," then click on File in the menu bar at the top of the screen and perform one of the following actions:
- Click Open... and then double-click a project to open an existing document.
- Click New... to create a new document, then add any images that you want to use.
-
3Select a layer. In the "Layers" section, click the image that you want to turn into its own layer mask.
-
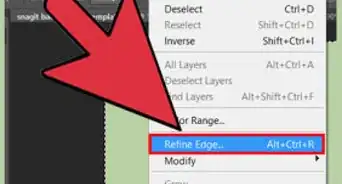
4Click Select. This tab is at the top of the Photoshop window (Windows) or the computer screen (Mac). A drop-down menu will appear.
-
5Click Select and Mask…. It's in the middle of the drop-down menu. Doing so opens the "Properties" window on the right side of the Photoshop window.
-
6Click the "View" drop-down box. This box is at the top of the "Properties" section on the right side of the window. Clicking it prompts a drop-down menu.
-
7Click Onion Skin. It's in the drop-down menu. This option will allow you to select the part of your image that you want to use as the layer mask.
- You can also just press the O letter key.
-
8Select the "Quick Selection" tool. Click the brush icon at the top of the column of brushes on the left side of the window, or press the W letter key.
- If your image's transparency is higher or lower than 50 percent, first drag the "Transparency" slider that's in the right-hand menu to the 50 percent mark.
- This tool may already be selected.
-
9Select a section to save. Click and drag your mouse around the part of the layer that you want to reveal. You should see the selected sections decrease in transparency.
- Anything not selected will be cut from the layer when you're done.
-
10Remove soft-edge details. Soft-edge details are remnants of the layer's original background. These details can cause your image to look sloppy, but you can get rid of them by doing the following:[2]
- Click the "View" drop-down box again.
- Click either On Black or On White depending on your photo's color.
- Press R to select the "Refine Edge Brush" tool.
- Click and drag around the edges of your image.
-
11Touch up your image. You can check for any last-minute sloppy details by clicking the "View" drop-down box and selecting Black & White, selecting the "Quick Selection" brush, and clicking any small black spots inside of the image area.
- The entire image's background will also be black—leave the background alone.
-
12Save your image as a layer mask. Click the "Output To" drop-down box on the right side of the page, click Layer Mask in the drop-down menu, and click OK at the bottom of the right-hand menu.
-
13Save your project's changes. Click File in the upper-left corner, then click Save in the drop-down menu.
- If you created a new project, doing this will open the "Save As" window in which you'll need to enter a file name, select a location, and click Save again.


Warnings
- Masking part of a layer won't have any effect if the layer itself isn't above a layer that you want to display.⧼thumbs_response⧽


References
About This Article
1. Open a Photoshop project.
2. Deselect any parts of images by clicking the Select menu and clicking Deselect
3. Select a layer.
4. Click Layer
5. Select Layer Mask
6. Click Hide All