X
wikiHow is a “wiki,” similar to Wikipedia, which means that many of our articles are co-written by multiple authors. To create this article, volunteer authors worked to edit and improve it over time.
This article has been viewed 31,015 times.
Learn more...
If you’re running a local area network and want to limit the access to the server to only a precise number of computers, you can set the server options so that only specific computers can use the network. By adding an IP address to a server, you can do just that. The process is simple and can be done in just a few steps.
Steps
Part 1
Part 1 of 2:
Getting the IP Address of the Computer You Want to Add
-
1Access the Command Prompt. Click the Start/Orb button on the bottom-right corner of the computer screen to open the Start menu.
- Type in “cmd” on the search field and press the Enter key on your keyboard to open the Command Prompt window.
-
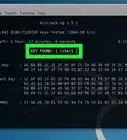
2Get the network identity of the computer. Inside the Command Prompt window, type in the “ipconfig” command (not case sensitive) and press the Enter key on your keyboard once more.
- The network identity of the computer will be displayed inside this window.
Advertisement -
3Get its IP address. Scroll along the displayed network identity on the Command Prompt window and the value beside the “IPv4 Address” field (which looks something like 192.xxx.xxx.xxx) will be the IP address of the computer.


Advertisement
Part 2
Part 2 of 2:
Adding the IP Address to the Server
-
1Access the Control Panel of the Window Server computer. Click the Start/Orb button to open its Start menu and select “Control Panel” from the list.
-
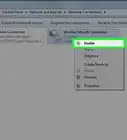
2Open the Server’s Local Area Settings. Select “Network and Sharing Center” from the Control Panel and click “Local Area Connections.” The server’s Local Area status will open on a new window.
- Inside the Local Area Connection Status window, click the “Properties” button on the lower-left corner of the window to view its properties.
-
3Open the Internet Protocol properties window. Inside the Local Area Connection Properties window, select the “Internet Protocol Version 4 (TCP/IPv4)” from the list and click the “Properties” button on the lower-right corner of the window.
-
4Add the IP Address. Click the “Advance” button inside the Internet Protocol Version 4 (TCP/IPv4) Properties window to open the Advanced TCP/IP Settings window. Click the “Add” button under the “IP Address” field, and type in the IP address that you wish to add.
-
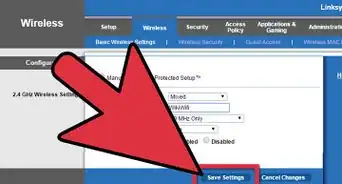
5Save the settings. Once you’re through adding the addresses you like, click the “OK” button on every window that you’ve opened, starting from the “Advanced TCP/IP Settings” up to the “Local Area Connection Status.”


Advertisement


About This Article
Advertisement