This article was co-authored by wikiHow staff writer, Nicole Levine, MFA. Nicole Levine is a Technology Writer and Editor for wikiHow. She has more than 20 years of experience creating technical documentation and leading support teams at major web hosting and software companies. Nicole also holds an MFA in Creative Writing from Portland State University and teaches composition, fiction-writing, and zine-making at various institutions.
This article has been viewed 56,529 times.
Learn more...
Whether you want to install Linux on your PC from a flash drive or just boot into a portable version of Linux, you can easily create a bootable Linux USB flash drive in Windows 10. We'll show you how to download the software you'll need to create your Linux USB drive, how to make the drive bootable, and how to make your PC boot from the flash drive instead of your hard drive.
Steps
Creating a Bootable Linux Flash Drive
-
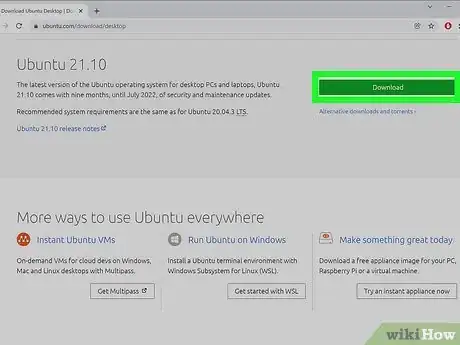
1Download an ISO image of Ubuntu (or your preferred Linux flavor). To boot into Linux from a USB drive, you'll need to download a file that contains an "image" of the Linux installation media. You can download the ISO for any flavor of Linux you want to install, including Debian and Linux Mint, and the process to create a bootable USB drive will be similar.
- To download an ISO of Ubuntu, head over to https://ubuntu.com/download/desktop and click the Download link next to the latest stable version. Ubuntu is a good option if you want to try out Linux without installing it—once you boot from the flash drive, you'll be able to choose an option to try before you install.[1]
- To download a Debian ISO, go to https://www.debian.org/download. The download will start automatically.
- You can get the Linux Mint ISO from https://linuxmint.com/download.php. Just click the Download button next to the version you want to install.
- If you just want to try out Linux without installing it on your hard drive, try Puppy Linux, which allows you to boot right into a functional Linux desktop. You can download a Puppy Linux ISO from https://puppylinux.com/index.html#download.
-
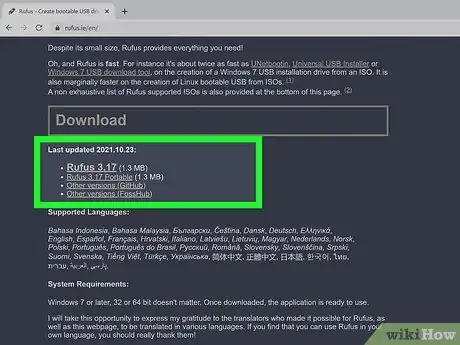
2Install Rufus on your PC. Rufus is free software that allows you to create bootable USB drives from ISO images.[2] Go to https://rufus.ie and click the Rufus link under "Download" toward the bottom of the page to download the installer.
- When the download is complete, double-click the file that begins with "rufus" and ends with "exe" and follow the on-screen instructions to install.
- Once Rufus is installed, you'll find it in your Windows menu. Launch Rufus if it doesn't start automatically after the installation.
Advertisement -
3Insert your USB flash drive into an available USB port. You'll want to use a blank USB drive, as everything on the drive will be deleted. Back the drive up before you continue if necessary.
-
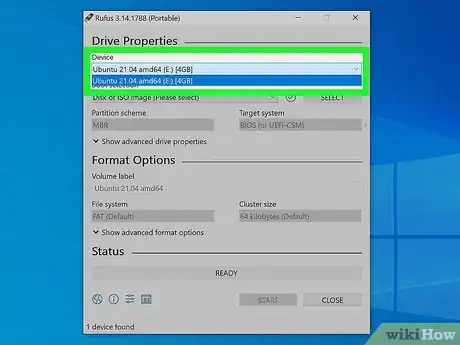
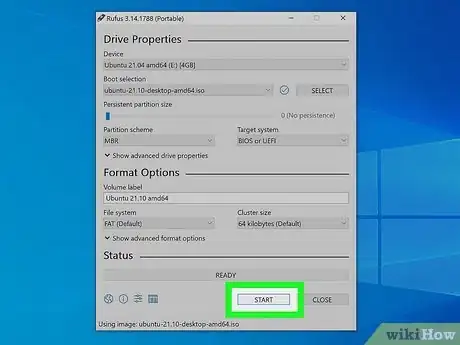
4Open Rufus and select your USB flash drive in Rufus. If multiple external drives are connected to your PC, Rufus may select the wrong drive. Click the proper drive in the "Device" menu if it's not accurate.
-
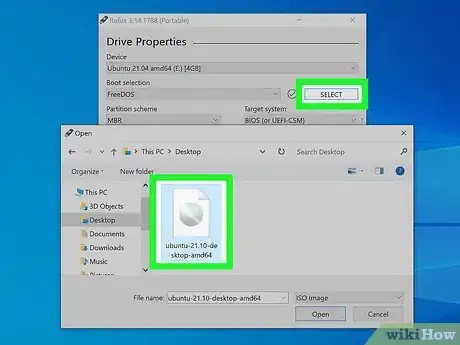
5Select FreeDOS from the "Boot selection" menu. It's just under the Device selector. This tells Rufus to make the drive bootable.[3]
- The default options for "Partition scheme" and "Target system" are filled in automatically and you won't need to change them.
-
6Click the Select button and choose the ISO you downloaded. This button is to the right of the "Boot selection" menu. You should find the ISO in your default download folder, which is usually called Downloads.
-
7Leave the other parameters in place and click START. This begins the process of writing the ISO image to the flash drive.
- If Rufus prompts you to download an additional file to write the ISO, click Yes to continue.[4]
-
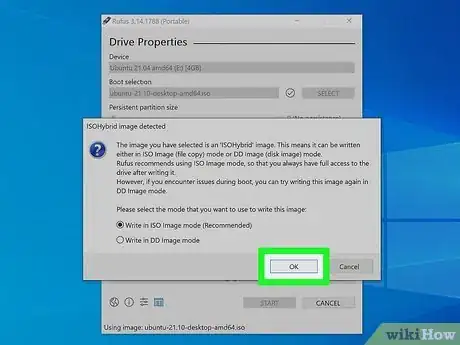
8Select "Write in ISO image mode (Recommended)" and click OK. This option will appear when the "ISOHybrid image detected" window appears. This just means you can use the same ISO on a bootable DVD or USB drive as needed.
-
9Click OK to create your bootable USB drive. This involves erasing the data on the drive and copying the necessary files for making the drive bootable. You'll see a Status bar at the bottom of the window once the process begins.
- When the drive is ready, the status bar will say "READY." At this point, you'll have a bootable Linux USB drive.
Booting into Linux
-
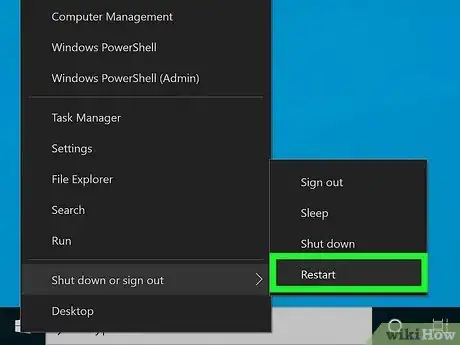
1Reboot your PC with the USB drive attached. If you've already set your PC to boot from USB, your computer will immediately boot into Linux once it comes back up.
- If your PC boots back into Windows 10 instead, continue with this method.
- skip to step 5. Otherwise, the steps to get to the BIOS are going to be different depending on your motherboard—you'll usually press a key immediately after the PC restarts, which is usually F2, F10, or Del. Search for your PC model and "BIOS setup key" to find your key. Alternatively, try the following steps to boot into the BIOS from Windows 10:
- Press Windows key + i to open Settings.
- Click Update & Security.
- Click Recovery in the left panel.
- Click Restart now under "Advanced startup."
- On the "Choose an option" screen, click Troubleshoot.
- Click UEFI Firmware Settings and then click Restart. The PC will boot into the BIOS or UEFI.
-
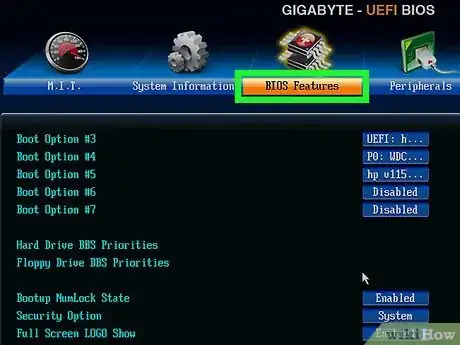
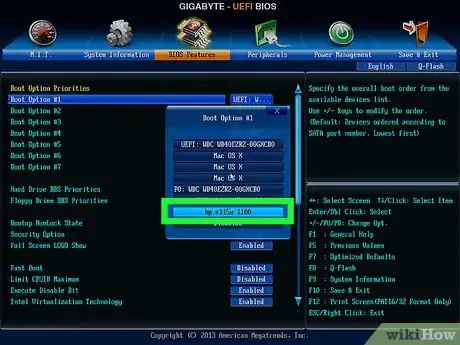
2Locate the Boot menu. Once the computer boots into the BIOS, look for a menu called Boot, Boot Order, or Boot Options. You might have to enter a menu called Advanced, System, Storage, or Configuration to find it. What you're looking for a list of boot devices, such as "Hard Drive" and "Removable Device" in order.
-
3Set the USB drive or "Removable Storage" to be first in the boot order. You may have to select an item called "1st boot device" or similar to bring up a list of options. The goal is to make your USB drive or removable media the first item in the list so your PC tries to boot from devices that are connected to it.
-
4Save and exit the BIOS. You'll usually do this by pressing the F10 key or by selecting an option called Save & Exit. Once saved, your PC will reboot.
-
5Install and run Linux. When your PC boots from the flash drive, you'll be prompted to choose some regional and keyboard settings. If you made an Ubuntu drive, you can choose Try Ubuntu without installing to use the live version of Ubuntu, or install it on your hard drive. Regardless of the version of Linux you want to install, the remaining steps will be simple—follow the on-screen instructions to get started!
- If you're installing Puppy Linux, you'll boot right into a functional Linux desktop without having to install.
References
- ↑ https://ubuntu.com/tutorials/try-ubuntu-before-you-install#3-boot-from-usb-flash-drive
- ↑ https://ubuntu.com/tutorials/create-a-usb-stick-on-windows#2-requirements
- ↑ https://ubuntu.com/tutorials/create-a-usb-stick-on-windows#4-boot-selection-and-partition-scheme
- ↑ https://ubuntu.com/tutorials/create-a-usb-stick-on-windows#7-additional-downloads
About This Article
1. Download the ISO image.
2. Install Rufus.
3. Insert a blank USB drive.
4. Use Rufus to flash the ISO to the drive.
5. Go into the BIOS and set the USB drive as first in the boot order.
6. Reboot into Linux.
