This article was co-authored by Ryaan Tuttle. Ryaan Tuttle is a Home Improvement Specialist and the CEO of Best Handyman, Inc. in Boston, Massachusetts. With over 17 years of experience, he specializes in building home service businesses, focusing on creating scalable and efficient brands. With the help of his global team, the companies have achieved over 10+ million in sales and received recognition through magazine features, and enjoy partnerships with wikiHow and Jobber field service software. Boston Magazine and LocalBest.com have named Best Handyman Boston the Best Handyman in Boston. Ryaan holds Construction Supervisor and Home Improvement Contractor Licenses.
This article has been viewed 79,332 times.
Modern construction wheelbarrows are relatively inexpensive, durable, and easy to use. But if you're looking for a more rustic, a decorative wheelbarrow, for use as a planter box or to display something, here are some steps to help you build your own.
Steps
-
1Select the wood you want to use for your wheelbarrow. Cedar is a good choice, since it is free of preservatives and naturally resists rot and decay. Plus, it is easier to work with than hardwoods or tightly grained softwoods such as pine that are more likely to warp and split.
-
2Build a simple, basic box suitable for your needs. The one in this illustration is 18 inches (46cm) wide, 22 inches (56cm) long, but the final size depends upon your needs.Advertisement
-
3Rip two pieces of sound 2 inch (5cm) thick lumber on a taper from about 1 1/4 inches to 2 inches (3cm to 5cm) and around 4 feet (1.2 meters) long. These pieces will be the main supports, serving as both the mounting frame for the wheel and for the handles, so choosing good lumber is important.
-
4Lay these handles on a table, placing them at an angle that will allow the grip ends to be spread apart far enough for you to use them, and with the wide end almost touching. Scribe a pair of parallel lines on the thicker end so you will have a pocket for the wheel/axle assembly to mount in.
-
5Cut these two lines with a circular saw. Then scribe a block to fasten the two handles together, staying back about 12 inches (30cm) from the end you are using for the wheel mount.
-
6Build your wheel by gluing and screwing layers of 1 inch (2.5cm) thick boards together at opposite angles. Three layers will give you a wheel about 2 inches (5cm) thick, using two 1 X 6 inch (2.5cm x 15cm) planks will allow you to cut a wheel 11 inches (28cm) in diameter, as shown in the illustrations.
-
7Scribe a circle on the blank you built for building the wheel. Then cut it out with a jigsaw or band saw.
-
8Drill the handle frame and the center of the wheel to accommodate an all-thread rod. A 1/2 inch (1.5cm) galvanized rod will give you a fairly stout axle. Put a nut on the all-thread, running it down about 3 inches (7.5cm), then add a flat washer. Thread your rod through one handle, and start a nut on the end where it passes through the handle. Tighten it so that it pulls into the wood if possible, to make it stationary.
-
9Place a washer on the rod, then pass it through the wheel. Add another washer, then another nut, before allowing it to pass through the second handle. Add a final nut on the outside of the second handle, and tighten it securely. Make sure the space between the wheel and its washer spacers is fairly tight, but not too tight, so the wheel cannot wobble.
-
10Install the handle/wheel assembly on the bottom of the box you built earlier. You can begin by laying this assembly on the inverted box and marking the edges of the handles so you can fit the next piece in the correct location.
-
11Cut two wedges from 2 x 4 inch (5cm x 10cm) material, the same length as the box. Lay them on the lines you marked earlier and fasten them with wood screws.
-
12Lay your wheel and handle assembly on these wedges, and screw them in place. Add your legs and braces, using 2 X 2 inch (5cm x 5cm) material scribed on the angle of the handles so that they support the wheelbarrow in the position you want. You can let these legs run wild (cut longer than needed) so you can trim them when you have completed the project.
-
13Cut and install a cross brace between the wheelbarrow support legs to keep it from wobbling. You can now set the wheelbarrow right side up and check it to make sure it sits correctly. There are a number of simple ways of adjusting the way the wheelbarrow sets, including adding wedges underneath the box, and trimming the support legs.
-
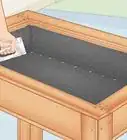
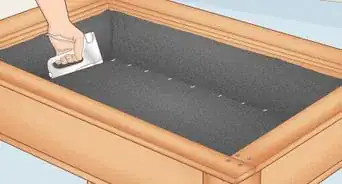
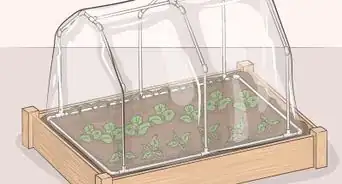
14Sand edges smooth if desired, and seal or paint the wheelbarrow with an exterior coating. You can line the wheelbarrow box with plastic to give it more protection from moisture if you are going to use it for a planter, but if you use a good, exterior grade wood, it should last for a long time with just a sealer on it.


Community Q&A
-
QuestionWhere can I buy all of these items?
 Bo$$yNJCommunity AnswerYour best bet would be a farm supply store or a hardware store.
Warnings
- Wear eye protection when using power tools.⧼thumbs_response⧽
- Sand all cut edges of lumber to prevent splinters.⧼thumbs_response⧽
Things You'll Need
- 1 X 6 inch (2.5cm x 15cm) lumber, cedar, redwood, or treated yellow pine
- 2 X 4 inch (5cm x 10cm) lumber
- Galvanized nails/screws
- Waterproof wood glue
- All-thread rod with nuts and washers
- Drill and bits, miscellaneous power tools and hand tools


-Oven-Step-15.webp)


About This Article