This article was co-authored by Ryaan Tuttle and by wikiHow staff writer, Megaera Lorenz, PhD. Ryaan Tuttle is a Home Improvement Specialist and the CEO of Best Handyman, Inc. in Boston, Massachusetts. With over 17 years of experience, he specializes in building home service businesses, focusing on creating scalable and efficient brands. With the help of his global team, the companies have achieved over 10+ million in sales and received recognition through magazine features, and enjoy partnerships with wikiHow and Jobber field service software. Boston Magazine and LocalBest.com have named Best Handyman Boston the Best Handyman in Boston. Ryaan holds Construction Supervisor and Home Improvement Contractor Licenses.
There are 15 references cited in this article, which can be found at the bottom of the page.
This article has been viewed 117,313 times.
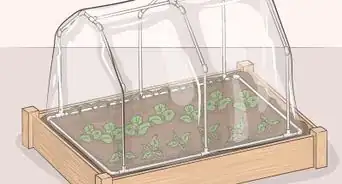
If you don’t have a lot of space for an outdoor garden, a planter box is a great solution! Planter boxes are also good for protecting plants from garden pests—plus, they’re easy to reach without having to bend down or kneel. This basic planter box is easy to build and requires only a few common tools, such as a circular saw (or good handsaw) and a power drill. We’ll show you how to build it in a few simple steps.
Steps
Bottom
-
1Choose a piece of plywood that’s about 3 by 2 feet (0.91 by 0.61 m). Your planter box should be small enough that you can easily reach the middle of it from any side.[1] In this article, we’ll show you how to make a 3 by 2 feet (0.91 by 0.61 m) planter box. To minimize cutting, select a board that’s already close to the size you want, and about 1 inch (2.5 cm) thick.
- You can always make your planter larger or smaller depending on your needs. For example, if someone in a wheelchair will be using the box, keep it small for easier access—e.g., no wider than 3 feet (0.91 m) for an adult or 2 feet (0.61 m) for a child. On the other hand, you can go longer or wider if you want a large walk-up vegetable garden for your deck.
-
2Mark off the desired length and width if your starting piece is too big. If you can’t find a piece of plywood in the dimensions you want, get a bigger one and trim it down. To do this, carefully measure out the dimensions you want with a tape measure or meter stick. Use a straight edge to mark where you’ll make the cuts in pencil or sharpie. Then, put painter’s tape over the cut line to minimize splintering when you cut the wood.[2]
- You may need to re-draw your line on top of the tape so you know exactly where to cut.
Advertisement -
3Cut the plywood to the correct size with a circular saw. Put the plywood on a stable surface, such as a work bench or sawhorse. If you can, get someone else to help you hold the board steady while you cut it.[3]
- To get a smooth cut, look for a carbide-tipped blade. You may even be able to find a blade that’s labeled for use with plywood.
- Set the better side of the board face-down for smoother, easier cutting.
- Always wear safety goggles when using an electric saw! You might also wish to wear ear plugs and a dust mask.[4]
- If you don’t have a circular saw, a table saw or a high-quality hand saw will also work.


Frame
-
1Cut 2 equal pieces of 2 in × 10 in (5.1 cm × 25.4 cm) board for the long sides. The longer sides of the frame need to be the same length as the long sides of the base. Use a measuring tape to measure out the correct length on a 10 ft (3.0 m) long, 2 in × 10 in (5.1 cm × 25.4 cm) board. Use a straight edge, such as a ruler or carpenter’s square, to help you mark off the line where you’ll be making your cut.[5] Cut a second board of the same length.
- For instance, if you’re making a planter that’s 3 feet (0.91 m) long, the long side pieces should each be 3 feet (0.91 m) long.
- A circular saw will work best for making this kind of cut, but you can use a good handsaw if a circular saw isn’t available.
- Put the board on a stable surface, such as a sawhorse.
-
2Make the short pieces 1.5 in (3.8 cm) shorter than the width of the base. To avoid having to deal with cutting angled edges, make your short pieces a little narrower so that they fit between the ends of the long pieces. Cut the 2 shorter side pieces from the same 2 in × 10 in (5.1 cm × 25.4 cm) board.[6]
- For a planter that’s 2 feet (0.61 m) wide, make the short pieces about 22.5 inches (57 cm) long.
-
3Drill 4 pilot holes into each end of both long sides. Pilot holes are holes you drill into a piece of wood before driving in a nail or screw. These holes will make putting in the deck screws a lot easier, and will also help protect your boards from splitting or warping when you put the screws in.[7] Use a pencil to mark 4 evenly-spaced dots about .5 in (1.3 cm) from the end of each board, on both ends. Drill screw holes into each of those 4 spots, using a drill shank with about the same diameter as the screws you’ll be using.[8]
- You can also mark the spots where you want to drill with a piece of painter’s tape.
- If possible, use a clamp to hold the boards in place on a work bench or table while you drill them. This will add extra stability.
-
4Attach the long sides to the short ones with 3 in (7.6 cm) deck screws. Line up the edges of the short side pieces so that they’re flush with the inside end of each long piece, forming a 90° angle. To help the pieces stay together while you’re working, apply a line of wood glue to the edges where they will meet. Using a drill driver (an electric drill with a screwdriver bit attached) or screwdriver, drive the deck screws into the pilot holes you made to attach the long side pieces to the short ones.
- You should now have a small, box-shaped frame that will fit perfectly on top of the planter box base!
- In addition to wood glue, a couple of wide bar clamps will also help hold the frame together while you put in the screws.
-
5Attach the base to the frame with 2 in (5.1 cm) screws. Set the base of the planter box on top of the frame so that the edges of the base line up with the edges of the boards. Use a pencil to mark a dot for a screw at each corner. Mark 3 more evenly spaced dots along the length of each long side between the corners, and 2 more between the corners on the short sides. Drill your 2 in (5.1 cm) screws straight down through the base and into the narrow edges of the frame underneath.[9]
- To help secure the base in position while you drill it, add some wood glue to the outer edges of the base board before setting it on the frame.
- If you don’t have a drill driver or electric screwdriver, drill some pilot holes in the base and frame before putting in the screws.
-
6Add support pieces at each corner for stability if needed. If you’re concerned that your box isn’t sturdy enough to hold a full load of soil, add a metal bracket to the outside of each corner. Alternatively, cut a 1 in × 1 in (2.5 cm × 2.5 cm) board into 4 pieces about 8–10 inches (20–25 cm) long. Slide a piece into each corner of the planter box and attach it with 2–3 in (5.1–7.6 cm) deck screws.[10]
- You can purchase simple metal corner support brackets at any hardware store. They often come with their own screws.


Legs
-
1Plan to make the legs about 46 inches (120 cm) long. Think about who will be using the planter box the most, and aim to make it tall enough so that they don’t have to bend over much to use it. For an adult, around 36 inches (91 cm) is a reasonable height for the finished box.[11] If you’re making a planter box for a child, make the legs shorter—e.g., around 20 inches (51 cm).[12] Since the walls of the planter are 10 inches (25 cm) high, add an extra 10 inches (25 cm) to the length of the legs to account for the overlap where they attach to the walls.
- Skip the legs altogether or make them much shorter if you plan to put the planter on a table or other elevated surface.
- To make the planter box wheelchair accessible, aim for a height of around 24 inches (61 cm).
-
2Cut some 1 in × 4 in (2.5 cm × 10.2 cm) boards into 8 pieces of equal length. Measure each section so it will be long enough to get the desired height. Remember to add an extra 10 inches (25 cm) to make the legs flush with the top of the frame![13] Cut the boards with a circular saw.
- So, to make legs that will be 36 inches (91 cm) after the planter is assembled, cut 8 pieces that are 46 inches (120 cm) long.
- Depending on how long you need the legs to be, you will need 3-4 boards, each about 8 feet (2.4 m) long, for this.
-
3Use 1.5 in (3.8 cm) screws to attach the legs. To make it easier, drill pilot holes in the leg pieces before screwing them in. To attach the legs securely, put in 3 evenly spaced screws, with the top and bottom screws about 1–2 inches (2.5–5.1 cm) from the top and bottom edges of the frame.[14]
- If you prefer not to let the screws show, drive in the screws from the inside of the planter box instead of through the outside of the legs.
-
4Attach 1 leg piece at each end of the long sides. Make the outer edge of each leg piece flush with the outer edge of the frame where the corners of the frame come together. The top of each leg piece should be flush with the top of the frame.[15]
-
5Place the other 4 leg pieces on the ends of the short sides. Position them so that they overlap the leg pieces that you attached to the long sides of the frame. They should form a neat 90° angle at each corner of the planter box.[16]
- Fitting together 2 pieces like this will create a much more stable design than using a single board for each leg.


Ledge
-
1Cut a 1 in × 3 in (2.5 cm × 7.6 cm) board into 2 3 ft (0.91 m) pieces and 2 22.5 in (57 cm) pieces. These boards will form the bottom part of a lip or ledge around the top of the frame. Cut your 1 in × 3 in (2.5 cm × 7.6 cm) board into 2 pieces that are the same length as the long sides of the planter box frame, and 2 more that are the same length as the short sides.[17]
- For example, for your 2 by 3 ft (0.61 by 0.91 m) planter box, the long pieces would be 3 feet (0.91 m) each, while the short sides would be 22.5 inches (57 cm) each.
-
2Screw these boards onto the top of the frame. Lay the boards you just cut flat on top of the rim of the planter, with the inner edges of each board flush with the inner edges of the planter frame. Drive in a 1.5 in (3.8 cm) screw about 1–2 inches (2.5–5.1 cm) from each end of the boards to secure them in place.[18]
- The outer edges of these boards should be flush with the outer edges of the legs at each corner.
- Just like with the frame pieces, the ends of the shorter boards should fit between the ends of the longer ones rather than overlapping them.
-
3Saw a 1 in × 4 in (2.5 cm × 10.2 cm) board into 3 ft (0.91 m) and 22.5 in (57 cm) lengths. These boards should also match the lengths of the boards you cut for the planter frame. They will go on top of the pieces you just attached. However, they will be a little bit wider, creating a ledge around the top of the planter box.[19]
- This ledge will help prevent soil from spilling out over the edges of the frame.
-
4Center the 1 in × 4 in (2.5 cm × 10.2 cm) boards over the 1 in × 3 in (2.5 cm × 7.6 cm) boards. Carefully lay the new boards down flat on top of the planter frame, but don’t make them flush with the inner or outer edges of the boards underneath them. Instead, position them so that they’re centered over the lower boards, with about .5 inches (1.3 cm) sticking out on either side.[20]
- Make sure the outer edges of the short and long boards in this top layer are flush with each other.
-
5Attach the 1 in × 4 in (2.5 cm × 10.2 cm) boards with screws. Drive 4-5 evenly placed 1.5 in (3.8 cm) screws into the long pieces, and 3-4 screws into the short pieces to secure them in place. Again, it may be helpful to drill some pilot holes first.[21]
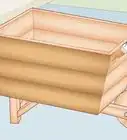
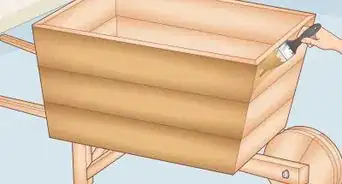
- Your basic planter box is now complete!


Finishing Touches
-
1Sand down any rough edges. Examine the bed for any splinters or rough spots. Use sandpaper or a sanding block to smooth them out. Use firm strokes and always go in the same direction for a smooth finish.[22]
- Sanding blocks are easier to use for this kind of work than a loose sheet of sandpaper. If you don’t have a sanding block, just wrap a piece of sandpaper around any small, rectangular piece of wood to make your own.
- Use a medium-grit sandpaper, in the 60- to 100-grit range.[23]
- If you plan to paint or stain the wood, go over it again with a finer-grained sandpaper, such as 120- to 220-grit.
-
2Drill a few drainage holes in the bottom. Most plants need good drainage to survive in a planter. You’ll only need 3-4 holes spaced out evenly across the bottom of the box. While some gardening experts recommend making the holes no bigger than .25 inches (0.64 cm) across, holes that are as big as .5 inches (1.3 cm) will probably work just fine and may be less likely to get clogged.[24]
- You can prevent soil from draining through the holes by adding a fabric lining or pouring a layer of gravel over the bottom of the planter box.
-
3Add a stain or other finish to the wood if you like. It’s totally optional, but staining or painting the box can give it a more finished, attractive look. To avoid contaminating your planter with anything toxic, go for a food-safe stain, paint, or sealant. Someone in your local garden center or home supply store may be able to recommend some good options.
-
4Line the planter box with landscaping fabric to protect the wood. Adding a lining will keep the wood in your planter from rotting as quickly.[27] It will also prevent the soil from running out through your drainage holes. Use landscape fabric or a piece of plastic with small holes in it so that water can still drain out through the lining.[28]
- Use nails or a staple gun to fasten the edges of the liner in place inside your planter box.


Expert Q&A
-
QuestionCould you make a planter out of concrete?
 Melinda MeservyMelinda Meservy is a Plant Specialist and the Owner of Thyme and Place, a botanical boutique offering plants and gifts in Salt Lake City, Utah. Before starting her own business, Melinda worked in process and business improvement and data analytics. Melinda earned a BA in History from the University of Utah, is trained in lean and agile methodologies, and completed her Certified Professional Facilitator certification. Thyme and Place offers indoor plants and containers, a fully stocked potting bench, and tips on plants to suit your space and lifestyle.
Plant SpecialistYes! Get some quick dry cement. Get two plastic cups of different sizes, and fill the bigger cup partially with the concrete. Push the smaller cup into the middle of the bigger cup so that the cement pushes up around the sides. Wait 15 minutes or so, and you've got a concrete planter! You can even add some dye to the cement to give it a marbled look. -
QuestionDo planters need drainage holes?Melinda MeservyMelinda Meservy is a Plant Specialist and the Owner of Thyme and Place, a botanical boutique offering plants and gifts in Salt Lake City, Utah. Before starting her own business, Melinda worked in process and business improvement and data analytics. Melinda earned a BA in History from the University of Utah, is trained in lean and agile methodologies, and completed her Certified Professional Facilitator certification. Thyme and Place offers indoor plants and containers, a fully stocked potting bench, and tips on plants to suit your space and lifestyle.
Plant SpecialistYes, absolutely. The easiest way to do this is to just drill holes through the base of the planter. -
QuestionOn the bottom of the box, should I use plastic or weed blocker?
 Jennifer LopezCommunity AnswerIt depends on where the box is going to be, how much sun it will get, and what the planter box is made of. If the box will be on a deck, I think pot feet or castors would be more helpful than lining with plastic. If it’s a small box for a tabletop, use a saucer underneath. If it will be sitting on soil in the garden, weed block fabric could help keep the roots from growing out of the bottom of the pot into the soil. The only time I’ve ever lined a planter with plastic was when it was a window box for a really hot, sunny wall. The plastic helped the box retain water so that the plants didn’t dry out too quickly.
Things You’ll Need
Bottom
- Sheet of plywood, 1 in (2.5 cm) thick
- 2 by 10 in (5.1 by 25.4 cm) board, approximately 10 ft (3.0 m) long
- 1 by 4 in (2.5 by 10.2 cm) boards, about 8 feet (2.4 m) long (4-5 boards total)
- 1 by 4 in (2.5 by 10.2 cm) board, about 8 feet (2.4 m) long
- Measuring tape
- Pencil
- Painter’s tape
- Circular saw
- Protective goggles
- Wood glue
- Clamps (optional)
- Drill
- Screwdriver or drill-driver
- 3 in (7.6 cm) deck screws (32 total)
- 2 in (5.1 cm) screws (24 total)
- 1.5 in (3.8 cm) screws (22 total)
- Sandpaper, 60- to 100-grit
- Wood-safe stain or treatment, such as raw linseed oil
- Landscape fabric
- Nails or staple gun


-Oven-Step-15.webp)

References
- ↑ https://extension.uga.edu/publications/detail.html?number=C1027-4&title=Raised%20Garden%20Bed%20Dimensions
- ↑ https://www.bobvila.com/articles/cutting-plywood/
- ↑ https://www.bobvila.com/articles/cutting-plywood/
- ↑ https://www.ccohs.ca/oshanswers/safety_haz/power_tools/saw_circ.html
- ↑ https://www.finegardening.com/article/diy-starter-raised-bed-for-kids
- ↑ https://www.finegardening.com/article/diy-starter-raised-bed-for-kids
- ↑ https://www.bobvila.com/articles/pilot-holes/
- ↑ https://sites.udel.edu/dustyn/2015/08/04/building-a-planter/
- ↑ https://sites.udel.edu/dustyn/2015/08/04/building-a-planter/
- ↑ https://sites.udel.edu/dustyn/2015/08/04/building-a-planter/
- ↑ https://extension.uga.edu/publications/detail.html?number=C1027-4&title=Raised%20Garden%20Bed%20Dimensions
- ↑ https://www.finegardening.com/article/diy-starter-raised-bed-for-kids
- ↑ https://www.finegardening.com/article/diy-starter-raised-bed-for-kids
- ↑ https://www.finegardening.com/article/diy-starter-raised-bed-for-kids
- ↑ https://www.finegardening.com/article/diy-starter-raised-bed-for-kids
- ↑ https://www.finegardening.com/article/diy-starter-raised-bed-for-kids
- ↑ https://www.finegardening.com/article/diy-starter-raised-bed-for-kids
- ↑ https://www.finegardening.com/article/diy-starter-raised-bed-for-kids
- ↑ https://www.finegardening.com/article/diy-starter-raised-bed-for-kids
- ↑ https://www.finegardening.com/article/diy-starter-raised-bed-for-kids
- ↑ https://www.finegardening.com/article/diy-starter-raised-bed-for-kids
- ↑ https://www.bobvila.com/articles/sanding-wood/
- ↑ https://www.bobvila.com/articles/2145-quick-tip-choosing-sandpaper/
- ↑ https://ask2.extension.org/kb/faq.php?id=220577
- ↑ https://www.woodsmith.com/article/facts-about-food-safe-finishes/
- ↑ https://extension.uga.edu/publications/detail.html?number=C1027-5&title=Raised%20Bed%20Materials
- ↑ https://ecologycenter.org/wp-content/uploads/2013/06/RaisedBeds.pdf
- ↑ https://content.ces.ncsu.edu/collard-greens-and-common-ground-a-north-carolina-community-food-gardening-handbook/soil-plots-and-planters
- ↑ Ryaan Tuttle. Home Improvement Specialist. Expert Interview. 10 June 2022.
- ↑ https://extension.missouri.edu/publications/g6985
About This Article