This article was co-authored by Art Fricke. Art Fricke is a home renovation and repair specialist and the owner of Art Tile & Renovation based in Austin, Texas. With over 10 years of experience, he specializes in bathroom and kitchen renovations. Art focuses on a single contractor approach to customized renovation work, and performs projects such as installing custom tile showers, fixing tiled shower leaks, replacing cracked tiles, and installing floor and wall tile.
This article has been viewed 24,657 times.
Caulking is useful for filling in gaps between surfaces in your home. Proper caulking will improve your home's appearance and insulation, as well as keep out pests and prevent mold and bacteria from growing. With the right supplies, you can caulk the walls in your home without the help of a professional.
Steps
Preparing the Surface and Tools
-
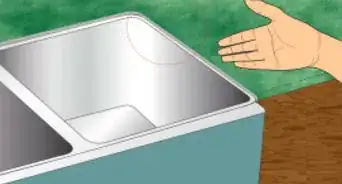
1Clean the wall. Caulk should never go on a dirty surface. Wipe down the wall with a dry cloth to remove dust. Wash with an all-purpose cleaner to remove grease and dirt. Rubbing alcohol and a wire brush will remove stubborn stains.
- Test the all-purpose cleaner on a small, unseen part of the wall first to make sure it doesn't affect the paint.
-
2Prime the surface. Wood surfaces and walls you wish to paint should be coated with primer. The caulk adheres better to primed surfaces. Pick up primer from a home improvement store and brush it over the surface you will treat.Advertisement
-
3Tape around the crack. Use painter’s tape or masking plastic. Place a strip of tape above the crack you wish to caulk.[1] Place a second strip below the crack. This prevents the caulk from running down your walls.[2]
- Tape is great at protecting areas where two surfaces, such as the wall and ceiling, meet.
- You can caulk without tape, but caulking is often a messy process unless you have plenty of practice.
-
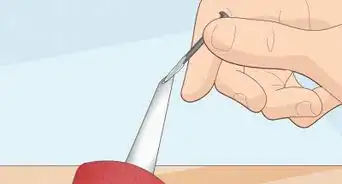
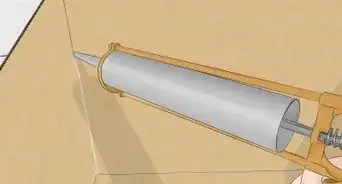
4Cut the tip of the caulk tube. Cut the tube at an angle so that the caulk flows evenly. You can do this with a strong pair of scissors or sharp knife, or you can use the cutter on your caulk gun if it has one. Hold the tube straight up in the air. Hold the scissors level with the ground but don’t cut. Instead, move the handle down so the scissors are halfway between the ground and their original position. This 45° cut is commonly used in all caulking projects.[3]
- Keep the hole small, about a fourth of an inch (.6 cm) wide. Remember, it’s better to cut a little bit off and widen the hole than it is to cut too much off at once.
- You can make your cut at a different angle. Do what feels comfortable for you and makes your project easier.
-
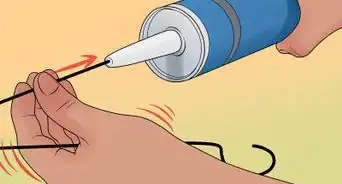
5Pierce the tube seal with a long object. A long nail, piece of wire, welding rod, or other object works well. Your caulk gun may also have a piece of wire attached to it that you can use. Push the object into the hole you made. There’s a foil seal in the tube and you’ll feel it pierce. Keep the hole small so that a lot of caulk doesn’t come out at the same time as you work.
-
6Load the cut tube into the caulk gun. Press the release trigger on the back of the gun. Pull back the plunger and lay the tube in the gun’s chamber. Make sure the nozzle faces outward. Push the plunger back into place. When you pull the trigger, caulk should flow from the tube.


Caulking the Walls
-
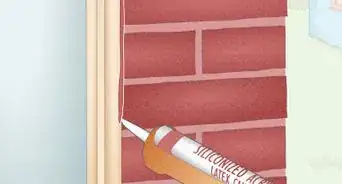
1Start caulking one end of the crack. Start at one end of the crack. Point the tube at it, letting the longer side of the tip trail. Squeeze the trigger firmly and with a medium amount of pressure. You need enough caulk to cover the crack without excess cleaning. If the caulk looks thick or about to run down the wall, slow down and use less pressure.[4]
- Don’t caulk over old caulk. The old caulk should be removed first or else the new caulk won’t stick.
- The crack you caulk should be no bigger than three-eighths of an inch (about one centimeter). Larger spots need to be narrowed with something else, such as spray-foam insulation.
-
2Fill in the crack slowly. Pull the caulk gun along the crack. Work in one motion, never lifting the gun. Work slowly, making sure the caulk goes on evenly. When you get near the end, gradually release the trigger to slow the stream. This way, you won’t leave a big gob of caulk at the end.
-
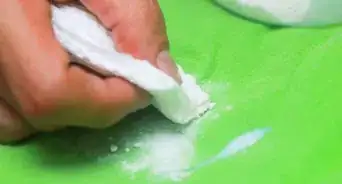
3Smooth out the caulk with a finger. Dampen your finger in water. Start at the end of the crack and run your finger through it. This pushes the caulk deeper into the crack. Wipe your finger on a wet rag to get rid of excess caulk.[5]
-
4


Removing Old Caulk
-
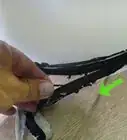
1Slice through the old caulk. A putty knife or utility knife works well for removing old caulk. Sometimes you can wedge it under old caulk and loosen large pieces. Otherwise, use your knife to make a cut in the caulk.[8]
- An oscillating tool can also make the cut. These tools may also come with a scraper.
-
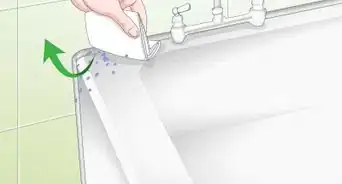
2Use caulk remover to loosen caulk. Find some caulk remover at a hardware store. If you have stubborn caulk you don’t think you can scrape out, apply this first. Read the instructions on the label before applying it. The product may come in a container like a glue bottle that you point and squeeze at the caulk.
-
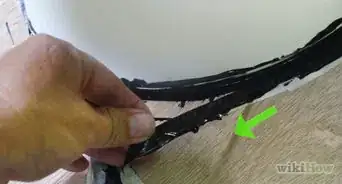
3Scrape out the old caulk. Use your knife or scraper to clear out the crack. Hold the blade sideways against the caulk. Work the blade under the caulk and scrape it out as you would the rind on fruit. Once you get the blade in, you can often remove lots of caulk by pushing the blade along the line. Get off as much caulk as you can.[9]
-
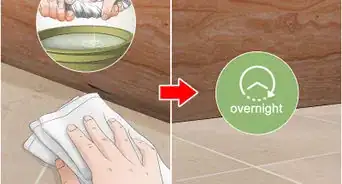
4Kill off any mold. When you remove caulk, you may see signs of mold. This happens sometimes in areas exposed to water, such as the bathroom. Get a mold-killing product from a home improvement store. Spray the product over any moldy areas you find and use a brush or sponge to scrub it in.[10]
-
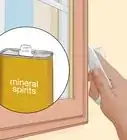
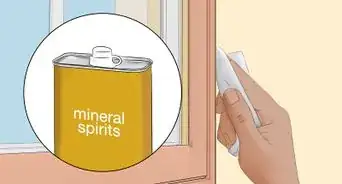
5Clean off the caulking area. Rinse out the cracks with water. You can use a brush, sponge, or old cloth to remove mold-killer and any debris. Let the area dry. You may follow this up with mineral spirits to make sure the crack is as clean as possible. Once it dries, you are ready to begin caulking.


Picking Supplies
-
1Get silicone caulk if you want something that's durable. 100% silicone caulk is the kind of caulk that lasts the longest. However, you can’t paint over it, so it isn’t a good choice for walls and moulding. Choose this caulk in areas where you need water protection, such as around showers or on the outside of your home.
- Silicone caulk is harder to work with than other caulks, and it requires more cleanup when you're finished.
- If you go with a silicone caulk, make sure you're working in a well-ventilated area.
- Silicone caulk cures differently than latex or painter's caulk. Rather than curing through evaporation, the exposure to oxygen causes the silicone to crystallize.[11]
- Some silicone caulks have a fast curing formula, and are water-ready in 30 minutes.[12]
-
2Choose latex caulk if you need to paint over it. Acrylic latex and silicone blends are the ideal choice for most indoor areas, including along walls and baseboards. These types are far easier to use and remove, even though they can shrink over time. The biggest benefit is that you can paint over this caulk.
- Check the label on the product. It’ll tell you whether or not you can paint over the caulk.
-
3Get caulk that matches your home. Since silicone caulk can’t be painted, choose one that looks closest to the colors on your wall. Clear caulking is always a good choice. Most stores will also carry white and almond. Paint stores, hardware stores, and tile stores may have more options or allow you to order a custom color.[13]
- If you plan on painting, get white latex or silicone mix caulk. This caulk can be painted over.
-
4Pay more for a quality caulk gun. Good caulk guns cost a little more than the cheapest models. These guns don’t have a ratchet rod. Instead, look for guns with a smooth rod in their chamber and a spring on the back. They’ll apply caulk much more evenly and have a pressure control to stop the flow immediately.[14]


Expert Q&A
-
QuestionHow do you caulk a large gap?
 Kevin TurnerKevin Turner is a handyman and the owner of Red Gator Maintenance, a handyman business based in Fresno, California. Working on handyman-related projects since the age of 12, Kevin specializes in a wide variety of home improvement projects such as (but not limited to) lighting/electrical, plumbing, deck staining, drywall repairs, cabinet installation, air conditioning, trash removal, and window, roof, and appliance repairs.
Commercial HandymanCaulk should be used to fill in small holes or cracks. If there are gaps along the entire area between your ceiling and walls, you may have improperly installed drywall. -
QuestionHow do you smooth out caulk?Kevin TurnerKevin Turner is a handyman and the owner of Red Gator Maintenance, a handyman business based in Fresno, California. Working on handyman-related projects since the age of 12, Kevin specializes in a wide variety of home improvement projects such as (but not limited to) lighting/electrical, plumbing, deck staining, drywall repairs, cabinet installation, air conditioning, trash removal, and window, roof, and appliance repairs.
Commercial HandymanYou can smooth it out with your finger, or you can use a wet rag or sponge.
Warnings
- 100% silicone caulk can’t be painted over. Don’t use it on surfaces you want to paint.⧼thumbs_response⧽
Things You’ll Need
- Caulk
- Caulk gun
- Scissors
- Putty knife
- Water


References
- ↑ Art Fricke. Home Renovation & Repair Specialist. Expert Interview. 1 July 2020.
- ↑ http://lifehacker.com/use-caulk-to-paint-straight-edges-like-a-pro-508232511
- ↑ https://www.familyhandyman.com/bathroom/remodeling/how-to-re-caulk-a-shower-or-bathtub/view-all
- ↑ https://www.do-it-yourself-help.com/caulking_techniques.html
- ↑ Kevin Turner. Commercial Handyman. Expert Interview. 15 July 2020.
- ↑ Art Fricke. Home Renovation & Repair Specialist. Expert Interview. 1 July 2020.
- ↑ https://www.do-it-yourself-help.com/caulking_techniques.html
- ↑ https://www.do-it-yourself-help.com/caulking_techniques.html
- ↑ https://www.familyhandyman.com/bathroom/remodeling/how-to-re-caulk-a-shower-or-bathtub/view-all
- ↑ https://www.familyhandyman.com/bathroom/remodeling/how-to-re-caulk-a-shower-or-bathtub/view-all
- ↑ Art Fricke. Home Renovation & Repair Specialist. Expert Interview. 1 July 2020.
- ↑ Art Fricke. Home Renovation & Repair Specialist. Expert Interview. 1 July 2020.
- ↑ https://www.lowes.com/n/buying-guide/caulk-buying-guide
- ↑ https://www.familyhandyman.com/bathroom/remodeling/how-to-re-caulk-a-shower-or-bathtub/view-all
About This Article